https://hackr.io/blog/css-cheat-sheet
https://hackr.io/blog/html-interview-questions
How to insert video in web page and play it using HTML ?
HTML allows playing video in the web browser by using the <video> tag. To embed the video in the webpage, we use the src element for mentioning the file address, and width and height attributes are used to define its size.
Approach: To make this feature, we are using <video> tag to add a video to the web page. The video tag uses width, height, and control attributes to set and control the video on the web page. Also, use the source tag with the src attribute to add a source of the video.
Example: In this example, we are using the above-discussed approach.
- html

. What is HTML? HTML stands for HyperText Markup Language. It is the standard markup language used to create web pages. It defines the structure and content of a web page using a set of markup tags.
What is HTML?
- HTML stands for HyperText Markup Language.
- It is a markup language used to create web pages and applications for the World Wide Web.
What are void elements in HTML?
HTML elements which do not have closing tags or do not need to be closed are Void elements. For Example <br />, <img />, <hr />, etc.
What is the advantage of collapsing white space?
Collapsing white spaces decreases the transmission time between the server and the client because collapsing features remove unnecessary bytes that are occupied by the white spaces. By mistake, if you leave extra white space, the browser will ignore it and display the UI perfectly
The for attribute associates a <label> with an <input> element; which offers some major advantages:
1. The label text is not only visually associated with its corresponding text input; it is programmatically associated with it too. This means that, for example, a screen reader will read out the label when the user is focused on the form input, making it easier for an assistive technology user to understand what data should be entered.
2. You can click the associated label to focus/activate the input, as well as the input itself. This increased hit area provides an advantage to anyone trying to activate the input, including those using a touch-screen device.
HTML tags are used to hold the HTML element.
HTML element holds the content.
HTML attributes are used to describe the characteristic of an HTML element in detail.
HTML tag starts with < and ends with > Whatever written within a HTML tag are HTML elements
HTML Tags
HTML Tags are used to add content in html, like text, headings, table, list links etc. Tags along with attributes are core components of HTML. The latest version of HTML, i.e HTML5 includes 142 tags. View HTML Tags List.
HTML tags are used to build webpage structure, like p, h1, h2, h3, address, b, i, etc. Tags can have attributes to add extra information.

What is the difference between HTML and HTML5? HTML5 is the fifth revision of HTML and comes with enhanced features like support for multimedia elements (audio and video), new structural elements (header, footer, nav, etc.), improved form controls, and better APIs for enhanced web development.
HTML Element
An HTML Tag with attributes and content is called HTML Element. Element include start tag, end tag, attributes and content inside.
Basically all HTML Elements are build using html tags.

Basic Elements
The basic elements of an HTML page are:
- A text header, denoted using the
<h1>,<h2>,<h3>,<h4>,<h5>,<h6>tags. - A paragraph, denoted using the
<p>tag. - A horizontal ruler, denoted using the
<hr>tag. - A link, denoted using the
<a>(anchor) tag. - A list, denoted using the
<ul>(unordered list),<ol>(ordered list) and<li>(list element) tags. - An image, denoted using the
<img>tag - A divider, denoted using the
<div>tag - A text span, denoted using the
<span>tag
The next few pages will give an overview of these basic HTML elements.
Each element can also have attributes — each element has a different set of attributes relevant to the element. There are a few global elements, the most common of them are:
id- Denotes the unique ID of an element in a page. Used for locating elements by using links, JavaScript, and more.class- Denotes the CSS class of an element. Explained in the CSS Basics tutorial.style- Denotes the CSS styles to apply to an element. Explained in the CSS Basics tutorial.data-xattributes - A general prefix for attributes that store raw information for programmatic purposes. Explained in detailed in the Data Attributes section.

What are Semantic Elements?
A semantic element clearly describes its meaning to both the browser and the developer.
Examples of non-semantic elements: <div> and <span> - Tells nothing about its content.
Examples of semantic elements: <form>, <table>, and <article> - Clearly defines its content.HTML5 offers new semantic elements to define different parts of a web page:
<article><aside><details><figcaption><figure><footer><header><main><mark><nav><section><summary><time>
What are the building blocks of HTML5?
- Semantics: allowing you to describe more precisely what your content is.
- Connectivity: allowing you to communicate with the server in new and innovative ways.
- Offline and storage: allowing webpages to store data on the client-side locally and operate offline more efficiently.
- Multimedia: making video and audio first-class citizens in the Open Web.
- 2D/3D graphics and effects: allowing a much more diverse range of presentation options.
- Performance and integration: providing greater speed optimization and better usage of computer hardware.
- Device access: allowing for the usage of various input and output devices.
- Styling: letting authors write more sophisticated themes.
What is HTML Semantics?
The core characteristic of a semantic element is that it clearly communicated its meaning to both the developer and the browser. These elements clearly define its content.
Why Do You Need to Use Semantic Tags in HTML?
The are several advantages of using semantics tags in HTML:
- The semantic HTML tags help the search engines and other user devices to determine the importance and context of web pages.
- The pages made with semantic elements are much easier to read.
- It has greater accessibility. It offers a better user experience
What does a <DOCTYPE html> do?
What happens when DOCTYPE is not given?
| Character | Entity Name | Entity Number | Description |
|---|---|---|---|
|   | Space | ||
| ! | ! | Exclamation mark | |
The HTML class attribute is used to specify one or more class names for an element. Commonly, the class attribute points to a class in a style sheet. The class name is case sensitive.
This attribute can also be used by JavaScript via the HTML DOM to make certain changes to HTML elements with a specified class name.
Multiple Classes Example
document.getElementsByClassName works very similarly to document.querySelector and document.querySelectorAll. Only elements with ALL of the classNames specified are selected.
How to Multipart File Upload Using FormData with HTML
In this guide, we will look at how we can upload a file from HTML form data to a server with the multipart-upload method. Multipart-Upload is commonly used method for sending files or data to a server.
How to Multipart File Upload Using FormData with HTML
In this guide, we will look at how we can upload a file from HTML form data to a server with the multipart-upload method. Multipart-Upload is commonly used method for sending files or data to a server.
What is Multipart Upload Request?
A multipart request is a HTTP request that HTTP clients construct to send files and data over to a HTTP Server. It is commonly used by browsers and HTTP clients to upload files to the server.
Example
We will take a file from the user with FormData and send it to the server. First, let's create our fields for the user to choose a file using HTML form.
<body>
    <div class="container">
        <h1>Multipart File Upload</h1>
        <form id="form" enctype="multipart/form-data">
            <div class="input-group">
                <label for="files">Select files</label>
                <input id="file" type="file" multiple />
            </div>
            <button class="submit-btn" type="submit">Upload</button>
        </form>
    </div>
    <script src="index.js"></script>
</body>
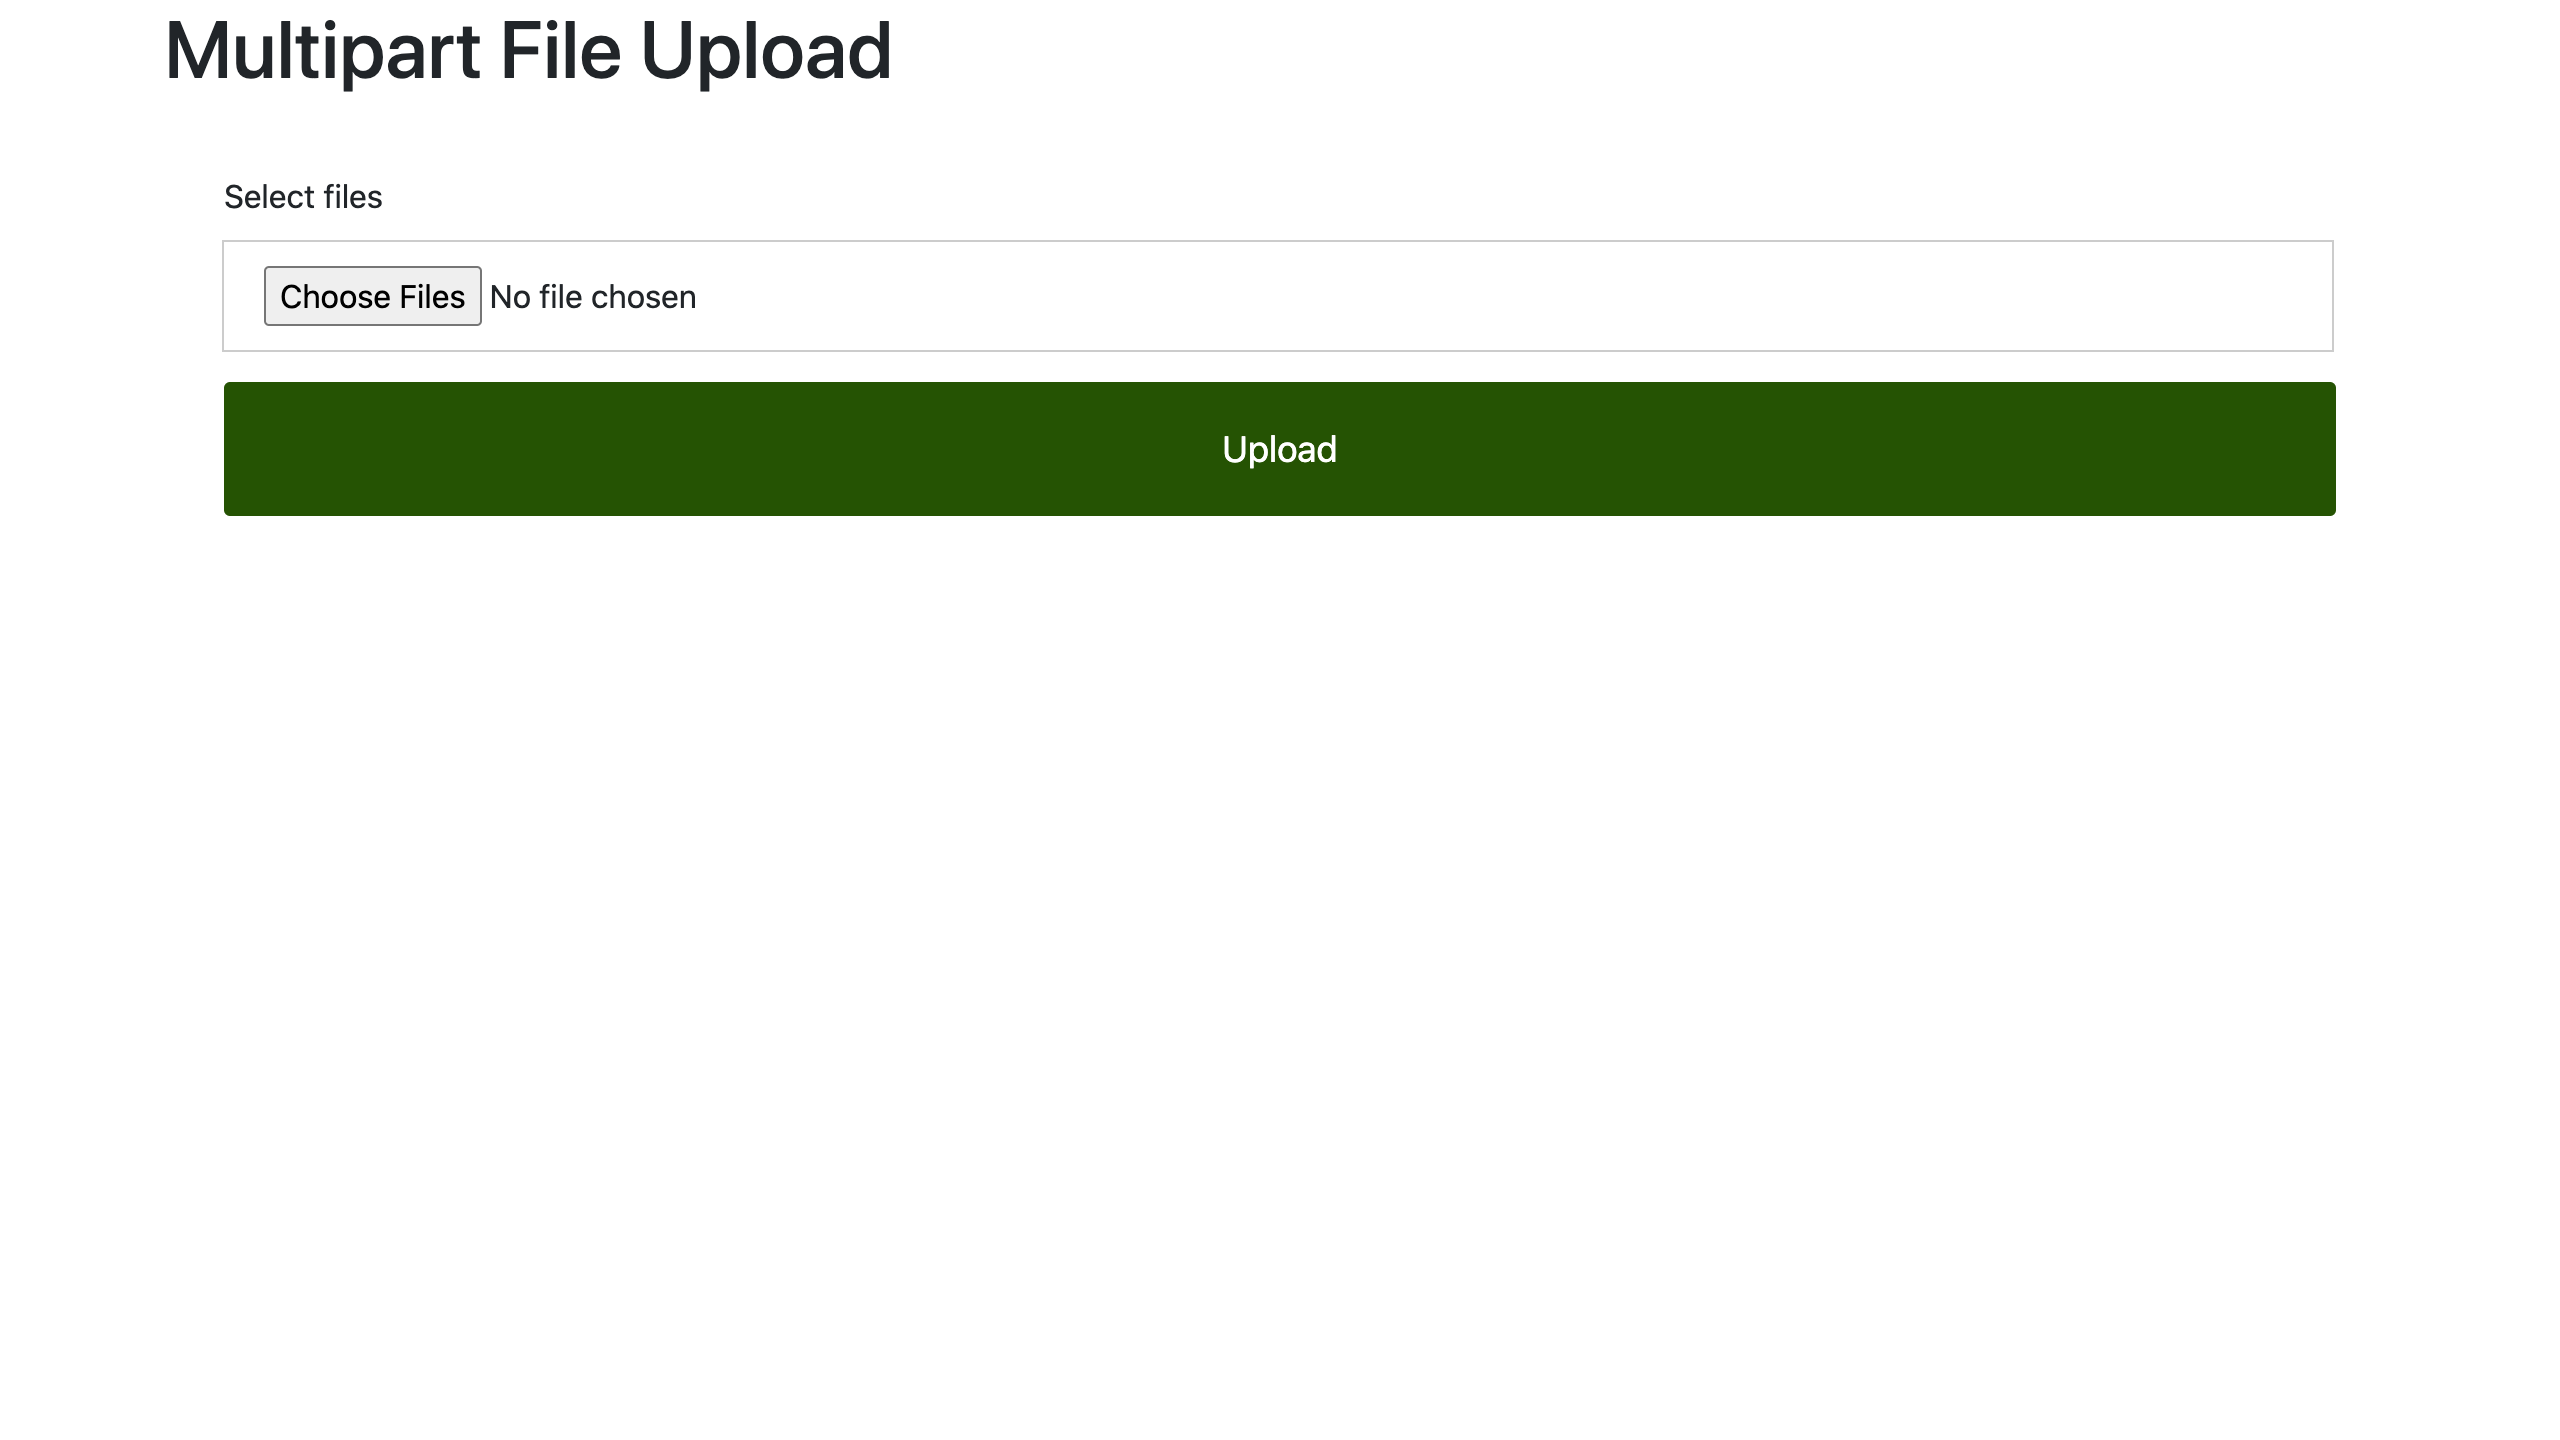
Here we simply created an input and a button. With these HTML elements we have created, we can get the file chosen by the user.
Let's make a request with JavaScript and Fetch to send the selected files to the server.
const form = document.getElementById("form");
const inputFile = document.getElementById("file");

const formData = new FormData();

const handleSubmit = (event) => {
    event.preventDefault();

    for (const file of inputFile.files) {
        formData.append("files", file);
    }

    fetch("http://localhost:8080/files", {
        method: "post",
        body: formData,
    }).catch((error) => ("Something went wrong!", error));
};

form.addEventListener("submit", handleSubmit);
We added the file we received from the user with the input file to FormData. We then created a request to send this FormData object to the server.
Now, let's create a simple server using Express and Multer in order to see that the files we sent are received by the server successfully.
Multer: JavaScript middleware for handling multipart/form-data , which is used for uploading files.
import express from "express";
import cors from "cors";
import multer from "multer";

const app = express();

//Cross-Origin Resource Sharing (CORS) is an HTTP-header based mechanism that allows a server to indicate any origins
app.use(cors());

const storage = multer.diskStorage({
    destination: (req, file, cb) => {
        cb(null, __dirname + "/uploads");
    },
    filename: (req, file, cb) => {
        cb(null, file.originalname);
    },
});

const Data = multer({ storage: storage });

app.post("/files", Data.any("files"), (req, res) => {
    if (res.status(200)) {
        console.log("Your file has been uploaded successfully.");
        console.log(req.files);
        res.json({ message: "Successfully uploaded files" });
        res.end();
    }
});

app.listen(8000, () => {
    console.log("Server is running");
});
As you can see, we have created our multer structure and a simple server to run locally in order to manage and receive FormData.
The requests we created to send files by JavaScript will now be sent to our local server.
What is Multipart Upload Request?
A multipart request is a HTTP request that HTTP clients construct to send files and data over to a HTTP Server. It is commonly used by browsers and HTTP clients to upload files to the server.
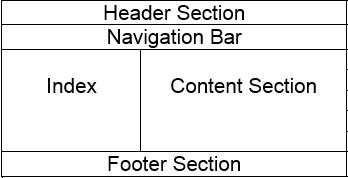
HTML Layout Elements
Page Layout Information:
- Header: The part of the front end which is used at the top of the page. <header> tag is used to add a header section on web pages.s
Syntax:
<header>
    <h1> ----- </h1>
    <h2> ----- </h2>
    ----------------
    ----------------
</header>- Navigation bar: The navigation bar is the same as the menu list. It is used to display the content information using hyperlinks. <nav> tag is used to add the nav section(nav elements) in web pages.
Syntax:
<nav>
    <ul>
        <li> ..... </li>
        <li> ..... </li>
    </ul>
</nav>- Index / Sidebar: It holds additional information or advertisements and is not always necessary to be added to the page.
- Content Section: The content section is the central part where content is displayed.<main> tag is used to add the main content of the webpages.
- Footer: The footer section contains the contact information and other query related to web pages. The footer section is always put on the bottom of the web pages. The <footer> tag sets the footer on web pages.
HTML contains different elements that define the structure of a web page:
HTML <aside> Tag
The HTML <aside> tag is used to represent a portion of a document that is indirectly related to the main content. It is most commonly used as a sidebar in the document. It does not render anything special in the browser. For example,
We use CSS to style to HTML <aside>. For example,
<aside>
    <h2>Sidebar</h2>
    <p>This is some content in the sidebar.</p>
</aside>
<main>
    <h1>Main Content</h1>
    <p>This is the main content of the page.</p>
</main>
<style>
    main {
        padding: 10px;
        margin: 10px;
    }

    aside {
        width: 200px;
        border: 1px solid black;
        padding: 10px;
        margin: 10px;
        float: left;
    }
</style>
Browser Output

HTML <main> Tag
The HTML
<main>tag is a semantic tag used to define the main content of the document. The main content contains the primary information or functionality that the page is meant to provide to the user.- <header>:This defines a header for a web page
- <nav>: This defines a container for navigation links
- <section>: This defines a section in a web page
- <article>: This is the primary element that contains information about the web page
- <aside>: The <aside> content is often placed as a sidebar in a document
- <footer>: This defines a footer for a document or a section
- <details>: This is used to define additional details
- <summary>: This defines a heading for the <details> element
What are the various formatting tags in HTML?
HTML has various formatting tags:
- <b> - makes text bold
- <i> - makes text italic
- <em> - makes text italic but with added semantics importance
- <big> - increases the font size of the text by one unit
- <small> - decreases the font size of the text by one unit
- <sub> - makes the text a subscript
- <sup> - makes the text a superscript
- <del> - displays as strike out text
- <strong> - marks the text as important
- <mark> - highlights the text
- <ins> - displays as added text
Please explain how to indicate the character set being used by a document in HTML?
Using Meta tag:
- The meta tag is used to specify the character encoding in an HTML document.
- The meta tag defines meta-data about HTML document which is not displayed on the webpage.
- It helps search engines to understand what that particular webpage is about.
- You can use <meta> tag to give a short description about the document. This again can be used by various search engines while indexing your webpage for searching purpose.
<!DOCTYPE html>
<html>

   <head>
      <title>Meta Tags Example</title>
      <meta name = "keywords" content = "HTML, Meta Tags, Metadata" />
      <meta name = "description" content = "Learning about Meta Tags." />
   </head>

   <body>
      <p>Hello HTML5!</p>
   </body>

</html>
Document Revision Date
You can use <meta> tag to give information about when last time the document was updated. This information can be used by various web browsers while refreshing your webpage.
Example
<!DOCTYPE html>
<html>

   <head>
      <title>Meta Tags Example</title>
      <meta name = "keywords" content = "HTML, Meta Tags, Metadata" />
      <meta name = "description" content = "Learning about Meta Tags." />
      <meta name = "revised" content = "Tutorialspoint, 3/7/2014" />
   </head>

   <body>
      <p>Hello HTML5!</p>
   </body>

</html>
ADDocument Refreshing
A <meta> tag can be used to specify a duration after which your web page will keep refreshing automatically.
Example
If you want your page keep refreshing after every 5 seconds then use the following syntax.
<!DOCTYPE html>
<html>

   <head>
      <title>Meta Tags Example</title>
      <meta name = "keywords" content = "HTML, Meta Tags, Metadata" />
      <meta name = "description" content = "Learning about Meta Tags." />
      <meta name = "revised" content = "Tutorialspoint, 3/7/2014" />
      <meta http-equiv = "refresh" content = "5" />
   </head>

   <body>
      <p>Hello HTML5!</p>
   </body>

</html>
ADPage Redirection
You can use <meta> tag to redirect your page to any other webpage. You can also specify a duration if you want to redirect the page after a certain number of seconds.
Example
Following is an example of redirecting current page to another page after 5 seconds. If you want to redirect page immediately then do not specify content attribute.
<!DOCTYPE html>
<html>

   <head>
      <title>Meta Tags Example</title>
      <meta name = "keywords" content = "HTML, Meta Tags, Metadata" />
      <meta name = "description" content = "Learning about Meta Tags." />
      <meta name = "revised" content = "Tutorialspoint, 3/7/2014" />
      <meta http-equiv = "refresh" content = "5; url = http://www.tutorialspoint.com" />
   </head>

   <body>
      <p>Hello HTML5!</p>
   </body>

</html>
ADSetting Cookies
Cookies are data, stored in small text files on your computer and it is exchanged between web browser and web server to keep track of various information based on your web application need.
You can use <meta> tag to store cookies on client side and later this information can be used by the Web Server to track a site visitor.
Example
Following is an example of redirecting current page to another page after 5 seconds. If you want to redirect page immediately then do not specify content attribute.
<!DOCTYPE html>
<html>
   <head>
      <title>Meta Tags Example</title>
      <meta http-equiv = "cookie" content = "userid = xyz; expires = Wednesday, 08-Aug-15 23:59:59 GMT;" />

   </head>
   <body>
      <p>Hello HTML5!</p>
   </body>
</html>
If you do not include the expiration date and time, the cookie is considered a session cookie and will be deleted when the user exits the browser.
Note − You can check PHP and Cookies tutorial for a complete detail on Cookies.
Setting Author Name
You can set an author name in a web page using meta tag. See an example below −
Example
<!DOCTYPE html>
<html>

   <head>
      <title>Meta Tags Example</title>
      <meta name = "keywords" content = "HTML, Meta Tags, Metadata" />
      <meta name = "description" content = "Learning about Meta Tags." />
      <meta name = "author" content = "Mahnaz Mohtashim" />
   </head>

   <body>
      <p>Hello HTML5!</p>
   </body>

</html>
Specify Character Set
You can use <meta> tag to specify character set used within the webpage.
Example
By default, Web servers and Web browsers use ISO-8859-1 (Latin1) encoding to process Web pages. Following is an example to set UTF-8 encoding −
<!DOCTYPE html>
<html>

   <head>
      <title>Meta Tags Example</title>
      <meta name = "keywords" content = "HTML, Meta Tags, Metadata" />
      <meta name = "description" content = "Learning about Meta Tags." />
      <meta name = "author" content = "Mahnaz Mohtashim" />
      <meta http-equiv = "Content-Type" content = "text/html; charset = UTF-8" />
   </head>

   <body>
      <p>Hello HTML5!</p>
   </body>

</html>
To serve the static page with traditional Chinese characters, the webpage must contain a <meta> tag to set Big5 encoding −
<!DOCTYPE html>
<html>

   <head>
      <title>Meta Tags Example</title>
      <meta name = "keywords" content = "HTML, Meta Tags, Metadata" />
      <meta name = "description" content = "Learning about Meta Tags." />
      <meta name = "author" content = "Mahnaz Mohtashim" />
      <meta http-equiv = "Content-Type" content = "text/html; charset = Big5" />
   </head>

   <body>
      <p>Hello HTML5!</p>
   </body>

</html>
Using Script tag:
- The script tag is used to specify the character encoding in an external file.
- The script tag defines client-side script.
- The script tag refers to an external script file through the ‘src’ attribute.
<script src="script.js" charset="UTF-8"></script>
Where the charset is an attribute for character encoding. Charset allows the web browser to use the character encoding while translating the machine code into human-readable text and vice-versa to display in the browser.
- The <script> tag embeds the JavaScript code into a HTML file.
- There are two types of attributes of <script> tag global and event.
- The <script> tag is can be used inside or outside of the HTML body.
- Other than embedding, external scripts can also be used in the HTML file using src attribute.
- The <script> tag is supported by almost all the browsers.
What is the difference between <strong>, <b> tags and <em>, <i> tags?
The effect on a normal webpage of the tags <strong>, <b> and <em>, <i> is the same. <b> and <i> tags stands for bold and italic. These two tags only apply font styling and bold tag <b>, just adds more ink to the text, these tags don't say anything about the text.
Whereas, <strong> and <em> tags represent that the span of text is of strong importance or more importance and emphatic stress respectively than the rest of the text. These tags have semantic meaning.
The <b> tag highlights in bold a part of the text to make it more obvious for the user. It is a style. It doesn’t convey any additional importance.
So, it’s recommended to use the <b> tag if you need to increase the font-weight of a particular word, phrase, or paragraph only for presentation purposes.
The <strong> tag specifies the strong importance of the content. It can be used to highlight seriousness, urgency, or importance. It indicates how something must be understood.
The <i> tag displays the text in italic. Like the <b> tag, the <i> tag is also used for presentation purposes. It represents some part of a text in an alternate voice or mood or something that indicates a different quality of text.
The <em> tag specifies the stress emphasis of its contents. It can be used for changing the meaning of a sentence. The text within this tag is also displayed in italic.
Overall Differences:
Here's a table comparing the differences between the <b> and <strong> tags, as well as the <i> and <em> tags:
Tag Meaning Visual Appearance Accessibility Implications <b> Text is stylistically bold Bold No specific accessibility meaning <strong> Text is of strong importance or emphasis Bold Screen readers and other assistive technologies recognize the tag as indicating significant content <i> Text is stylistically italic Italic No specific accessibility meaning <em> Text is of emphasis or importance Italic Screen readers and other assistive technologies recognize the tag as indicating significant content
What is the significance of <head> and <body> tag in HTML?
<head> tag provides the information about the document. It should always be enclosed in the <html> tag. This tag contains the metadata about the webpage and the tags which are enclosed by head tag like <link>, <meta>, <style>, <script>, etc. are not displayed on the web page. Also, there can be only 1 <head> tag in the entire Html document and will always be before the <body> tag.
<body> tag defines the body of the HTML document. It should always be enclosed in the <html> tag. All the contents which needs to be displayed on the web page like images, text, audio, video, contents, using elements like <p>, <img>, <audio>, <heading>, <video>, <div>, etc. will always be enclosed by the <body> tag. Also, there can be only 1 body element in an HTML document and will always be after the <head> tag.
How is Cell Padding different from Cell Spacing?
Cell Spacing is the space or gap between two consecutive cells. Whereas, Cell Padding is the space or gap between the text/ content of the cell and the edge/ border of the cell. Please refer to the above figure example to find the difference.

How to handle events in HTML?
https://www.tutorialspoint.com/how-to-handle-javascript-events-in-html#:~:text=To%20handle%20events%20in%20HTML,form%20events%2C%20and%20many%20more.
<!DOCTYPE html>
<html>
   <body style="padding-top:50px">
       <h3 id="event_demo">0</h3>
       <input type="button" onclick="myFunction()" value="Click Me" />
       <input type="reset" onclick="reset()" value="Reset" />
   </body>

   <script>
       function myFunction() {
           var value = document.getElementById("event_demo").innerHTML
           value = parseInt(value) + 1;
           document.getElementById("event_demo").innerHTML = value;
       }
       function reset() {
           document.getElementById("event_demo").innerHTML = 0;
       }
   </script>
</html>
. What are forms and how to create forms in HTML?
Where should we use script tag in the HTML ?
Script Tag: It is used to add JavaScript inside the HTML code and to make the behavior of the website dynamic.
There are two approaches for adding the script file in the HTML that are:
- TOP Approach
- END Approach
Difference between link tag <link> and anchor tag <a>?
The anchor tag <a> is used to create a hyperlink to another webpage or to a certain part of the webpage and these links are clickable, whereas, link tag <link> defines a link between a document and an external resource and these are not clickable.
Difference Between HTML and HTML5
The following table compares HTML vs HTML5:
HTML | HTML5 |
It contains elaborate types of character encoding. | It contains easier types of character encoding |
It does not support audio and video without the use of a flash player. | It supports audio and video controls with the use of <audio> and <video> tags. |
HTML uses browser cache memory as temporary storage. | HTML5 offers multiple storage options, such as an SQL database, application cache, and web storage. |
Programmers are unable to use features that determine a user’s geolocation.. | HTML5 has a JavaScript geolocation API, which can be used to identify any user's location when accessing the website. |
<tHml>, <Head>, and <Body> tags are mandatory while coding. | < Html >, <ody>, and Head> tags can be omitted while coding. |
Drag and drop features are not provided. | Drag and drop features are provided. |
It cannot handle inaccurate syntax. | It is capable of handling inaccurate syntax. |
In HTML, vector graphics are supported with the help of various tools, such as Adobe Flash, VML, etc. | In HTML5, vector graphics are supported by default. |
Attributes such as async, charset, and ping are not the part of HTML. | Attributes such as async, charset, and ping are an essential part of HTML5. |
The doctype declaration is long and complicated in HTML. | The doctype declaration is comparatively quite simple and easy to understand in HTML5. |
Newer attributes like tabindex, id, and repeat are unavailable in HTML. | HTML5 contains tabindex, id, and repeat attributes. |
HTML <img> Tag
HTML <img> tag is used to add image inside webpage/website. Nowadays website does not directly add images to a web page, as the images are linked to web pages by using the <img> tag which holds space for the image.
Syntax:
<img src="" alt="" width="" height="">
Attributes: The <img> tag has following attributes.
- src: It is used to specify the path to the image.
- alt: It is used to specify an alternate text for the image. It is useful as it informs the user about what the image means and also due to any network issue if the image cannot be displayed then this alternate text will be displayed.
39. Write a program to create nested web pages in HTML.
A webpage inside of another is a nested webpage. It is done using the iframe tag which creates an inline frame.
<!DOCTYPE html>
<html>
<body>
<h2>HTML Iframes example</h2>
<p>Use the height and width attributes to specify the size of the iframe:</p>
<iframesrc="https://hackr.io/"height="400"width="600"></iframe>
</body>
</html>
40. Explain SVG with HTML code.
HTML SVG is a two-dimensional vector and vector/raster graphics. SVG images and their behaviors are defined in XML text files. It is used for vector diagrams like pie charts and 2-dimensional graphs in an X, Y coordinate system.
<!DOCTYPE html>
<html>
<body>
<h2>HTML SVG example</h2>
<svg width="400" height="400">
<circle cx="50" cy="50" r="40" stroke="black" stroke-width="6" fill="red" />
</svg>
</body>
</html>
41. Explain the button tag with the help of code.
The button tag lets you create a clickable button in the HTML form on the webpage.
<!DOCTYPE html>
<html>
<body>
<h2>HTML Button Tag Example</h2>
<button name="button" type="button">CLICK ME</button>
</body>
</html>
42. What are the different types of headings in HTML?
<!DOCTYPE html>
<html>
 <head>
<style>
h1{
color: red;
}
h2{
color: blue;
}
h3{
color: green;
}
h4{
color: purple;
}
h5{
color: yellow;
}
h6{
color: orange;
}
</style>
 </head>
<body>
 <h1>This is Heading 1</h1>
 <h2>This is Heading 2</h2>
 <h3>This is Heading 3</h3>
 <h4>This is Heading 4</h4>
 <h5>This is Heading 5</h5>
 <h6>This is Heading 6</h6>
</body>
43. Explain the script tag.
The script tag embeds client-side script. It can be inside the head or body tag of the HTML code. This tag is executed when the browser reaches that part of the document.
<!DOCTYPE html>
<html>
<body>
<h2>HTML Script Tag Example</h2>
<script>
var x = 5;
var y = 6;
var result = x + y;
alert("X + Y is equal to " + result);
</script>
</body>
</html>
44. How do you insert an image in a HTML webpage?
<!DOCTYPE html>
<html>
<body>
<h2>HTML Image Example</h2>
<img src="tulip.jpeg">
</body>
</html>
45. How do you insert an Emoji in a web page?
<!DOCTYPE html>
<html>
<body>
<h2>HTML Emoji Example</h2>
<p>😀</p>
</body>
</html> 46. Explain HTML forms.
Forms are designed to get user input which can later be sent to the server for processing. Input can be given as text or in the form of radio buttons and can be submitted by clicking the submit button.
<!DOCTYPE html>
<html>
<body>
<h2>HTML Form Example</h2>
<form>
 <label for="fname">First name:</label><br>
 <input type="text"id="fname"name="fname"><br>
 <label for="lname">Last name:</label><br>
 <input type="text"id="lname"name="lname">
</form>
<p> </p>
<form>
 <input type="radio"id="male"name="gender"value="male">
 <label for="male">Male</label><br>
 <input type="radio"id="female"name="gender"value="female">
 <label for="female">Female</label><br>
 <input type="radio"id="other"name="gender"value="other">
 <label for="other">Other</label>
 <br> </br>
 <inputtype="submit"value="Submit">
</form>
</body>
</html>
47. How are hyperlinks inserted in a web page?
Hyperlinks are defined with the HTML <a> tag.
<!DOCTYPE html>
<html>
<body>
<h2>HTML Hyperlink Example</h2>
<a href="url">link text</a>
</body>
</html>
48. How do you add color to text?
<!DOCTYPE html>
<html>
<body>
<h2>HTML Color Text Example</h2>
<h1 style="color:Tomato;">Hello HTML</h1>
<p style="color:DodgerBlue;">Line 1</p>
<p style="color:MediumSeaGreen;">Line 2</p>
</body>
</html>
49. Explain ordered and unordered lists.
An unordered list is written with the <ul> tag and each element of the list is with a <li> tag. The list items are displayed as bullets.
An ordered list is written between <ol> tag and each element of the list is written with a <li> tag. The list items are displayed as numbers.
<!DOCTYPE html>
<html>
<body>
<h2>HTML List Example</h2>
<ul>
 <li>Coffee</li>
 <li>Tea</li>
 <li>Milk</li>
</ul>
<ol>
 <li>Coffee</li>
 <li>Tea</li>
 <li>Milk</li>
</ol>
</body>
</html>
50. Explain Description Lists.
The description list allows us to add a description to each element of the list.
The <dl> tag defines the description list, the <dt> tag defines the term (name), and the <dd> tag describes each term.
<!DOCTYPE html>
<html>
<body>
<h2>HTML Description List xample</h2>
<dl>
 <dt>Coffee</dt>
 <dd>- black hot drink</dd>
 <dt>Milk</dt>
 <dd>- white cold drink</dd>
</dl>
</body>
</html>
51. Define and implement the alt attribute.
If an image cannot be displayed, the alt attribute specifies the alternate text to be displayed instead.
<!DOCTYPE html>
<html>
<body>
<h2>HTML Alt Example</h2>
<img src="tulip.jpeg"alt= "Tulip Garden">
</body>
</html>
div
The div (division) element is a generic block-level element. You most frequently use it to divide your page content into digestible blocks. A block element is a page element that starts a new line and has a width equal to the entire page or the parent container.
It's extremely common to see divs used to group related paragraphs, images, headings, and links together. For instance, consider this. A three-paragraph article may be enclosed in a div, and a navigation menu containing links might be enclosed in another div. Using divs this way makes it easier to identify different page sections and apply styling to them with CSS.
Here's an example of what a div element in HTML looks like:
<div id=“paragraphs”>
    <p>This is my first paragraph.</p>
    <p>This is my second paragraph.</p>
    <p>This is my final paragraph.</p>
</div>
span
Span is a generic inline element often used to apply styling to a portion of content. An inline element does not start a new line and only takes up as much space on the page as its content. Span tags are used on small segments of text, links, images, and other HTML elements that appear inline with the surrounding content.
A basic example of a span element in HTML looks like this:
<p>This is a paragraph with <span id=“special-text”>a little something extra</span> inside it.</p>
To summarize, a div tag creates a block-level element while a <span> tag wraps around an inline element. Despite their differences, both are used to group like elements for structural and/or styling purposes.
Difference Between Span and Div
div tag creates a block-level element
while a <span> tag wraps around an inline element.
Additionally, the <span> tag is used to group smaller pieces of text together,
whereas div can be used to group larger ones. Another significant difference between span and div elements is nesting. While it's common to see div elements nested, it's best practice to avoid nesting <span> tags to avoid confusion.
What is HTML?
HTML, short for HyperText Markup Language, is the core language of the World Wide Web. It defines the content and basic structure of web pages and web applications.
HTML, short for HyperText Markup Language, is the core language of the World Wide Web. It defines the content and basic structure of web pages and web applications.
First published by Tim Berners-Lee in 1989, HTML is now used by 94% of all websites, and probably all the ones you visit. But what is it, exactly?
First, check out this short video for a quick definition of HTML, then we'll dive deeper:
As mentioned above, HTML is an acronym for “HyperText Markup Language.” Let’s break this down to better understand what HTML actually means.
“HyperText” is text on a web page that contains references to another web page. You probably know these as hyperlinks. We use hyperlinks to jump to another section of the same page, a different page on the current website, or a completely new website. Hyperlinks can also open a PDF, email, or multimedia, like a video or audio file.
Linking information together in this way was a revolutionary step in building the web. Together, HTML and the internet make it possible for anyone to access all types of information around the world, in any order they want.
Moving on, “Markup” refers to how HTML “marks up” the page with annotations within the HTML file. These annotations are not displayed on the web page itself. Instead, they work behind-the-scenes telling the browser how to display the document to visitors. We'll learn more about this markup soon.
Finally, “Language” is the simplest part of the acronym to understand. Like any language, HTML has a unique syntax and alphabet. But what kind of language is it, exactly? Let’s tackle this question next.
Is HTML a programming language?
Whether HTML is or is not technically a “programming” language is an ongoing debate among web developers and experts. While the majority defines HTML as a “markup” language (not a programming language) some argue the two aren’t mutually exclusive.
All programming languages have some functional purpose — they need to “do” something, whether it be evaluating expressions, declaring variables, or modifying data. JavaScript is the most widely-used programming language in web development. Other popular programming languages include Python, Java, and C.
Though it’s very useful as we’ll see, HTML doesn’t really “do” anything in this sense. It simply gives browsers the content it needs to display. HTML doesn’t care how the browser goes about displaying the content, as long as it’s displayed. In other words, HTML has a structural purpose, not a functional one.
Still, some developers use this same logic to argue that HTML is a programming language — it’s just a declarative programming language. According to Professor David Brailsford from the University of Nottingham, declarative languages are more restricted than other languages, but that doesn’t make them any less of a programming language. You can see his full argument in this video.
With that in mind, let’s move on to what HTML is used for.
What is HTML used for?
HTML is primarily used for creating web pages. HTML is free to use and ensures your text, images, and other elements are displayed as intended.
With HTML, not only can you add headings, paragraphs, lists, and other elements to your page — you can also embed images, videos, audio files, and other multimedia. And, you can link to other web pages on the same website or from another site. This allows visitors to easily navigate your website and jump between websites.
Even after adding headings, images, and hyperlinks, you’d still have a very basic web page — and that’s by design. HTML is purely for the content of a page. It creates a simple base upon which you can add styling with another language called CSS (which stands for Cascading Style Sheets). With CSS, you can customize your styling and layouts, changing the color, font, and alignment of elements.
HTML is used to create things other than web pages, too. You can use it to:
- make tables for organizing data
- create forms for collecting user information, processing transactions, making reservations, or placing an order
- create emails with HTML
Whether you want to create web pages, tables, forms, or emails, you'll need to know how to write HTML. So, let’s break down the process next.
How to Write HTML
Compared to other coding languages, HTML is relatively easy to read and understand, since it’s essentially plain English text with extra symbols here and there.
The main building block of an HTML web page is an element. An HTML element is a unit of information that tells the web browser what to render for the viewer. An HTML element could be a piece of text like a paragraph, an interactive item like a button, or a section of the page like a header or footer.
Here’s what a basic element looks like written out in HTML. This element is called the <button> element, and creates a button on the screen that users can click with the mouse.
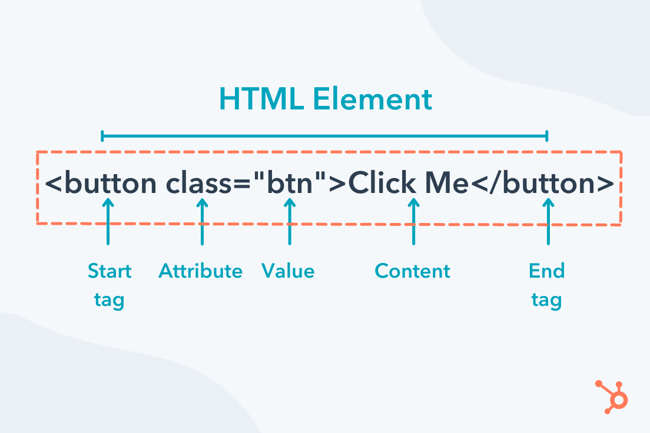
Let's take a closer look at each component of an HTML element.
HTML Tags
HTML elements are designated by tags. Most elements have an opening tag and a closing tag. Opening tags precede contain the element name enclosed by angle brackets (<>). Closing tags are identical to opening tags, save for a slash (/) that precedes the element name.
Tags contain an element’s content. Content may be text, a media item, or even other elements.
So, say you want to add a paragraph to your web page, the the paragraph contains the text “This is a paragraph.” You’ll wrap it with the HTML paragraph tags <p> and </p>. So, the HTML will look like this:
<p>This is a paragraph.</p>
Simple as that. Together, these three things are all you need make a paragraph element in HTML.
Most HTML elements have an opening tag, a closing tag, and content in between these tags. However, some HTML elements only have an opening tag — these are called empty elements.
The line break element is a common empty element. To add a line break in HTML, you just need to write <br> (for “break”), and a line break will be added.
Also, element names are case-insensitive, meaning they can be written in uppercase or lowercase. For example, the <p> tag can also be written as <P>. However, you’ll almost always see element names written in lowercase.
HTML Attributes
While all HTML elements need tags, only some require attributes. An HTML attribute is text inside of the opening tag that provides additional information about the HTML element.
An attribute is always found in the opening tag of an HTML element. Most have the syntax name=“value”, though some attributes only require you to write the name without any assigned value.
Some elements require certain attributes. For example, an HTML image element (<img>) must always contain a source attribute (src) whose value is the image URL or file path. Otherwise, the browser will not know what image to render.
Similarly, the anchor element (<a>), which creates a hyperlink, must contain an href attribute with a value that specifies the link’s destination. Otherwise, if a visitor clicks on the anchor element, the browser won’t send them anywhere.
Other elements have attributes that aren’t essential to include, but are considered a good practice. For example, the <img> element also takes the alt attribute, which contains image alt text. The browser will still render the image if the alt attribute is not present in the <img> tag. But, readers with low vision might have trouble understanding what the image conveys without an alternative text description. So, it’s recommended that all non-decorative images have alt text and therefore use the alt attribute.
Attributes can be written in any order inside the opening tag. However, you cannot put multiple instances of the same attribute inside the same HTML tag.
How to Use HTML
To start using HTML, you’ll need a text editor. A text editor is a software program for writing code. Since an HTML file is in standard text format, any basic text editor will work for this tutorial.
Your first step will be to download a free text editor to use. Notepad++ is a good free text editor for Windows, and Sublime Text is a popular option for Mac. Usually, you can search the text editor online and download a zip file from the download page. Open the zip file, follow any instructions given to install the program, and open it.
When you open the text editor, you’ll likely see an editor window like the one below. This is where you’ll write your HTML code.

With this editor window open, copy the HTML code below and paste it into the window.
 <!DOCTYPE html>
<html>
    <body>
        <h1>My First Heading</h1>
        <p>My first paragraph.</p>
    </body>
</html>
We’ll explain what each of these elements means in the following section.
Next, save the file and name it “index.html.” You can save it to your desktop or another folder.
After saving the HTML file, you’ll be able to open this file in your web browser. To do this, you can double click on the file, right-click and choose Open, or drag and drop the file icon into an open browser window. It will look like this:
Now that you know how to use an HTML editor, let’s look at how to write the actual code.
How to Create an HTML File
To build a website with HTML, you need to create an HTML file first. This file will contain all the HTML for your web page and will be uploaded to your web server. That way, when a visitor searches for your website, the server will send the HTML file to the visitor's browser, and the browser will render the page accordingly.
In the last section, we made a very simple HTML file to open in your browser. In this section, we’ll walk through the process of building out a more complex one.
Step 1: Add a <!DOCTYPE> declaration.
To start, we’ll need declare the type of document as HTML. Add the special code <!DOCTYPE html> on the very first line of the file. Every HTML file starts this way.
<!DOCTYPE html>
Step 2: Add an <html> element.
Next, we’ll add the <html> element after the doctype declaration, also called the “root” element of the document because it contains all other elements in the document.
On the line below the DOCTYPE declaration, add an <html> opening tag. Below that, add a closing </html> tag.
<!DOCTYPE html>
<html>
</html>
Every other element in the document will be placed between these tags.
Step 3: Add a language attribute.
Within the opening tag of the html element, we’ll also add a lang (language) attribute. This helps screen readers determine what language the document is in, making your website more accessible.
Without a language attribute, screen readers will default to the operating system’s language, which could result in mispronunciations of the title and other content on the page.
Since we’re writing this post in English, we’ll set the file’s lang attribute value to en.
<!DOCTYPE html>
<html lang="en">
</html>
Step 4: Add a head and body section.
An HTML document consists of two parts: the head section and the body section. The head section contains meta-information about the page as well as any internal CSS. The browser does not display this information to users. The body section contains all the information that will be visible on the front end, like your paragraphs, images, and links.
To create these sections, we will add <head></head> tags and <body></body> tags inside the <html> section of the document.
<!DOCTYPE html>
<html lang=”en”>
    <head>
    </head>
    <body>
    </body>
</html>
You’ll also notice that the <head> and <body> tags are indented here. This visually indicates to us that these tags are placed inside, or “nested” in, the <html> tags. While indenting isn’t necessary and makes no difference in how the browser renders the document, it’s still common practice to indent your HTML for better readability.
Step 5: Add a title in the head section.
Next, in the head section, we want to name our document. Write a name (we’ll go with “My HTML Page” in this example) and then wrap it in <title></title> tags. We’ll also indent this <title> element so show that it is nested in the <head> section.
In the head section, you'll want to name your document. Write a name (we’ll go with “My HTML Page” in this example) and then wrap it in <title></title> tags.
<!DOCTYPE html>
<html lang=”en”>
    <head>
        <title>My HTML Page</title>
    </head>
    <body>
        <h1>This is a Heading</h1>
        <p>This is a paragraph.</p>
    </body>
</html>
Step 6: Add HTML elements in the body section.
In the body section, let’s now add a heading and paragraph. Write out the heading content and wrap it in <h1></h1> tags, then write out the paragraph content and wrap it in <p></p> tags.
<!DOCTYPE html>
<html lang=”en”>
    <head>
        <title>My HTML Page</title>
    </head>
    <body>
        <h1>This is a Heading</h1>
        <p>This is a paragraph.</p>
    </body>
</html>
HTML Example
We now have a basic HTML file that will load in your browser. Here’s what our completed file looks on the front end.
Below is how it would look on the front end. Note that only the heading and paragraph from the body section are rendered.
As you can see, this is a pretty skeletal page. To fill it, we need to learn some more page elements. Page elements are elements that are actually rendered on the front end. We’ve already used two of them, <h1> and <p>. Let’s take a closer look at these page elements and others next.
If you'd prefer to watch how a more complex HTML file is built out with images, links, forms, and other elements, check out this video:
Common HTML Elements
The first version of HTML consisted of just 18 elements. Since then, more versions have been released with dozens of tags added in each one. In the most recent version of HTML, HTML5, there are 110 HTML tags.
Don’t worry, though — there are only a handful that you’ll use the most often. Below we’ll review the most common elements and their tags.
Below we’ll review the most common elements and their tags.
Paragraph (<p>)
The HTML paragraph element represents a paragraph. By placing <p></p> tags around text, you’ll make that text start on a new line.
Image (<img>)
The HTML image element embeds an image into the document. It requires a src (source) attribute to render properly. An alt attribute should also be included in case the image doesn’t load properly or the reader has a visual impairment.
Here’s an example of an image with a source and alt attribute:
Headings (<h1>-<h6>)
The HTML heading elements represent different levels of section headings. <h1> is the highest section level and the most prominent, whereas <h6> is the lowest and therefore least prominent.
Division (<div>)
The HTML content division (div) element is a generic block-level container. Div elements help organize the code into clearly marked sections. They also add line breaks before and after their content. Otherwise, they do not affect the content or layout of the page unless styled with CSS.
Here’s an example of div wrapped around an image:
Here, the image looks the same as it did without the div wrapper element. That’s because no style information was given to this div element. To change the appearance of the container and therefore the image inside that container, you’d need to add style information.
Say, for example, you wanted to center the image. Then you could use the following code to horizontally center the image on the page:
Span (<span>)
The HTML span element is a generic inline container. Span tags do not inherently represent anything, but they are used to group phrasing content for two reasons.
The first is to apply styling to a piece of text. For example, if you’re creating drop caps, you can wrap the first letter of the opening paragraphs of each section of your article in span tags.
The second reason to use span tags is to group elements that already share attribute values. For example, maybe you have a website for English speakers learning French. The default language is set to English but on several pages, you might have a table with French terms in the first column and their English translations in the second column. In that case, you can wrap the French terms in span tags with the language attribute set to “fr.”
Anchor (<a>)
The HTML anchor element creates a hyperlink. The anchor element requires an href attribute, which species the destination of the link. The destination can be another section on the same web page or another web page on the same site, or external websites, files, and email addresses.
Here’s an example of a link nested in a paragraph:
Line Break (<br>)
The line break element creates a line break where it’s placed. That means you can add it wherever you want the text to end on the current line and resume on the next. This element can be used to display poems, song lyrics, or other forms of content in which the division of lines is significant.
Below is an example of an address rendered in two ways: one using line break elements and one using paragraph elements.
Unordered List (<ul>)
The HTML unordered list element is used for grouping items when the order doesn't matter. Shopping lists, for example, don’t need to follow a particular order. List items are defined by the <li> tag and wrapped in the <ul> element.
Here’s an example of an unordered list. Try adding some list items yourself and see how the list changes.
Ordered List (<ol>)
The HTML ordered list element is used for grouping items when the order matters. Recipes, for example, should follow a particular order. The steps must be defined by the <li> tag and then wrapped in the <ol> element.
An ordered list will start at the number 1 by default. If you’d like to start at another number, add a start attribute and set the value to the number you want.
Here’s an example of an ordered list that starts at 1. Try adding steps at different parts of the list:
Emphasis (<em>)
The HTML emphasis element signals that the text inside it should be emphasized. Browsers typically render text inside <em> tags in italics.
Here’s an example of the emphasis wrapped around a paragraph and nested within a paragraph:
Strong (<strong>)
The HTML strong element indicates that the text it contains is of particular importance or urgency. Browsers typically render the text in bold.
Table (<table>)
The <table> element creates a table for organizing content. It requires three other HTML elements:
- <tr> defines a table row.
- <th> defines the table header
- <td> defines the table data (i.e., the content of the table’s cells).
Here's an example of a table:
Horizontal Rule (<hr>)
The horizontal rule element defines a horizontal line across a web page. It can be used to mark any thematic change, like the next scene in a play, a new section of an essay, or the conclusion of an article.
Select
The select element defines a dropdown list of options, from which a user can select one option (or multiple if allowed). The select element is usually used in HTML forms for gathering user submissions. It’s best for selecting one option out of many while maximizing space on the web page.
Common HTML Attributes
Attributes modify HTML elements in different ways. They can change the appearance of the element, apply unique identifiers so the elements can be targeted by CSS, or provide necessary information to readers or screen readers.
Attributes usually appear lowercase and as name/value pairs, with their values in quotes.
Below we’ll take a look at the most common attributes.
Style Attribute
The style attribute contains inline CSS. This CSS will override any styles set in the head section of the document or in an external stylesheet. It will only be applied to the HTML element that has the style attribute in its opening tag.
Here’s an example of the attribute in HTML:
<p>This paragraph will be black by default. </p>
<p style="color: #800000">This paragraph will be maroon. </p>
ID Attribute
The ID attribute is used to identify a single element in an HTML file. That means the value of an ID attribute should not be repeated inside the same file. Using this unique value, you can target a single element with internal or external CSS.
Here’s an example of the attribute in HTML:
<h1 id=”decorative”>Title in Fancy Typography</h1>
Class Attribute
The class attribute is used to identify a group of elements under the same name and customize that group, effectively creating a new group of elements.
Bootstrap buttons, for example, are all labeled with the .btn class so they have the same basic style: 14px font, medium size, rounded edges, etc.
Here’s an example of the attribute in HTML:
<button class="btn" type="submit">Button</button>
Language Attribute
As mentioned, the language attribute signals to screen readers what the primary language of the web page is and when they need to switch to another language. This is a small detail that can make your content more accessible to all readers, no matter what region they’re from or the language they speak.
While this attribute is most commonly embedded in the HTML element, it can also be used with paragraph, div, span, and other elements.
Here’s an example of the attribute in HTML:
<p lang="fr">Cette phrase est en français</p>
<p lang="es">Esta frase es en español.</p>
Href Attribute
An href attribute contains the destination of a link. This attribute must always be included with an anchor element.
Here’s an example of the href attribute in HTML:
<a rel="noopener" target="_blank" href="https://www.hubspot.com">go to HubSpot.com</a>
Source Attribute
Just like an anchor element needs an href attribute, an image needs a source attribute. This contains the path to the image file or its URL.
Here are two examples of the attribute in HTML:
<img src="images/pineapple.png">
<img src="https://cdn.pixabay.com/photo/2015/07/30/11/05/pineapple-867245_960_720.jpg">
Alt Attribute
The alt attribute provides descriptive information about the HTML element. This is important for readers with visual impairments and for all readers in case the element doesn’t load. In that case, readers will still be able to glean what the element was meant to convey. Like the source attribute, you’ll most often find the alt attribute with the image element.
HTML - <marquee> Tag
The HTML <marquee> tag is used for scrolling piece of text or image displayed either horizontally across or vertically down your web site page depending on the settings.
Example
<!DOCTYPE html>
<html>

   <head>
      <title>HTML marquee Tag</title>
   </head>

   <body>
      <marquee>This is basic example of marquee</marquee>
      <marquee direction = "up">The direction of text will be from bottom to top.</marquee>
   </body>

</html>
This will produce the following result −
Global Attributes
This tag supports all the global attributes described in − HTML Attribute Reference
Specific Attributes
The HTML <marquee> tag also supports the following additional attributes −
| Attribute | Value | Description |
|---|---|---|
| behavior | scroll slide alternate | Defines the type of scrolling. |
| bgcolor | rgb(x,x,x) #xxxxxx colorname | Deprecated − Defines the direction of scrolling the content. |
| direction | up down left right | Defines the direction of scrolling the content. |
| height | pixels or % | Defines the height of marquee. |
| hspace | pixels | Specifies horizontal space around the marquee. |
| loop | number | Specifies how many times to loop. The default value is INFINITE, which means that the marquee loops endlessly. |
| scrolldelay | seconds | Defines how long to delay between each jump. |
| scrollamount | number | Defines how how far to jump. |
| width | pixels or % | Defines the width of marquee. |
| vspace | pixels | Specifies vertical space around the marque |
<img src="pic_trulli.jpg" alt="Trulli" style="width:100%">
<figcaption>Fig.1 - Trulli, Puglia, Italy.</figcaption>
</figure>
The <option> tag defines items in a drop-down list, defined by the <select> tag, or the items of the data list for autocomplete, defined by the <datalist> tag. The <option> tag can be used as a child element of the <select> tag, <datalist> tag or <optgroup> tag, which groups the list elements.
The <select> tag is placed in the <form> tag, if the data lists must be sent to the server, or when the data list is accessed via scripts.
Syntax
The <option> tag comes in pairs. The content is written between the opening (<option>) and closing (</option>) tags.
Example of the HTML <option> tag:
<!DOCTYPE html>
<html>
  <head>
    <title>Title of the document</title>
  </head>
  <body>
    <form>
      <select>
        <option value="computers">Computer</option>
        <option value="notebook">Notebook</option>
        <option value="tablet">Tablet</option>
      </select>
    </form>
  </body>
</html>Definition and Usage
The <iframe> tag specifies an inline frame.
An inline frame is used to embed another document within the current HTML document.
The <iframe> tag comes in pairs. The content is written between the opening (<iframe>) and closing (</iframe>) tags.
Example of an HTML <iframe> Tag:
<!DOCTYPE html>
<html>
  <head>
    <title>Title of the document</title>
  </head>
  <body>
    <iframe src="https://www.w3docs.com"></iframe>
  </body>
</html>The <datalist> tag is one of the HTML5 elements. It is used to create a list of input options, predefined by the <input> tag. Initially, the options are hidden, and the list of them becomes available when the user starts typing. The list attribute of the <input> tag must match the id of the <datalist> element.
Predefined options for input are enclosed in a nested <option> element.
Syntax
The <datalist> tag comes in pairs. The content is written between the opening (<datalist>) and closing (</datalist>) tags.
Example of the HTML <datalist> tag:
<!DOCTYPE html>
<html>
  <head>
    <title>Title of the document</title>
  </head>
  <body>
    <div>Choose browser</div>
    <input list="browsers" />
    <datalist id="browsers">
      <option value="Opera">
      <option value="Safari">
      <option value="Firefox">
      <option value="Google Chrome">
      <option value="Maxthon">
    </datalist>
  </body>
</html>HTML <datalist> tag: This tag specifies the predefined options for an <input> element. This tag also gives the autocomplete feature for the <input> element of HTML. Like once the user starts typing the input element of <datalist> tag, the user will see the pre-defined options starting with the letter or word typed by the user. Note that to use the <datalist> tag, the id of the tag must be the same as of the <input> element attribute.
Syntax:
<datalist id="courses">
   <option value="DSA">
   <option value="ML and AI">
</datalist>
Example: In this example, we will see the use of <datalist>
- HTML
Output:

HTML <select> tag: This tag creates a drop-down menu list in a webpage that is mostly used in the online forms that we all use for collecting the user input. The <select> tag contains <option> tag to display the list of available options from the drop-down list. The tag has various attributes that include <name>, <autofocus>, etc.
Syntax:
<select id="courses">
   <option value="Java">Java</option>
   <option value="C++">C++</option>
</select>
Example: In this example, we will see the use of <select> tag
- HTML
Output:
Comments
Post a Comment