CSS Box Model
The CSS box model is essentially a box that wraps around every HTML element. It consists of: margins, borders, padding, and the actual content.
While creating the layout of a web page, the browser's rendering engine calculates the size of each box and the placement of each box on the page according to the standard CSS box model.
The properties and sizes of the box model can be changed using CSS.
Every HTML element can be compared with a box. Treating HTML elements as boxes we can visualize an element size using these 4 properties:
- Content edge
- Padding edge
- Border edge
- Margin edge
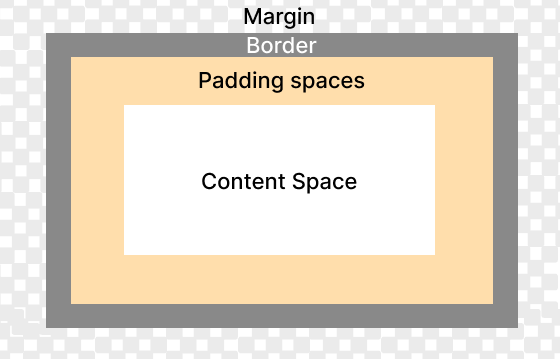
The above image shows the box model of an element. Content, padding, border, and margin of the element combined form the height and weight of the element.
Content
Content is the main part of the box model. It is the actual text or image that is displayed on the page.
It is surrounded by padding of the element (if any).
Padding
Padding is the internal space of the box model around the content. It takes its own space.
It is surrounded by the border of the element.
Border
The border is the line that surrounds the padding and content of the element.
It is surrounded by the margin of the element.
Margin
Margin is the external space of the box model. It is the space between the border of the element and the border of the adjacent element.
It is not part of the element.
Effective Height and width of the element
The effective height and width of an element is the total height and width of the element including content, padding, border, and margin.
From the above figure you can see that the effective height and width of the content are:
- Total height = margin-top + margin-bottom + border-top + border-bottom + padding-top + padding-bottom + content-height
- Total width = margin-left + margin-right + border-left + border-right + padding-left + padding-right + content-width
Example
▶ Try itBorders In CSS
CSS border properties are used to design and shape borders of elements on web pages.
The CSS border can specify color, border type, the width of the border, etc. These are the following properties in CSS for border:
Let's look at all these properties with examples.
1. CSS Border Style
The border-style property defines the style of the border. It specifies the type of border to be drawn. It can have the following values:
- solid - Specifies a solid border. This is default
- dotted - Specifies a dotted border
- dashed - Specifies a dashed border
- double - Specifies a double border
- groove - Specifies a 3D grooved border. The effect depends on the border-color value
- ridge - Specifies a 3D ridged border. The effect depends on the border-color value
- inset - Specifies a 3D inset border. The effect depends on the border-color value
- outset - Specifies a 3D outset border. The effect depends on the border-color value
- none - Specifies no border
- hidden - Specifies the same as none, except in border conflict resolution for table elements
Let's see the following example to understand the border-style property.
Example
▶ Try it2. CSS Border Color
Borders can be given color using the border-color property.
The color value of the border-color property can be any valid CSS color value. It can be specified as:
- color name - like red, green, blue, etc.
- HEX value - like #a53427.
- RGB value - like rgb(255, 165, 0).
- HSL value - like hsl(9, 100%, 64%).
Note - Before setting border-color you must set border-style because to set the color to border it must exist first.
Example
▶ Try it3. CSS Border Width
CSS border-width property controls the width of the border.
The width value of the border-width property can be given on any valid scale.
Using the border-width property we can also individually control the width of each side of the box by using the following property:
- border-top-width - It is the width of the top of the box.
- border-right-width - It is the width of the right of the box.
- border-bottom-width - It is the width of the bottom of the box.
- border-left-width - It is the width of the left of the box.
Note: Before setting border-width you must set border-style because to set width to border it must exist first.
Example
▶ Try itInstead of using CSS property to specify a width for each side of the box, you can also set values like border-width: top right bottom left.
Using this method you can set different values on different sides.
Example
▶ Try it4. CSS Border Radius
CSS border-radius property is used to create rounded corners on an element's border.
The border-radius property can have from one to four values.
- If one value is given, it applies to all four corners.
- If two values are given, the first applies to the top-left and bottom-right corners, and the second applies to the top-right and bottom-left corners.
- If three values are given, the first applies to the top-left corner, the second applies to the top-right and bottom-left corners, and the third applies to the bottom-right corner.
- If four values are given, they apply to the top-left, top-right, bottom-right, and bottom-left corners, respectively.
Example
▶ Try itCSS border (shorthand)
You have seen how to set the border style, width, and color individually. But you can also set all these properties in one line using the border property.
Using shorthand border property is more convenient, easy to remember, and most importantly, it saves time.
You can set the border style, width, and color in one line in any order.
Example
▶ Try itWhen you use the border property, you can omit the border color or the border width. If you omit the border color, the default value is black. If you omit the border width, the default value is 3px.
In the next article, you will learn about CSS Margins.
Margin in CSS - External Space
Margin is the space between the border of the element and the border of the adjacent element. It is the space between the element and the edge of the container.
In CSS, the margin property is used to specify space around the HTML element. The specified space is transparent and has no background color.
Using this property we can specify the top, bottom, left, and right margin independently. These are four properties of margin.
CSS margin properties
There are four properties of margin in CSS which are used to specify the margin of the element. Also, there is one shorthand property of margin which is used to specify all the four properties of margin at once.
| Property | Description |
|---|---|
| margin-top | Specifies the top margin of the element. |
| margin-bottom | Specifies the bottom margin of the element. |
| margin-left | Specifies the left margin of the element. |
| margin-right | Specifies the right margin of the element. |
| margin | Specifies all the four properties of margin at once. |
CSS margin values
There are many values that can be used with the margin property. The values can be specified in pixels, percentage, ems, rems, etc.
| Value | Description |
|---|---|
| auto | It is used to set the margin to the auto value. The margin is set to the auto value so that the element is centered in the container. |
| inherit | It is used to inherit the margin from the parent element. |
| initial | It is used to set the margin to the initial value. |
| length | It is used to set the margin to the specified length. The length can be specified in pixels, percentage, ems, rems, etc. |
| unset | It is used to set the margin to the initial value. |
margin-top
The margin-top property is used to specify the top margin of the element. The top margin is the space between the top border of the element and the margin of the adjacent element.
Increasing the top margin will push the element down and decreasing the top margin will pull the element up.
Example
▶ Try itmargin-bottom
The margin-bottom property is used to specify the bottom margin of the element. The bottom margin is the space between the bottom border of the element and the margin of the adjacent element.
Increasing the bottom margin will push the next element down and decreasing the bottom margin will pull the next element up.
Example
▶ Try itmargin-left
The margin-left property is used to specify the left margin of the element. The left margin is the space between the left border of the element and the margin of the adjacent element.
Increasing the left margin will push the element to the right and decreasing the left margin will pull the element to the left.
Example
▶ Try itmargin-right
The margin-right property is used to specify the right margin of the element. The right margin is the space between the right border of the element and the margin of the adjacent element.
Increasing the right margin will push the element to the left and decreasing the right margin will pull the element to the right.
Example
▶ Try itmargin (shorthand)
The margin is the shorthand hand property for the margin-top, margin-right, margin-bottom, and margin-left properties.
The margin property can have from one to four values.
- If there is only one value, it will be applied to all four sides. For example margin: 25px; - top, right, bottom, and left
- If there are two values, the first value will be applied to the top and bottom, and the second value will be applied to the left and right. For example margin: 25px 50px; - top and bottom, left and right
- If there are three values, the first value will be applied to the top, the second value will be applied to the left and right, and the third value will be applied to the bottom. For example margin: 25px 50px 75px; - top, left and right, bottom
- If there are four values, the first value will be applied to the top, the second value will be applied to the right, the third value will be applied to the bottom, and the fourth value will be applied to the left. For example margin: 25px 50px 75px 100px; - top, right, bottom, left
Example
▶ Try itCenter an element horizontally
To center an element horizontally, you need to set the margin property to auto for the left and right margins.
For example, to center a div element, you need to set the margin property to auto for the left and right margins:
Note: For the margin property to work, the element should be a block element and have a width set.
CSS margin vs padding
The margin property is used to create space around the element, while the padding property is used to create space inside the element.
Both the margin and padding properties can have from one to four values.
Both the margin and padding properties can have negative values.
Padding in CSS - Internal Spacing
The CSS padding property is used to create space around the element's content.
Padding is the space between the content and the border of an element.
Using padding property we can specify top, bottom, left and right padding independently.
CSS padding properties
There are 4 padding properties for each side of an element and a shorthand property for all 4 sides.
| Property | Description |
|---|---|
| padding-top | Specifies the padding on the top of an element. |
| padding-right | Specifies the padding on the right of an element. |
| padding-bottom | Specifies the padding on the bottom of an element. |
| padding-left | Specifies the padding on the left of an element. |
| padding | Specifies the padding on all 4 sides of an element. |
CSS padding values
| Values | Description |
|---|---|
| length | Specifies the padding in px, cm, etc. |
| % | Specifies the padding in the percentage of the width of the containing block. |
| initial | Specifies the padding to its default value. |
| inherit | Specifies the padding to be inherited from its parent element. |
padding-top
The padding-top property is used to set the padding on the top of an element.
Setting padding-top 20px will create 20px of space between top border and content.
Example
▶ Try itpadding-right
The padding-right property is used to set the padding on the right of an element.
Setting padding-right 20px will create 20px of space between right border and content.
Example
▶ Try itpadding-bottom
The padding-bottom property is used to set the padding on the bottom of an element.
Setting padding-bottom 20px will create 20px of space between bottom border and content.
Example
▶ Try itpadding-left
The padding-left property is used to set the padding on the left of an element.
Setting padding-left 20px will create 20px of space between left border and content.
Example
▶ Try itpadding (shorthand)
The padding property is used to set the padding on all four sides of an element.
This is a shorthand property for padding-top, padding-right, padding-bottom, and padding-left properties.
It accepts 4 different sets of values.
If you specify only one value, it will be applied to all four sides.
For example, padding: 20px; - top, right, bottom and left padding will be 20px.
If you specify two values, the first value will be applied to the top and bottom, and the second value will be applied to the left and right.
For example, padding: 20px 10px; - top and bottom padding will be 20px, and left and right padding will be 10px.
If you specify three values, the first value will be applied to the top, the second value will be applied to the left and right, and the third value will be applied to the bottom.
For example, padding: 20px 10px 30px; - top padding will be 20px, left and right padding will be 10px, and bottom padding will be 30px.
If you specify four values, they will be applied to the top, right, bottom and left, respectively.
For example, padding: 20px 10px 30px 40px; - top padding will be 20px, right padding will be 10px, bottom padding will be 30px, and left padding will be 40px.
Example
▶ Try it
Comments
Post a Comment