What is a Module in JavaScript?
In simple terms, a module is a piece of reusable JavaScript code. It could be a .js file or a directory containing .js files. You can export the content of these files and use them in other files.
Module in Node.js is a simple or complex functionality organized in single or multiple JavaScript files which can be reused throughout the Node.js application.
Each module in Node.js has its own context, so it cannot interfere with other modules or pollute global scope. Also, each module can be placed in a separate .js file under a separate folder.
What is Node.js?
Node.js is an open-source framework for building fast and scalable server-side JavaScript applications. NodeJS uses an event-driven, non-blocking I/O model that makes it lightweight and efficient.The NodeJS process model can be explained with three architectural features of NodeJS.
Single-threaded: In Node.js all requests are single-threaded and collected in an event loop. The event loop is what allows Node.js to perform all non-blocking operations. This means that everything from receiving the request to performing the tasks to sending the response to the client is executed in a single thread. This feature prevents reloading and reduces context switching time.
Highly Scalable: Node.js applications are highly scalable because they run asynchronously. Node.js can efficiently handle concurrent requests while balancing all active CPU cores. This feature of Node.js is very beneficial for developers.
Cross-Platform Compatibility: Node.js can be used on a wide variety of systems, from Windows to Mac OS, Linux, and even mobile platforms.
JavaScript: Most developers already have a good understanding of JavaScript, how it works, and other basic and advanced concepts related to it. Node.js allows developers to use JavaScript for backend development. This is convenient because developers don't have to switch between multiple programming languages and can make full-stack projects by only knowing JavaScript.
Fast Data Streaming: Node.js is built on Google Chrome's V8 JavaScript engine, which makes your code run faster. The engine compiles JavaScript code into machine code. This allows Node.js to run significantly faster and provides fast data flow for web applications. Concepts like asynchronous programming and how it works with non-blocking I/O operations make Node.js efficient.
No buffering: Node.js works with data streams, which are aggregated data. Therefore, the user can get the data more easily and quickly because there is no need to wait for the entire operation to complete. It reduces the overall time required for processing. Because of this, there is little or no data buffering with Node.js.
Asynchronous: Node.js is asynchronous by default i.e. that a server built using Node.js does not need to wait for the date from an API. In other words, Node.js works in a non-blocking way, that does not block the execution of any further operation. Asynchronous and non-blocking I/O improves both response time and user experience.
This feature means that if a Node receives a request for some Input/Output operation, it will execute that operation in the background and continue with the processing of other requests. Thus it will not wait for the response from the previous requests.
What is Synchronous Code?
When we write a program in JavaScript, it executes line by line. When a line is completely executed, then and then only does the code move forward to execute the next line.
What is Asynchronous Code?
With asynchronous code, multiple tasks can execute at the same time while tasks in the background finish. This is what we call non-blocking code. The execution of other code won't stop while an asynchronous task finishes its work.
Event-driven: The concept of event-driven is similar to the concept of callback functions in asynchronous programming. In Node.js, callback functions, also known as event handlers, are executed when an event is triggered or completed. Callback functions require fewer resources on the server side and consume less memory. This feature of Node.js makes the application lightweight.
What is NPM?
NPM (Node Package Manager) is a package manager for Node.js that allows developers to easily install, manage, and share packages of code.
How to create a simple server in Node.js that returns Hello World?
/**
* Express.js
*/
const express = require('express');
const app = express();
app.get('/', function (req, res) {
res.send('Hello World!');
});
app.listen(3000, function () {
console.log('App listening on port 3000!');
});
Explain the concept of URL module in Node.js?
The URL module splits up a web address into readable parts.To include the URL module, use the require() method:var url = require('url');
Parse an address with the url.parse() method, and it will return a URL object with each part of the address as properties:

ExampleGet your own Node.js Server
Split a web address into readable parts:
var url = require('url');
var adr = 'http://localhost:8080/default.htm?year=2017&month=february';
var q = url.parse(adr, true);
console.log(q.host); //returns 'localhost:8080'
console.log(q.pathname); //returns '/default.htm'
console.log(q.search); //returns '?year=2017&month=february'
var qdata = q.query; //returns an object: { year: 2017, month: 'february' }
console.log(qdata.month); //returns 'february'
ts What are the data types in Node.js?
Just like JS, there are two categories of data types in Node: Primitives and Objects.
1. Primitives:
- String
- Number
- BigInt
- Boolean
- Undefined
- Null
- Symbol
2. Objects:
- Function
- Array
- Buffer
Explain String data type in Node.js?
Strings in Node.js are sequences of unicode characters. Strings can be wrapped in a single or double quotation marks. Javascript provide many functions to operate on string, like indexOf(), split(), substr(), length.
String functions:
Function Description charAt() It is useful to find a specific character present in a string. concat() It is useful to concat more than one string. indexOf() It is useful to get the index of a specified character or a part of the string. match() It is useful to match multiple strings. split() It is useful to split the string and return an array of string. join() It is useful to join the array of strings and those are separated by comma (,) operator.
Example:
/**
* String Data Type
*/
const str1 = "Hello";
const str2 = 'World';
console.log("Concat Using (+) :" , (str1 + ' ' + str2));
console.log("Concat Using Function :" , (str1.concat(str2)));
Explain Number data type in Node.js?
The number data type in Node.js is 64 bits floating point number both positive and negative. The parseInt() and parseFloat() functions are used to convert to number, if it fails to convert into a number then it returns NaN.
Example:
/**
* Number Data Type
*/
// Example 01:
const num1 = 10;
const num2 = 20;
console.log(`sum: ${num1 + num2}`);
// Example 02:
console.log(parseInt("32")); // 32
console.log(parseFloat("8.24")); // 8.24
console.log(parseInt("234.12345")); // 234
console.log(parseFloat("10")); // 10
// Example 03:
console.log(isFinite(10/5)); // true
console.log(isFinite(10/0)); // false
// Example 04:
console.log(5 / 0); // Infinity
console.log(-5 / 0); // -Infinity
Explain Boolean data type in Node.js?
Boolean data type is a data type that has one of two possible values, either true or false. In programming, it is used in logical representation or to control program structure.
The boolean() function is used to convert any data type to a boolean value. According to the rules, false, 0, NaN, null, undefined, empty string evaluate to false and other values evaluates to true.
Example:
/**
* Boolean Data Type
*/
// Example 01:
const isValid = true;
console.log(isValid); // true
// Example 02:
console.log(true && true); // true
console.log(true && false); // false
console.log(true || false); // true
console.log(false || false); // false
console.log(!true); // false
conso
Explain Undefined and Null data type in Node.js?
In node.js, if a variable is defined without assigning any value, then that will take undefined as value. If we assign a null value to the variable, then the value of the variable becomes null.
Example:
/**
* NULL and UNDEFINED Data Type
*/
let x;
console.log(x); // undefined
let y = null;
console.log(y); // null
Q. Explain Symbol data type in Node.js?
Symbol is an immutable primitive value that is unique. It's a very peculiar data type. Once you create a symbol, its value is kept private and for internal use.
Example:
/**
* Symbol Data Type
*/
const NAME = Symbol()
const person = {
[NAME]: 'Ritika Bhavsar'
}
person[NAME] // 'Ritika Bhavsar'
Q. Explain function in Node.js?
Functions are first class citizens in Node's JavaScript, similar to the browser's JavaScript. A function can have attributes and properties also. It can be treated like a class in JavaScript.
Example:
/**
* Function in Node.js
*/
function Messsage(name) {
console.log("Hello "+name);
}
Messsage("World"); // Hello Worldle.log(!false); // true
Q. Explain Buffer data type in Node.js?
Node.js includes an additional data type called Buffer ( not available in browser's JavaScript ). Buffer is mainly used to store binary data, while reading from a file or receiving packets over the network.
Example:
/**
* Buffer Data Type
*/
let b = new Buffer(10000);
let str = "----------";
b.write(str);
console.log( str.length ); // 10
console.log( b.length ); // 10000
Note: Buffer() is deprecated due to security and usability issues.
What are the core modules of Node.js?
Node.js has a set of core modules that are part of the platform and come with the Node.js installation. These modules can be loaded into the program by using the require function.
Syntax:
const module = require('module_name');
Example:
const http = require('http');
http.createServer(function (req, res) {
res.writeHead(200, {'Content-Type': 'text/html'});
res.write('Welcome to Node.js!');
res.end();
}).listen(3000);
The following table lists some of the important core modules in Node.js.
Name Description Assert It is used by Node.js for testing itself. It can be accessed with require('assert'). Buffer It is used to perform operations on raw bytes of data which reside in memory. It can be accessed with require('buffer') Child Process It is used by node.js for managing child processes. It can be accessed with require('child_process'). Cluster This module is used by Node.js to take advantage of multi-core systems, so that it can handle more load. It can be accessed with require('cluster'). Console It is used to write data to console. Node.js has a Console object which contains functions to write data to console. It can be accessed with require('console'). Crypto It is used to support cryptography for encryption and decryption. It can be accessed with require('crypto'). HTTP It includes classes, methods and events to create Node.js http server. URL It includes methods for URL resolution and parsing. Query String It includes methods to deal with query string. Path It includes methods to deal with file paths. File System It includes classes, methods, and events to work with file I/O. Util It includes utility functions useful for programmers. Zlib It is used to compress and decompress data. It can be accessed with require('zlib').
What are the global objects of Node.js?
Node.js Global Objects are the objects that are available in all modules. Global Objects are built-in objects that are part of the JavaScript and can be used directly in the application without importing any particular module.
These objects are modules, functions, strings and object itself as explained below.
1. global:
It is a global namespace. Defining a variable within this namespace makes it globally accessible.
var myvar;
2. process:
It is an inbuilt global object that is an instance of EventEmitter used to get information on current process. It can also be accessed using require() explicitly.
3. console:
It is an inbuilt global object used to print to stdout and stderr.
console.log("Hello World"); // Hello World
4. setTimeout(), clearTimeout(), setInterval(), clearInterval():
The built-in timer functions are globals
function printHello() {
console.log( "Hello, World!");
}
// Now call above function after 2 seconds
var timeoutObj = setTimeout(printHello, 2000);
5. __dirname:
It is a string. It specifies the name of the directory that currently contains the code.
console.log(__dirname);
6. __filename:
It specifies the filename of the code being executed. This is the resolved absolute path of this code file. The value inside a module is the path to that module file.
console.log(__filename);
What is Chrome V8?
Chrome V8 is a JavaScript engine, which means that it executes JavaScript code. Originally, JavaScript was written to be executed by web browsers. Chrome V8, or just V8, can execute JavaScript code either within or outside of a browser, which makes server-side scripting possible.
Like a V8 (eight-cylinder) car engine, Chrome V8 is fast and powerful. V8 translates JavaScript code directly into machine code* so that computers can actually understand it, then it executes the translated, or compiled, code. V8 optimizes JavaScript execution as well.
*Machine code is a language that CPUs can understand. It is purely digital, meaning made up of digits.
Q. How V8 compiles JavaScript code?Compilation is the process of converting human-readable code to machine code. There are two ways to compile the code
- Using an Interpreter: The interpreter scans the code line by line and converts it into byte code.
- Using a Compiler: The Compiler scans the entire document and compiles it into highly optimized byte code.
The V8 engine uses both a compiler and an interpreter and follows just-in-time (JIT) compilation to speed up the execution. JIT compiling works by compiling small portions of code that are just about to be executed. This prevents long compilation time and the code being compiles is only that which is highly likely to run.
What is EventEmitter in Node.js?
https://nodejs.dev/en/learn/the-nodejs-event-emitter/
If you worked with JavaScript in the browser, you know how much of the interaction of the user is handled through events: mouse clicks, keyboard button presses, reacting to mouse movements, and so on.
On the backend side, Node.js offers us the option to build a similar system using the events module.
This module, in particular, offers the EventEmitter class, which we'll use to handle our events.
You initialize that using
const EventEmitter = require('events');
const eventEmitter = new EventEmitter();
This object exposes, among many others, the on and emit methods.
emit is used to trigger an eventon is used to add a callback function that's going to be executed when the event is triggered
For example, let's create a start event, and as a matter of providing a sample, we react to that by just logging to the console:
eventEmitter.on('start', () => {
console.log('started');
});
When we run
eventEmitter.emit('start');
the event handler function is triggered, and we get the console log.
You can pass arguments to the event handler by passing them as additional arguments to emit():
eventEmitter.on('start', number => {
console.log(`started ${number}`);
});
eventEmitter.emit('start', 23);
Multiple arguments:
eventEmitter.on('start', (start, end) => {
console.log(`started from ${start} to ${end}`);
});
eventEmitter.emit('start', 1, 100);
The EventEmitter object also exposes several other methods to interact with events, like
once(): add a one-time listenerremoveListener() / off(): remove an event listener from an eventremoveAllListeners(): remove all listeners for an event
You can read more about these methods in the official documentation.
What is EventEmitter in Node.js?
The EventEmitter is a class that facilitates communication/interaction between objects in Node.js. The EventEmitter class can be used to create and handle custom events.
EventEmitter is at the core of Node asynchronous event-driven architecture. Many of Node's built-in modules inherit from EventEmitter including prominent frameworks like Express.js. An emitter object basically has two main features:
- Emitting name events.
- Registering and unregistering listener functions.
Example:
/**
* Callback Events with Parameters
*/
const events = require('events');
const eventEmitter = new events.EventEmitter();
function listener(code, msg) {
console.log(`status ${code} and ${msg}`);
}
eventEmitter.on('status', listener); // Register listener
eventEmitter.emit('status', 200, 'ok');
// Output
status 200 and ok
Q. How does the EventEmitter works in Node.js?
- Event Emitter emits the data in an event called message
- A Listened is registered on the event message
- when the message event emits some data, the listener will get the data

Building Blocks: https://nodejs.dev/en/api/v19/events/
- .emit() - this method in event emitter is to emit an event in module
- .on() - this method is to listen to data on a registered event in node.js
- .once() - it listen to data on a registered event only once.
- .addListener() - it checks if the listener is registered for an event.
- .removeListener() - it removes the listener for an event.

Example 01:
/**
* Callbacks Events
*/
const events = require('events');
const eventEmitter = new events.EventEmitter();
function listenerOne() {
console.log('First Listener Executed');
}
function listenerTwo() {
console.log('Second Listener Executed');
}
eventEmitter.on('listenerOne', listenerOne); // Register for listenerOne
eventEmitter.on('listenerOne', listenerTwo); // Register for listenerOne
// When the event "listenerOne" is emitted, both the above callbacks should be invoked.
eventEmitter.emit('listenerOne');
// Output
First Listener Executed
Second Listener Executed
Example 02:
/**
* Emit Events Once
*/
const events = require('events');
const eventEmitter = new events.EventEmitter();
function listenerOnce() {
console.log('listenerOnce fired once');
}
eventEmitter.once('listenerOne', listenerOnce); // Register listenerOnce
eventEmitter.emit('listenerOne');
// Output
listenerOnce fired once
What are the EventEmitter methods available in Node.js?
EventEmitter Methods Description .addListener(event, listener) Adds a listener to the end of the listeners array for the specified event. .on(event, listener) Adds a listener to the end of the listeners array for the specified event. It can also be called as an alias of emitter.addListener() .once(event, listener) This listener is invoked only the next time the event is fired, after which it is removed. .removeListener(event, listener) Removes a listener from the listener array for the specified event. .removeAllListeners([event]) Removes all listeners, or those of the specified event. .setMaxListeners(n) By default EventEmitters will print a warning if more than 10 listeners are added for a particular event. .getMaxListeners() Returns the current maximum listener value for the emitter which is either set by emitter.setMaxListeners(n) or defaults to EventEmitter.defaultMaxListeners. .listeners(event) Returns a copy of the array of listeners for the specified event. .emit(event[, arg1][, arg2][, ...]) Raise the specified events with the supplied arguments. .listenerCount(type) Returns the number of listeners listening to the type of event.
How the Event Loop Works in Node.js?
The event loop allows Node.js to perform non-blocking I/O operations despite the fact that JavaScript is single-threaded. It is done by offloading operations to the system kernel whenever possible.
Event Loop plays a major role in the execution of asynchronous functions The event loop plays a crucial role in scheduling which operations our only thread should be performing at any given point in time. Hence the event loop helps us to understand Node's asynchronous processes and its non-blocking I/O nature.
Node.js is a single-threaded application, but it can support concurrency via the concept of event and callbacks. Every API of Node.js is asynchronous and being single-threaded, they use async function calls to maintain concurrency. Node uses observer pattern. Node thread keeps an event loop and whenever a task gets completed, it fires the corresponding event which signals the event-listener function to execute.
Features of Event Loop:
- Event loop is an endless loop, which waits for tasks, executes them and then sleeps until it receives more tasks.
- The event loop executes tasks from the event queue only when the call stack is empty i.e. there is no ongoing task.
- The event loop allows us to use callbacks and promises.
- The event loop executes the tasks starting from the oldest first.

Example:
/**
* Event loop in Node.js
*/
const events = require('events');
const eventEmitter = new events.EventEmitter();
// Create an event handler as follows
const connectHandler = function connected() {
console.log('connection succesful.');
eventEmitter.emit('data_received');
}
// Bind the connection event with the handler
eventEmitter.on('connection', connectHandler);
// Bind the data_received event with the anonymous function
eventEmitter.on('data_received', function() {
console.log('data received succesfully.');
});
// Fire the connection event
eventEmitter.emit('connection');
console.log("Program Ended.");
// Output
Connection succesful.
Data received succesfully.
Program Ended.
How are event listeners created in Node.JS?
An array containing all eventListeners is maintained by Node. Each time .on() function is executed, a new event listener is added to that array. When the concerned event is emitted, each eventListener that is present in the array is called in a sequential or synchronous manner.
The event listeners are called in a synchronous manner to avoid logical errors, race conditions etc. The total number of listeners that can be registered for a particular event, is controlled by .setMaxListeners(n). The default number of listeners is 10.
emitter.setMaxlisteners(12);
The Event Loop - A Quick Primer
Node.js is a single-threaded, event-driven platform that can run non-blocking, asynchronous code. These Node.js features make it memory efficient. Even though JavaScript is single-threaded, the event loop enables Node.js to perform non-blocking I/O operations. It is accomplished by delegating tasks to the operating system whenever and wherever possible.
Because most operating systems are multi-threaded, they can handle multiple operations that are running in the background. When one of these operations is finished, the kernel notifies Node.js, and the callback associated with that operation is added to the event queue, where it will eventually be executed.
Features of Event Loop:
- An event loop is an infinite loop that waits for tasks, executes them, and then sleeps until more tasks are received.
- When the call stack is empty, i.e., there are no ongoing tasks, the event loop executes tasks from the event queue.
- We can use callbacks and promises in the event loop.
- The event loop executes the tasks in reverse order, beginning with the oldest.
Example:
console.log("One");
setTimeout(function(){
console.log("Two");
}, 1000);
console.log("Three");Output:
One
Three
Two
The first console log statement is pushed to the call stack in the above example, and "One" is logged on the console before the task is popped from the stack. Following that, the setTimeout is added to the queue, the task is sent to the operating system, and the task's timer is set. After that, this task is removed from the stack. The third console log statement is then pushed to the call stack, "Three" is logged on the console, and the task is removed from the stack.
Timers in JavaScript
A timer is used in JavaScript to execute a task or function at a specific time. The timer is essentially used to delay the execution of the program or to execute the JavaScript code at regular intervals. You can delay the execution of the code by using a timer. As a result, when an event occurs or a page loads, the code does not complete its execution at the same time.
Advertisement banners on websites, which change every 2-3 seconds, are the best example of a timer. These advertising banners are rotated at regular intervals on websites such as Flipkart. To change them, you set a time interval.
JavaScript provides two timer functions, setInterval() and setTimeout(), which help to delay code execution and allow one or more operations to be performed repeatedly.
setTimeout():
The setTimeout() function allows users to postpone the execution of code. The setTimeout() method accepts two parameters, one of which is a user-defined function, and the other is a time parameter to delay execution. The time parameter, which is optional to pass, stores the time in milliseconds (1 second = 1000 milliseconds).
setInterval():
The setInterval method is similar to the setTimeout() function in some ways. It repeats the specified function after a time interval. Alternatively, you can say that a function is executed repeatedly after a certain amount of time specified by the user in this function.
Timers in Node.js - setTimeout()
https://www.knowledgehut.com/blog/web-development/how-to-use-timers-in-nodejssetTimeout() can be used to execute code after a specified number of milliseconds. This function is equivalent to window. setTimeout() from the browser JavaScript API, but no code string can be passed to be executed.
setTimeout() takes a function to execute as the first argument and a millisecond delay defined as a number as the second. Additional arguments may be provided, and these will be passed to the function. As an example, consider the following:
Using setTimeout()
The timeout interval is not guaranteed to execute after that exact number of milliseconds. This is because any other code that blocks or holds onto the event loop will delay the execution of the timeout. The only guarantee is that the timeout will not be executed sooner than the timeout interval specified.
setTimeout(function A() {
return console.log('Hello World!');
}, 2000);
console.log('Executed before A');

clearTimeout():
The clearTimeout() method deactivates a timer that was previously set with the setTimeout() method.
The ID value returned by setTimeout() is passed to the clearTimeout() method as a parameter.
Syntax:
clearTimeout(id_of_settimeout)
Example:
function welcome () {
console.log("Welcome to Knowledgehut!");
}
var id1 = setTimeout(welcome,1000);
var id2 = setInterval(welcome,1000);
clearTimeout(id1);

Timers in Node.js - setImmediate()
To execute code at the end of the loop cycle, use the setImmediate() method. In layman's terms, this method divides tasks that take longer to complete, in order to run a callback function that is triggered by other operations such as events.
Syntax:
let immediateId = setImmediate(callbackFunction, [param1, param2, ...]);
let immediateId = setImmediate(callbackFunction);
The function to be executed will be the first argument to setImmediate(). When the function is executed, any additional arguments will be passed to it.
Now consider the difference between setImmediate() and process. nextTick(), as well as when to use which.
While processing, setImmediate() is executed in the Check handlers phase. process.nextTick() is called at the start of the event loop and at the end of each phase.
process.nextTick() has higher priority than setImmediate():
setImmediate(() => console.log('I run immediately'))
process.nextTick(() => console.log('But I run before that'))Output:

Using setImmediate()
Multiple setImmediate functions are called in the following example. When you do this, the callback functions are queued for execution in the order in which they are created. After each event loop iteration, the entire callback queue is processed. If an immediate timer is queued from within an executing callback, it will not be triggered until the next iteration of the event loop. To kick-start your web development career, enroll in the best Online Courses for Web Development.
Example:
setImmediate(function A() {
setImmediate(function B() {
console.log(1);
setImmediate(function D() {
console.log(2);
});
});
setImmediate(function C() {
console.log(3);
setImmediate(function E() {
console.log(4);
});
});
});
console.log('Started');

clearImmediate():
The clearImmediate function is used to remove the function call that was scheduled by the setImmediate function. Both of these functions can be found in Node.js's Timers module.
Example:
console.log("Before the setImmediate call")
let timerID = setImmediate(() => {console.log("Hello, World")});
console.log("After the setImmediate call")
clearImmediate(timerID);

Timers in Node.js - setInterval()
This method, unlike setTimeout(), is used to execute code multiple times. For example, the company may send out weekly newsletters to its Edge as a Service customer. This is where the setInterval() method comes into play. It is an infinite loop that will continue to execute as long as it is not terminated (or halted).
As the second argument, setInterval() accepts a function argument that will run an infinite number of times with a given millisecond delay. In the same way that setTimeout() accepts additional arguments beyond the delay, these will be passed on to the function call. The delay, like setTimeout(), cannot be guaranteed due to operations that may stay in the event loop and should thus be treated as an approximation.
Syntax:
let intervalId = setInterval(callbackFunction, [delay, argument1, argument2, ...]); //option 1
let intervalId = setInterval(callbackFunction[, delayDuration]); // option 2
let intervalId = setInterval(code, [delayDuration]); //option 3
Using setInterval()
Example:
setInterval(function A() {
return console.log('Hello World!');
}, 1000);
// Executed right away
console.log('Executed before A');
setInterval(), like setTimeout() returns a Timeout object that can be used to reference and modify the interval that was set.
In the above example, function A() will execute after every 1000 milliseconds.
clearInterval():
Example:
var si = setInterval(function A() {
return console.log("Hello World!");
}, 1000);
setTimeout(function() {
clearInterval(si);
}, 4000);

Using Timer.unref()
The timer module is used to schedule functions that will be called later. Because it is a global API, there is no need to import (require("timers")) to use it.
The Timeout Class contains an object (setTimeout()/setInterval()) that is created internally to schedule actions, and (clearTimeout()/clearInterval()) that can be passed to cancel those scheduled actions. When a timeout is set, the Node.js event loop will continue to run until clearTimeout() is called. The setTimeout() method returns timeout objects that can be used to control this default behaviour, and it exports both the timeout.ref() and timeout.unref() functions.
timeout.ref():
When the Timeout is active and (timeout.ref()) is called, it requests that the Node.js event loop not exit for an extended period of time. In any case, calling this Method multiple times has no effect.
Syntax:
timeout.ref()
timeout.unref():
When the Timeout is enabled, the Node.js event loop is not required to remain active. If any other activity keeps the event loop running, the Timeout object's callback is invoked after the process exits. In any case, calling this Method multiple times has no effect.
Syntax:
timeout.unref()
Example:
var Timeout = setTimeout(function alfa() {
console.log("0.> Setting Timeout", 12);
});
console.log("1 =>", Timeout.ref());
Timeout.unref()
Timeout.ref()
console.log("2 =>", Timeout.unref());
clearTimeout(Timeout);
console.log("3 => Printing after clearing Timeout"); Output:

What is the difference between process.nextTick() and setImmediate()?
1. process.nextTick():
The process.nextTick() method adds the callback function to the start of the next event queue. It is to be noted that, at the start of the program process.nextTick() method is called for the first time before the event loop is processed.
2. setImmediate():
The setImmediate() method is used to execute a function right after the current event loop finishes. It is callback function is placed in the check phase of the next event queue.
Example:
/**
* setImmediate() and process.nextTick()
*/
setImmediate(() => {
console.log("1st Immediate");
});
setImmediate(() => {
console.log("2nd Immediate");
});
process.nextTick(() => {
console.log("1st Process");
});
process.nextTick(() => {
console.log("2nd Process");
});
// First event queue ends here
console.log("Program Started");
// Output
Program Started
1st Process
2nd Process
1st Immediate
2nd Immediate
What is callback function in Node.js?
A callback is a function which is called when a task is completed, thus helps in preventing any kind of blocking and a callback function allows other code to run in the meantime.
Callback is called when task get completed and is asynchronous equivalent for a function. Using Callback concept, Node.js can process a large number of requests without waiting for any function to return the result which makes Node.js highly scalable.
What is a Callback?
A callback function is a simple javascript function that is passed as an argument to another function and is executed when the other function has completed its execution. In layman's terms, a callback is generally used as a parameter to another function. Callbacks in Node.js are so common that you probably used callbacks yourself without understanding that they are called callbacks.
Example:
/**
* Callback Function
*/
function message(name, callback) {
console.log("Hi" + " " + name);
callback();
}
// Callback function
function callMe() {
console.log("I am callback function");
}
// Passing function as an argument
message("Node.JS", callMe);
Output:
Hi Node.JS
I am callback function
What are the difference between Events and Callbacks?
1. Events:
Node.js events module which emits named events that can cause corresponding functions or callbacks to be called. Functions ( callbacks ) listen or subscribe to a particular event to occur and when that event triggers, all the callbacks subscribed to that event are fired one by one in order to which they were registered.
All objects that emit events are instances of the EventEmitter class. The event can be emitted or listen to an event with the help of EventEmitter
Example:
/**
* Events Module
*/
const event = require('events');
const eventEmitter = new event.EventEmitter();
// add listener function for Sum event
eventEmitter.on('Sum', function(num1, num2) {
console.log('Total: ' + (num1 + num2));
});
// call event
eventEmitter.emit('Sum', 10, 20);
// Output
Total: 30
2. Callbacks:
A callback function is a function passed into another function as an argument, which is then invoked inside the outer function to complete some kind of routine or action.
Example:
/**
* Callbacks
*/
function sum(number) {
console.log('Total: ' + number);
}
function calculator(num1, num2, callback) {
let total = num1 + num2;
callback(total);
}
calculator(10, 20, sum);
// Output
Total: 30
Callback functions are called when an asynchronous function returns its result, whereas event handling works on the observer pattern. The functions that listen to events act as Observers. Whenever an event gets fired, its listener function starts executing. Node.js has multiple in-built events available through events module and EventEmitter class which are used to bind events and event-listeners
What is callback hell in Node.js?
The callback hell contains complex nested callbacks. Here, every callback takes an argument that is a result of the previous callbacks. In this way, the code structure looks like a pyramid, making it difficult to read and maintain. Also, if there is an error in one function, then all other functions get affected.
An asynchronous function is one where some external activity must complete before a result can be processed; it is "asynchronous" in the sense that there is an unpredictable amount of time before a result becomes available. Such functions require a callback function to handle errors and process the result.
Example:
/**
* Callback Hell
*/
firstFunction(function (a) {
secondFunction(a, function (b) {
thirdFunction(b, function (c) {
// And so on…
});
});
});
How to avoid callback hell in Node.js?
1. Managing callbacks using Async.js:
Async is a really powerful npm module for managing asynchronous nature of JavaScript. Along with Node.js, it also works for JavaScript written for browsers.
Async provides lots of powerful utilities to work with asynchronous processes under different scenarios.
npm install --save async
2. Managing callbacks hell using promises:
Promises are alternative to callbacks while dealing with asynchronous code. Promises return the value of the result or an error exception. The core of the promises is the .then() function, which waits for the promise object to be returned.
The .then() function takes two optional functions as arguments and depending on the state of the promise only one will ever be called. The first function is called when the promise if fulfilled (A successful result). The second function is called when the promise is rejected.
Example:
/**
* Promises
*/
const myPromise = new Promise((resolve, reject) => {
setTimeout(() => {
resolve("Successful!");
}, 300);
});
3. Using Async Await:
Async await makes asynchronous code look like it's synchronous. This has only been possible because of the reintroduction of promises into node.js. Async-Await only works with functions that return a promise.
Example:
/**
* Async Await
*/
const getrandomnumber = function(){
return new Promise((resolve, reject)=>{
setTimeout(() => {
resolve(Math.floor(Math.random() * 20));
}, 1000);
});
}
const addRandomNumber = async function(){
const sum = await getrandomnumber() + await getrandomnumber();
console.log(sum);
}
addRandomNumber();
What is typically the first argument passed to a callback handler?
The first parameter of the callback is the error value. If the function hits an error, then they typically call the callback with the first parameter being an Error object.
Example:
/**
* Callback Handler
*/
const Division = (numerator, denominator, callback) => {
if (denominator === 0) {
callback(new Error('Divide by zero error!'));
} else {
callback(null, numerator / denominator);
}
};
// Function Call
Division(5, 0, (err, result) => {
if (err) {
return console.log(err.message);
}
console.log(`Result: ${result}`);
});
Q. What are the timing features of Node.js?
The Timers module in Node.js contains functions that execute code after a set period of time. Timers do not need to be imported via require(), since all the methods are available globally to emulate the browser JavaScript API.
Some of the functions provided in this module are
1. setTimeout():
This function schedules code execution after the assigned amount of time ( in milliseconds ). Only after the timeout has occurred, the code will be executed. This method returns an ID that can be used in clearTimeout() method.
Syntax:
setTimeout(callback, delay, args )
Example:
function printMessage(arg) {
console.log(`${arg}`);
}
setTimeout(printMessage, 1000, 'Display this Message after 1 seconds!');
2. setImmediate():
The setImmediate() method executes the code at the end of the current event loop cycle. The function passed in the setImmediate() argument is a function that will be executed in the next iteration of the event loop.
Syntax:
setImmediate(callback, args)
Example:
// Setting timeout for the function
setTimeout(function () {
console.log('setTimeout() function running...');
}, 500);
// Running this function immediately before any other
setImmediate(function () {
console.log('setImmediate() function running...');
});
// Directly printing the statement
console.log('Normal statement in the event loop');
// Output
// Normal statement in the event loop
// setImmediate() function running...
// setTimeout() function running...
3. setInterval():
The setInterval() method executes the code after the specified interval. The function is executed multiple times after the interval has passed. The function will keep on calling until the process is stopped externally or using code after specified time period. The clearInterval() method can be used to prevent the function from running.
Syntax:
setInterval(callback, delay, args)
Example:
setInterval(function() {
console.log('Display this Message intervals of 1 seconds!');
}, 1000);
How to implement a sleep function in Node.js?
One way to delay execution of a function in Node.js is to use async/await with promises to delay execution without callbacks function. Just put the code you want to delay in the callback. For example, below is how you can wait 1 second before executing some code.
Example:
function delay(time) {
return new Promise((resolve) => setTimeout(resolve, time));
}
async function run() {
await delay(1000);
console.log("This printed after about 1 second");
}
run();
Node.js as a File Server
The Node.js file system module allows you to work with the file system on your computer.
To include the File System module, use the require() method:
var fs = require('fs');Common use for the File System module:
- Read files
- Create files
- Update files
- Delete files
- Rename files
Read Files
The fs.readFile() method is used to read files on your computer.
Assume we have the following HTML file (located in the same folder as Node.js):
demofile1.html
<html>
<body>
<h1>My Header</h1>
<p>My paragraph.</p>
</body>
</html>Create a Node.js file that reads the HTML file, and return the content:
ExampleGet your own Node.js Server
var http = require('http');
var fs = require('fs');
http.createServer(function (req, res) {
fs.readFile('demofile1.html', function(err, data) {
res.writeHead(200, {'Content-Type': 'text/html'});
res.write(data);
return res.end();
});
}).listen(8080);Save the code above in a file called "demo_readfile.js", and initiate the file:
Initiate demo_readfile.js:
C:\Users\Your Name>node demo_readfile.jsIf you have followed the same steps on your computer, you will see the same result as the example: http://localhost:8080
ADVERTISEMENT
Create Files
The File System module has methods for creating new files:
fs.appendFile()fs.open()fs.writeFile()
The fs.appendFile() method appends specified content to a file. If the file does not exist, the file will be created:
Example
Create a new file using the appendFile() method:
var fs = require('fs');
fs.appendFile('mynewfile1.txt', 'Hello content!', function (err) {
if (err) throw err;
console.log('Saved!');
});The fs.open() method takes a "flag" as the second argument, if the flag is "w" for "writing", the specified file is opened for writing. If the file does not exist, an empty file is created:
Example
Create a new, empty file using the open() method:
var fs = require('fs');
fs.open('mynewfile2.txt', 'w', function (err, file) {
if (err) throw err;
console.log('Saved!');
});The fs.writeFile() method replaces the specified file and content if it exists. If the file does not exist, a new file, containing the specified content, will be created:
Example
Create a new file using the writeFile() method:
var fs = require('fs');
fs.writeFile('mynewfile3.txt', 'Hello content!', function (err) {
if (err) throw err;
console.log('Saved!');
});
Update Files
The File System module has methods for updating files:
fs.appendFile()fs.writeFile()
The fs.appendFile() method appends the specified content at the end of the specified file:
Example
Append "This is my text." to the end of the file "mynewfile1.txt":
var fs = require('fs');
fs.appendFile('mynewfile1.txt', ' This is my text.', function (err) {
if (err) throw err;
console.log('Updated!');
});The fs.writeFile() method replaces the specified file and content:
Example
Replace the content of the file "mynewfile3.txt":
var fs = require('fs');
fs.writeFile('mynewfile3.txt', 'This is my text', function (err) {
if (err) throw err;
console.log('Replaced!');
});
Delete Files
To delete a file with the File System module, use the fs.unlink() method.
The fs.unlink() method deletes the specified file:
Example
Delete "mynewfile2.txt":
var fs = require('fs');
fs.unlink('mynewfile2.txt', function (err) {
if (err) throw err;
console.log('File deleted!');
});
Rename Files
To rename a file with the File System module, use the fs.rename() method.
The fs.rename() method renames the specified file:
Example
Rename "mynewfile1.txt" to "myrenamedfile.txt":
var fs = require('fs');
fs.rename('mynewfile1.txt', 'myrenamedfile.txt', function (err) {
if (err) throw err;
console.log('File Renamed!');
}); How Node.js read the content of a file?
The "normal" way in Node.js is probably to read in the content of a file in a non-blocking, asynchronous way. That is, to tell Node to read in the file, and then to get a callback when the file-reading has been finished. That would allow us to handle several requests in parallel.
Common use for the File System module:
- Read files
- Create files
- Update files
- Delete files
- Rename files
Example: Read Files
<!-- index.html -->
<html>
<body>
<h1>File Header</h1>
<p>File Paragraph.</p>
</body>
</html>
/**
* read_file.js
*/
const http = require('http');
const fs = require('fs');
http.createServer(function (req, res) {
fs.readFile('index.html', function(err, data) {
res.writeHead(200, {'Content-Type': 'text/html'});
res.write(data);
res.end();
});
}).listen(3000);
How many types of streams are present in node.js?
Streams are objects that let you read data from a source or write data to a destination in continuous fashion. There are four types of streams
- Readable − Stream which is used for read operation.
- Writable − Stream which is used for write operation.
- Duplex − Stream which can be used for both read and write operation.
- Transform − A type of duplex stream where the output is computed based on input.
Each type of Stream is an EventEmitter instance and throws several events at different instance of times.
Methods:
- data − This event is fired when there is data is available to read.
- end − This event is fired when there is no more data to read.
- error − This event is fired when there is any error receiving or writing data.
- finish − This event is fired when all the data has been flushed to underlying system.
1. Reading from a Stream:
const fs = require("fs");
let data = "";
// Create a readable stream
const readerStream = fs.createReadStream("file.txt");
// Set the encoding to be utf8.
readerStream.setEncoding("UTF8");
// Handle stream events --> data, end, and error
readerStream.on("data", function (chunk) {
data += chunk;
});
readerStream.on("end", function () {
console.log(data);
});
readerStream.on("error", function (err) {
console.log(err.stack);
});
2. Writing to a Stream:
const fs = require("fs");
const data = "File writing to a stream example";
// Create a writable stream
const writerStream = fs.createWriteStream("file.txt");
// Write the data to stream with encoding to be utf8
writerStream.write(data, "UTF8");
// Mark the end of file
writerStream.end();
// Handle stream events --> finish, and error
writerStream.on("finish", function () {
console.log("Write completed.");
});
writerStream.on("error", function (err) {
console.log(err.stack);
});
3. Piping the Streams:
Piping is a mechanism where we provide the output of one stream as the input to another stream. It is normally used to get data from one stream and to pass the output of that stream to another stream. There is no limit on piping operations.
const fs = require("fs");
// Create a readable stream
const readerStream = fs.createReadStream('input.txt');
// Create a writable stream
const writerStream = fs.createWriteStream('output.txt');
// Pipe the read and write operations
// read input.txt and write data to output.txt
readerStream.pipe(writerStream);
4. Chaining the Streams:
Chaining is a mechanism to connect the output of one stream to another stream and create a chain of multiple stream operations. It is normally used with piping operations.
const fs = require("fs");
const zlib = require('zlib');
// Compress the file input.txt to input.txt.gz
fs.createReadStream('input.txt')
.pipe(zlib.createGzip())
.pipe(fs.createWriteStream('input.txt.gz'));
console.log("File Compressed.");
Node.js multithreading: Worker threads and why they matter
10 min read

Editor’s note: This post was updated on 18 January 2022 to include some new information about the Web Workers API and web workers in general, improve and add definitions of key terms, and reflect stable support for the worker_threads module.
Since the release of Node.js v10.5.0, there’s a new worker_threads module available, which has been stable since Node.js v12 LTS.
What exactly is this Worker thread module, and why do we need it? In this post, we will discuss Worker threads alongside:
- The historical reasons concurrency is implemented in JavaScript and Node.js
- The problems we might find and their current solutions
- The future of parallel processing with Worker threads
The history of single-threaded JavaScript
JavaScript was conceived as a single-threaded programming language that ran in a browser. Being single-threaded means that only one set of instructions is executed at any time in the same process (the browser, in this case, or just the current tab in modern browsers).
This made things easier for developers because JavaScript was initially a language that was only useful for adding interaction to webpages, form validations, and so on — nothing that required the complexity of multithreading.
Ryan Dahl saw this limitation as an opportunity when he created Node.js. He wanted to implement a server-side platform based on asynchronous I/O to avoid a need for threads and make things a lot easier.
But concurrency can be a very hard problem to solve. Having many threads accessing the same memory can produce race conditions that are very hard to reproduce and fix.
Is Node.js single-threaded?
Our Node.js applications are only sort of single-threaded, in reality. We can run things in parallel, but we don’t create threads or sync them. The virtual machine and the operating system run the I/O in parallel for us, and when it’s time to send data back to our JavaScript code, it’s the JavaScript that runs in a single thread.
In other words, everything runs in parallel except for our JavaScript code. Synchronous blocks of JavaScript code are always run one at a time:
let flag = false
function doSomething() {
flag = true
// More code (that doesn't change `flag`)...
// We can be sure that `flag` here is true.
// There's no way another code block could have changed
// `flag` since this block is synchronous.
}
This is great if all we do is asynchronous I/O. Our code consists of small portions of synchronous blocks that run fast and pass data to files and streams, so our JavaScript code is so fast that it doesn’t block the execution of other pieces of JavaScript.
A lot more time is spent waiting for I/O events to happen than JavaScript code being executed. Let’s see this with a quick example:
db.findOne('SELECT ... LIMIT 1', function(err, result) {
if (err) return console.error(err)
console.log(result)
})
console.log('Running query')
setTimeout(function() {
console.log('Hey there')
}, 1000)
Maybe this database query takes a minute, but the “Running query” message will be shown immediately after invoking the query. And we will see the “Hey there” message a second after invoking the query regardless of whether the query is still running or not.
Our Node.js application just invokes the function and does not block the execution of other pieces of code. It will get notified through the callback when the query is done, and we will receive the result.
The need for threads to perform CPU-intensive tasks
What happens if we need to do synchronous-intense stuff, such as making complex calculations in memory in a large dataset? Then we might have a synchronous block of code that takes a lot of time and will block the rest of the code.
Imagine that a calculation takes 10 seconds. If we are running a web server, that means that all of the other requests get blocked for at least 10s because of that calculation. That’s a disaster; anything more than 100ms could be too much.
JavaScript and Node.js were not meant to be used for CPU-bound tasks. Since JavaScript is single-threaded, this will freeze the UI in the browser and queue any I/O events in Node.js.
Going back to our previous example, imagine we now have a query that returns a few thousand results and we need to decrypt the values in our JavaScript code:
db.findAll('SELECT ...', function(err, results) {
if (err) return console.error(err)
// Heavy computation and many results
for (const encrypted of results) {
const plainText = decrypt(encrypted)
console.log(plainText)
}
})
We will get the results in the callback once they are available. Then, no other JavaScript code is executed until our callback finishes its execution.
Usually, as we said before, the code is minimal and fast enough, but in this case, we have many results and we need to perform heavy computations on them. This might take a few seconds, and any other JavaScript execution will be queued during that time, which means we might be blocking all our users during that time if we are running a server in the same application.
Why we will never have multithreading in JavaScript
So, at this point, many people might think our solution should be to add a new module in the Node.js core and allow us to create and sync threads.
But that isn’t possible.If we add threads to JavaScript, then we are changing the nature of the language. We cannot just add threads as a new set of classes or functions available — we’d probably need to change the language to support multithreading. Languages that currently support it have keywords such as synchronized in order to enable threads to cooperate.
It’s a shame we don’t have a nice way of solving this use case in a mature server-side platform such as Node.js. In Java, for example, even some numeric types are not atomic; if you don’t synchronize their access, you could end up having two threads change the value of a variable.
The result would be that, after both threads have accessed the variable, it has a few bytes changed by one thread and a few bytes changed by the other thread — and, thus, will not result in any valid value.
The naive solution: Synchronous code-splitting
Node.js won’t evaluate the next code block in the event queue until the previous one has finished executing. So, one simple thing we can do is split our code into smaller synchronous code blocks and call setImmediate(callback) to tell Node.js we are done. This way, it can continue executing things that are pending in the queue; or, in other words, it can move on to the next iteration (or “tick”) of the event loop.
Let’s see how we can refactor some code from our previous example to take advantage of this. Imagine we have a large array that we want to process, and every item in the array requires CPU-intensive processing:
const arr = [/*large array*/]
for (const item of arr) {
// do heavy stuff for each item on the array
}
// code that runs after the whole array is executed
Like we said before, if we do this, it will take too much time to process the whole array and the rest of the JavaScript execution will be blocked. Let’s split this into smaller chunks and use setImmediate(callback):
const crypto = require('crypto')
const arr = new Array(200).fill('something')
function processChunk() {
if (arr.length === 0) {
// code that runs after the whole array is executed
} else {
console.log('processing chunk');
// pick 10 items and remove them from the array
const subarr = arr.splice(0, 10)
for (const item of subarr) {
// do heavy stuff for each item on the array
doHeavyStuff(item)
}
// Put the function back in the queue
setImmediate(processChunk)
}
}
processChunk()
function doHeavyStuff(item) {
crypto.createHmac('sha256', 'secret').update(new Array(10000).fill(item).join('.')).digest('hex')
}
// This is just for confirming that we can continue
// doing things
let interval = setInterval(() => {
console.log('tick!')
if (arr.length === 0) clearInterval(interval)
}, 0)
Now, we can process 10 items each time the event loop runs and call setImmediate(callback) so that if there’s something else the program needs to do, it will do it in between those chunks of 10 items. I’ve added a setInterval() for demonstrating exactly that.
More great articles from LogRocket:
- Don't miss a moment with The Replay, a curated newsletter from LogRocket
- Learn how LogRocket's Galileo cuts through the noise to proactively resolve issues in your app
- Use React's useEffect to optimize your application's performance
- Switch between multiple versions of Node
- Discover how to animate your React app with AnimXYZ
- Explore Tauri, a new framework for building binaries
- Advisory boards aren’t just for executives. Join LogRocket’s Content Advisory Board. You’ll help inform the type of content we create and get access to exclusive meetups, social accreditation, and swag.
As you can see, the code gets more complicated. And many times, the algorithm is a lot more complex than this, so it’s hard to know where to put the setImmediate() to find a good balance. Besides, the code now is asynchronous, and if we depend on third-party libraries, we might not be able to split the execution into smaller chunks.
Running parallel processes in the background, without threads
So, setImmediate() is sufficient for some simple use cases, but it’s far from an ideal solution. Can we do parallel processing without threads? Yes!
What we need is some kind of background processing, a way of running a task with input that could use whatever amount of CPU and time it needs to return a result back to the main application. Something like this:
// Runs `script.js` in a new environment without sharing memory.
const service = createService('script.js')
// We send an input and receive an output
service.compute(data, function(err, result) {
// result available here
})
The reality is that we can already do background processing in Node.js: we can fork the process and do exactly that using message passing, which you can imagine as simply as passing a message from one process to another. This achieves the following goals:
- The main process can communicate with the child process by sending and receiving events
- No memory is shared
- All the data exchanged is “cloned,” meaning that changing it in one side doesn’t change it on the other side
- If we don’t share memory, we don’t have race conditions, and we don’t need threads!
Well, hold on. This is a solution, but it’s not the ideal solution. Forking a process is expensive and slow — it means running a new virtual machine from scratch and using a lot of memory, since processes don’t share memory.
Can we reuse the same forked process? Sure, but sending different heavy, synchronously-executed workloads inside the forked process creates two problems:
- You may not blocking the main app, but the forked process will only be able to process one task at a time
- If one task crashes the process, it will leave all tasks sent to the same process unfinished
If you have two tasks — one that will take 10s and one that will take 1s, in that order — it’s not ideal to have to wait 10s to execute the second task. It’s even less ideal if that task never reaches execution because another process got in its way.
Since we are forking processes, we want to take advantage of our OS’s scheduling and all the cores of our machine. The same way you can listen to music and browse the internet at the same time, you can fork two processes and execute all the tasks in parallel.
In order to fix these problems, we need multiple forks, not only one. But we need to limit the number of forked processes because each one will have all the virtual machine code duplicated in memory, meaning a few MBs per process and a non-trivial boot time.
Using worker-farm to pool threads
Like with database connections, we need a pool of processes that are ready to be used, run a task at a time in each one, and reuse the process once the task has finished. This looks complex to implement, and it would be if we were building it from scratch!
Let’s use worker-farm to help us out instead:
// main app
const workerFarm = require('worker-farm')
const service = workerFarm(require.resolve('./script'))
service('hello', function (err, output) {
console.log(output)
})
// script.js
// This will run in forked processes
module.exports = (input, callback) => {
callback(null, input + ' ' + world)
}
So, problem solved? Well, while we have solved the problem, we are still using a lot more memory than a multithreaded solution.
Threads are still very lightweight in terms of resources compared to forked processes. This is the reason why Worker threads were born.
What are Worker threads?
Worker threads have isolated contexts. They exchange information with the main process using message passing, so we avoid the race conditions problem regular threads have! But they do live in the same process, so they use a lot less memory.
You can share memory with Worker threads and pass ArrayBuffer or SharedArrayBuffer objects that are specifically meant for that. Only use them if you need to do CPU-intensive tasks with large amounts of data. Some examples of CPU-intensive tasks with Node workers are discussed in this article. They allow you to avoid a need for data serialization.
Using Worker threads for multiple tasks
You can start using the worker_threads module today if you run Node.js ≥ v10.5.0. If you’re using any version ≤ 11.7.0, however, you need to enable it by using the --experimental-worker flag when invoking Node.js.
Keep in mind that creating a Worker — even though it’s a lot cheaper than forking a process — can also use too many resources depending on your needs. In that case, the docs recommend you create a pool of Workers.
You can probably look for a generic pool implementation or a specific one in npm instead of creating your own pool implementation. Node.js provides AsyncResource to provide proper async tracking of a worker pool.
Let’s see a simple example. First, we’ll implement the main file, create a Worker thread, and give it some data. The API is event-driven, but I’m going to wrap it into a promise that resolves in the first message received from the Worker:
// index.js
// run with node --experimental-worker index.js on Node.js 10.x
const { Worker } = require('worker_threads')
function runService(workerData) {
return new Promise((resolve, reject) => {
const worker = new Worker('./service.js', { workerData });
worker.on('message', resolve);
worker.on('error', reject);
worker.on('exit', (code) => {
if (code !== 0)
reject(new Error(`Worker stopped with exit code ${code}`));
})
})
}
async function run() {
const result = await runService('world')
console.log(result);
}
run().catch(err => console.error(err))
As you can see, this is as easy as passing the filename as an argument and the data we want the Worker to process. Remember that this data is cloned and is not in any shared memory.
When we’re finished, we wait for the Worker thread to send us a message by listening to the message event. Implement the service:
const { workerData, parentPort } = require('worker_threads')
// You can do any heavy stuff here, in a synchronous way
// without blocking the "main thread"
parentPort.postMessage({ hello: workerData })
Here, we need two things: the workerData that the main app sent to us and a way to return information to the main app. This is done with the parentPort that has a postMessage method where we will pass the result of our processing.
That’s it! This is the simplest example, but we can yet build more complex things — for example, we could send multiple messages from the Worker thread indicating the execution status if we need to provide feedback.
Or we can send partial results. Imagine that you are processing thousands of images. Maybe you want to send a message per image processed, but you don’t want to wait until all of them are processed.
In order to run the example, remember to use the --experimental-worker flag if you are using any version prior to Node.js 11.7:
node --experimental-worker index.js
For additional information, check out the worker_threads documentation.
What is the Web Workers API?
Maybe you’ve heard of the Web Workers API. The API is different from worker_threads because the needs and technical conditions are different, but they can solve similar problems in the browser runtime.
The Web Workers API is more mature and is well supported by modern browsers. It can be useful if you are doing crypto mining, compressing/decompressing, image manipulation, computer vision (e.g., face recognition), etc. in your web application.
Introducing: Partytown
Web workers can also be used to run third-party scripts. Running heavy scripts from the main thread can cause UX issues on your site, which isn’t ideal, but running a script apart from the main thread can create issues, as we directly don’t have access to the main thread APIs like window, document, or localStorage.
Here’s where Partytown comes in. Partytown is a lazy-loaded, 6kB package that helps you solve the issue mentioned. Your third-party packages will run as expected without affecting the main thread. If you’re interested in trying this out, see our other post exploring the library, or check out their documentation for a more in-depth discussion.
Conclusion
worker_threads is an exciting and useful module if you need to do CPU-intensive tasks in your Node.js application. They provide the same behavior as threads without sharing memory and, thus, avoid the potential race conditions threads introduce. Since the worker_threads module became stable in Node.js v12 LTS, you should feel secure using it in production-grade apps!


.png&w=3840&q=75)
.png&w=3840&q=75)
.png&w=3840&q=75)
.png&w=3840&q=75)
.png&w=3840&q=75)


When you’re using scrolling through Instagram on your phone, the app sends some requests to its server. Their server receives the request, processes it, and returns a response to your phone. The app on your phone processes the response and presents it to you in a readable manner. Here, the app on your phone talks to Instagram’s servers via what we call Application Programming Interface or APIs.
Let’s take another example to understand APIs. You must have heard of UPI payments and apps like GPay, PhonePe, and Paytm which allow you to do transactions via UPI. The UPI payment system is managed by NPCI or National Payments Corporation of India which exposes its APIs so that these payment apps can use them and facilitate UPI transactions to their customers. Simply put, an API is a way for two or more software systems to communicate with each other.
The application sending the request is commonly referred to as a client and the application sending the response is called the server. So, in the above example, the app on your device is the client which requests data from Instagram’s servers.
The way an API works is that the client sends some request to the server at a particular endpoint, with some payload using one of the HTTP methods; the server processes the request and returns a response which can be in HTML, XML, JSON, etc.
https://www.scaler.com/topics/nodejs/node-js-rest-api/
Q. Explain RESTful Web Services in Node.js?
REST stands for REpresentational State Transfer. REST is web standards based architecture and uses HTTP Protocol. It is an architectural style as well as an approach for communications purposes that is often used in various web services development. A REST Server simply provides access to resources and REST client accesses and modifies the resources using HTTP protocol.
HTTP methods:
GET− Provides read-only access to a resource.PUT− Updates an existing resource or creates a new resource.DELETE− Removes a resource.POST− Creates a new resource.PATCH− Update/modify a resource
Example: users.json
{
   "user1" : {
      "id": 1,
      "name" : "Ehsan Philip",
      "age" : 24
   },

   "user2" : {
      "id": 2,
      "name" : "Karim Jimenez",
      "age" : 22
   },

   "user3" : {
      "id": 3,
      "name" : "Giacomo Weir",
      "age" : 18
   }
}
List Users ( GET method)
Let's implement our first RESTful API listUsers using the following code in a server.js file −
const express = require('express');
const app = express();
const fs = require("fs");

app.get('/listUsers', function (req, res) {
   fs.readFile( __dirname + "/" + "users.json", 'utf8', function (err, data) {
      console.log( data );
      res.end( data );
   });
})

const server = app.listen(3000, function () {
   const host = server.address().address
   const port = server.address().port
   console.log("App listening at http://%s:%s", host, port)
});
Add User ( POST method )
Following API will show you how to add new user in the list.
const express = require('express');
const app = express();
const fs = require("fs");

const user = {
   "user4" : {
      "id": 4,
      "name" : "Spencer Amos",
      "age" : 28
   }
}

app.post('/addUser', function (req, res) {
   // First read existing users.
   fs.readFile( __dirname + "/" + "users.json", 'utf8', function (err, data) {
      data = JSON.parse( data );
      data["user4"] = user["user4"];
      console.log( data );
      res.end( JSON.stringify(data));
   });
})

const server = app.listen(3000, function () {
   const host = server.address().address
   const port = server.address().port
   console.log("App listening at http://%s:%s", host, port)
})
Delete User:
const express = require('express');
const app = express();
const fs = require("fs");

const id = 2;

app.delete('/deleteUser', function (req, res) {
   // First read existing users.
   fs.readFile( __dirname + "/" + "users.json", 'utf8', function (err, data) {
      data = JSON.parse( data );
      delete data["user" + 2];
      console.log( data );
      res.end( JSON.stringify(data));
   });
})

const server = app.listen(3000, function () {
   const host = server.address().address
   const port = server.address().port
   console.log("App listening at http://%s:%s", host, port)
})
1. req.body
Generally used in POST/PUT requests.
Use it when you want to send sensitive data(eg. form data) or super long JSON data to the server.
How to send data in request body
- using curl
curl -d '{"key1":"value1", "key2":"value2"}' -H "ContentType: application/json" -X POST http://localhost:3000/giraffe
- using axios
axios.post('/giraffe', {
key1: 'value1',
key2: 'value2'
})
.then(response => {
...
})
.catch(error => {
...
})
How to get data from request body
app.get('/giraffe', (req, res) => {
console.log(req.body.key1) //value1
console.log(req.body.key2) //value2
})
Remember to use express.json() middleware to parse request body else you'll get an error
app.use(express.json())
2. req.params
These are properties attached to the url i.e named route parameters. You prefix the parameter name with a colon(:) when writing your routes.
For instance,
app.get('/giraffe/:number', (req, res) => {
console.log(req.params.number)
})
To send the parameter from the client, just replace its name with the value
GET http://localhost:3000/giraffe/1
3. req.query
req.query is a request object that is populated by request query strings that are found in a URL. These query strings are in key-value form. req.query is mostly used for searching,sorting, filtering, pagination, e.t.c
Say for instance you want to query an API but only want to get data from page 10, this is what you'd generally use.
It written as key=value
GET http://localhost:3000/animals?page=10
To access this in your express server is pretty simple too;
app.get('/animals', ()=>{
console.log(req.query.page) // 10
})
I hope you found this helpful.
What is the difference between req.params and req.query?
The req.params are a part of a path in URL and they're also known as URL variables. for example, if you have the route /books/:id, then the id property will be available as req.params.id. req.params default value is an empty object {}.
A req.query is a part of a URL that assigns values to specified parameters. A query string commonly includes fields added to a base URL by a Web browser or other client application, for example as part of an HTML form. A query is the last part of URL
Example 01: req.params
/**
* req.params
*/
// GET http://localhost:3000/employees/10
app.get('/employees/:id', (req, res, next) => {
console.log(req.params.id); // 10
})
Example 02: req.query
/**
* req.query
*/
// GET http://localhost:3000/employees?page=20
app.get('/employees', (req, res, next) => {
console.log(req.query.page) // 20
})
Parameters
- The promise constructor takes only one argument which is a callback function
- The callback function takes two arguments, resolve and reject
- Perform operations inside the callback function and if everything went well then call resolve.
- If desired operations do not go well then call reject.
A Promise has four states:
fulfilled: Action related to the promise succeeded
rejected: Action related to the promise failed
pending: Promise is still pending i.e. not fulfilled or rejected yet
settled: Promise has been fulfilled or rejected
Promise Consumers: Promises can be consumed by registering functions using .then and .catch methods.
Introduction: Callback functions are used for Asynchronous events. Whenever any asynchronous event has to be taken place it is generally preferred to use callbacks (if data is not nested or inter-dependent).
Following is the simplest example where we could visualize how we may use a callback:-
Example:
javascript
What are Promises? A promise is basically an advancement of callbacks in Node. In other words, a promise is a JavaScript object which is used to handle all the asynchronous data operations. While developing an application you may encounter that you are using a lot of nested callback functions.
javascript
This is what happens due to the nesting of callback functions. Now imagine if you need to perform multiple nested operations like this. That would make your code messy and very complex. In Node.js world, this problem is called “Callback Hell”. To resolve this issue we need to get rid of the callback functions whilst nesting. This is where Promises come into the picture. A Promise in Node means an action which will either be completed or rejected. In case of completion, the promise is kept and otherwise, the promise is broken. So as the word suggests either the promise is kept or it is broken. And unlike callbacks, promises can be chained.
**
Callbacks to Promises Promises notify whether the request is fulfilled or rejected. Callbacks can be registered with the .then() to handle fulfillment and rejection. The .then() can be chained to handle the fulfillment and rejection whereas .catch() can be used for handling the errors(if any).
The then() method (as discussed earlier in the Instance Methods Section) is used to extract the result from the async task.
Syntax:
Extracting the Promise Rejection Error
.catch() method is used to extract out the reason for rejection (if the promise rejects).
Syntax:
promise
.catch(reason => {
// use value...
});
What is difference between put and patch?
PUT and PATCH are HTTP verbs and they both relate to updating a resource. The main difference between PUT and PATCH requests are in the way the server processes the enclosed entity to modify the resource identified by the Request-URI.
In a PUT request, the enclosed entity is considered to be a modified version of the resource stored on the origin server, and the client is requesting that the stored version be replaced.
With PATCH, however, the enclosed entity contains a set of instructions describing how a resource currently residing on the origin server should be modified to produce a new version.
Also, another difference is that when you want to update a resource with PUT request, you have to send the full payload as the request whereas with PATCH, you only send the parameters which you want to update.
The most commonly used HTTP verbs POST, GET, PUT, DELETE are similar to CRUD (Create, Read, Update and Delete) operations in database. We specify these HTTP verbs in the capital case. So, the below is the comparison between them.
POST- createGET- readPUT- updateDELETE- delete
PATCH: Submits a partial modification to a resource. If you only need to update one field for the resource, you may want to use the PATCH method.
What is difference between promises and async-await in Node.js?
1. Promises:
A promise is used to handle the asynchronous result of an operation. JavaScript is designed to not wait for an asynchronous block of code to completely execute before other synchronous parts of the code can run. With Promises, we can defer the execution of a code block until an async request is completed. This way, other operations can keep running without interruption.
States of Promises:
Pending: Initial State, before the Promise succeeds or fails.Resolved: Completed PromiseRejected: Failed Promise, throw an error
Example:
function logFetch(url) {
  return fetch(url)
    .then(response => {
      console.log(response);
    })
    .catch(err => {
      console.error('fetch failed', err);
    });
}
2. Async-Await:
Await is basically syntactic sugar for Promises. It makes asynchronous code look more like synchronous/procedural code, which is easier for humans to understand.
Putting the keyword async before a function tells the function to return a Promise. If the code returns something that is not a Promise, then JavaScript automatically wraps it into a resolved promise with that value. The await keyword simply makes JavaScript wait until that Promise settles and then returns its result.
Example:
async function logFetch(url) {
  try {
    const response = await fetch(url);
    console.log(response);
  }
  catch (err) {
    console.log('fetch failed', err);
  }
}
Mention the steps by which you can async in Node.js?
ES 2017 introduced Asynchronous functions. Async functions are essentially a cleaner way to work with asynchronous code in JavaScript.
1. Async/Await:
- The newest way to write asynchronous code in JavaScript.
- It is non blocking (just like promises and callbacks).
- Async/Await was created to simplify the process of working with and writing chained promises.
- Async functions return a Promise. If the function throws an error, the Promise will be rejected. If the function returns a value, the Promise will be resolved.
Syntax
// Normal Function
function add(x,y){
return x + y;
}
// Async Function
async function add(x,y){
return x + y;
}
2. Await:
Async functions can make use of the await expression. This will pause the async function and wait for the Promise to resolve prior to moving on.
Example:
function doubleAfter2Seconds(x) {
return new Promise(resolve => {
setTimeout(() => {
resolve(x * 2);
}, 2000);
});
}
async function addAsync(x) {
const a = await doubleAfter2Seconds(10);
const b = await doubleAfter2Seconds(20);
const c = await doubleAfter2Seconds(30);
return x + a + b + c;
}
addAsync(10).then((sum) => {
console.log(sum);
});
What is Routing?
Routing defines the way in which the client requests are handled by the application endpoints.
Implementation of routing in Node.js: There are two ways to implement routing in node.js which are listed below:
- By Using Framework
- Without using Framework
Using Framework: Node has many frameworks to help you to get your server up and running. The most popular is Express.js.
Routing with Express in Node: Express.js has an “app” object corresponding to HTTP. We define the routes by using the methods of this “app” object. This app object specifies a callback function called when a request is received. We have different methods of in-app objects for different types of requests.
For a GET request using the app.get() method:
const express = require('express')
const app = express()
app.get('/', function(req, res) {
res.send('Hello Sir')
})For POST requests use the app.post() method:
const express = require('express')
const app = express()
app.post('/', function(req, res) {
res.send('Hello Sir')
})For handling all HTTP methods (i.e. GET, POST, PUT, DELETE, etc.) use the app.all() method:
const express = require('express')
const app = express()
app.all('/', function(req, res) {
console.log('Hello Sir')
next() // Pass the control to the next handler
})The next() is used to hand off the control to the next callback. Sometimes we use app.use() to specify the middleware function as the callback. So, to perform routing with Express.js you have only to load the express and then use the app object to handle the callbacks according to the requirement. Routing without Framework: Using the frameworks is good to save time, but sometimes this may not suit the situation. So, a developer may need to build up their own server without other dependencies. Now create a file with any name using .js extension and follow the steps to perform routing from scratch:
Here we will use the built-in module of node.js i.e. HTTP. So, First load http:
const http = require('http');Now create a server by adding the following lines of code:
http.createServer(function (req, res) {
res.write('Hello World!'); // Write a response
res.end(); // End the response
}).listen(3000, function() {
console.log("server start at port 3000"); // The server object listens on port 3000
});Now add the following lines of code in the above function to perform routing:
const url = req.url;
if(url ==='/about') {
res.write(' Welcome to about us page');
res.end();
} else if(url ==='/contact') {
res.write(' Welcome to contact us page');
res.end();
} else {
res.write('Hello World!');
res.end();
}Example 1: The complete code of routing by combining the above code.
- javascript
Output:
Console Output

Browser Output

What is Axios?
Axios is an HTTP client library that allows you to make requests to a given endpoint:

This could be an external API or your own backend Node.js server, for example.
By making a request, you expect your API to perform an operation according to the request you made.
For example, if you make a GET request, you expect to get back data to display in your application.
Why Use Axios in React
There are a number of different libraries you can use to make these requests, so why choose Axios?
Here are five reasons why you should use Axios as your client to make HTTP requests:
- It has good defaults to work with JSON data. Unlike alternatives such as the Fetch API, you often don't need to set your headers. Or perform tedious tasks like converting your request body to a JSON string.
- Axios has function names that match any HTTP methods. To perform a GET request, you use the
.get()method. - Axios does more with less code. Unlike the Fetch API, you only need one
.then()callback to access your requested JSON data. - Axios has better error handling. Axios throws 400 and 500 range errors for you. Unlike the Fetch API, where you have to check the status code and throw the error yourself.
- Axios can be used on the server as well as the client. If you are writing a Node.js application, be aware that Axios can also be used in an environment separate from the browser.
How to Set Up Axios with React
Using Axios with React is a very simple process. You need three things:
- An existing React project
- To install Axios with npm/yarn
- An API endpoint for making requests
The quickest way to create a new React application is by going to react.new.
If you have an existing React project, you just need to install Axios with npm (or any other package manager):
npm install axiosIn this guide, you'll use the JSON Placeholder API to get and change post data.
Here is a list of all the different routes you can make requests to, along with the appropriate HTTP method for each:
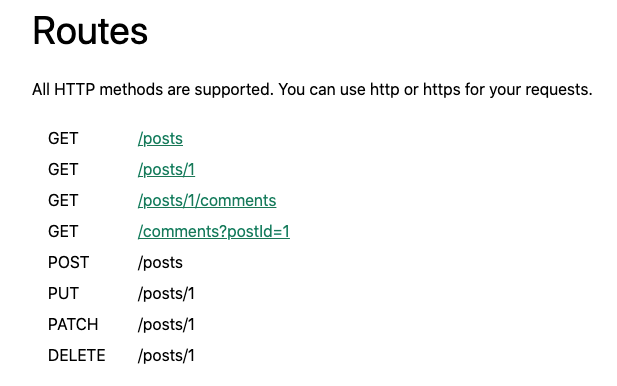
Here is a quick example of all of the operations you'll be performing with Axios and your API endpoint — retrieving, creating, updating, and deleting posts:
How to Make a GET Request
To fetch data or retrieve it, make a GET request.
First, you're going to make a request for individual posts. If you look at the endpoint, you are getting the first post from the /posts endpoint:
import axios from "axios";
import React from "react";

const baseURL = "https://jsonplaceholder.typicode.com/posts/1";

export default function App() {
  const [post, setPost] = React.useState(null);

  React.useEffect(() => {
    axios.get(baseURL).then((response) => {
      setPost(response.data);
    });
  }, []);

  if (!post) return null;

  return (
    <div>
      <h1>{post.title}</h1>
      <p>{post.body}</p>
    </div>
  );
}
To perform this request when the component mounts, you use the useEffect hook. This involves importing Axios, using the .get() method to make a GET request to your endpoint, and using a .then() callback to get back all of the response data.
The response is returned as an object. The data (which is in this case a post with id, title, and body properties) is put in a piece of state called post which is displayed in the component.
Note that you can always find the requested data from the .data property in the response.
How to Make a POST Request
To create new data, make a POST request.
According to the API, this needs to be performed on the /posts endpoint. If you look at the code below, you'll see that there's a button to create a post:
import axios from "axios";
import React from "react";

const baseURL = "https://jsonplaceholder.typicode.com/posts";

export default function App() {
  const [post, setPost] = React.useState(null);

  React.useEffect(() => {
    axios.get(`${baseURL}/1`).then((response) => {
      setPost(response.data);
    });
  }, []);

  function createPost() {
    axios
      .post(baseURL, {
        title: "Hello World!",
        body: "This is a new post."
      })
      .then((response) => {
        setPost(response.data);
      });
  }

  if (!post) return "No post!"

  return (
    <div>
      <h1>{post.title}</h1>
      <p>{post.body}</p>
      <button onClick={createPost}>Create Post</button>
    </div>
  );
}
When you click on the button, it calls the createPost function.
To make that POST request with Axios, you use the .post() method. As the second argument, you include an object property that specifies what you want the new post to be.
Once again, use a .then() callback to get back the response data and replace the first post you got with the new post you requested.
This is very similar to the .get() method, but the new resource you want to create is provided as the second argument after the API endpoint.
How to Make a PUT Request
To update a given resource, make a PUT request.
In this case, you'll update the first post.
To do so, you'll once again create a button. But this time, the button will call a function to update a post:
import axios from "axios";
import React from "react";

const baseURL = "https://jsonplaceholder.typicode.com/posts";

export default function App() {
  const [post, setPost] = React.useState(null);

  React.useEffect(() => {
    axios.get(`${baseURL}/1`).then((response) => {
      setPost(response.data);
    });
  }, []);

  function updatePost() {
    axios
      .put(`${baseURL}/1`, {
        title: "Hello World!",
        body: "This is an updated post."
      })
      .then((response) => {
        setPost(response.data);
      });
  }

  if (!post) return "No post!"

  return (
    <div>
      <h1>{post.title}</h1>
      <p>{post.body}</p>
      <button onClick={updatePost}>Update Post</button>
    </div>
  );
}
In the code above, you use the PUT method from Axios. And like with the POST method, you include the properties that you want to be in the updated resource.
Again, using the .then() callback, you update the JSX with the data that is returned.
How to Make a DELETE Request
Finally, to delete a resource, use the DELETE method.
As an example, we'll delete the first post.
Note that you do not need a second argument whatsoever to perform this request:
import axios from "axios";
import React from "react";

const baseURL = "https://jsonplaceholder.typicode.com/posts";

export default function App() {
  const [post, setPost] = React.useState(null);

  React.useEffect(() => {
    axios.get(`${baseURL}/1`).then((response) => {
      setPost(response.data);
    });
  }, []);

  function deletePost() {
    axios
      .delete(`${baseURL}/1`)
      .then(() => {
        alert("Post deleted!");
        setPost(null)
      });
  }

  if (!post) return "No post!"

  return (
    <div>
      <h1>{post.title}</h1>
      <p>{post.body}</p>
      <button onClick={deletePost}>Delete Post</button>
    </div>
  );
}
In most cases, you do not need the data that's returned from the .delete() method.
But in the code above, the .then() callback is still used to ensure that your request is successfully resolved.
In the code above, after a post is deleted, the user is alerted that it was deleted successfully. Then, the post data is cleared out of the state by setting it to its initial value of null.
Also, once a post is deleted, the text "No post" is shown immediately after the alert message.
How to Handle Errors with Axios
What about handling errors with Axios?
What if there's an error while making a request? For example, you might pass along the wrong data, make a request to the wrong endpoint, or have a network error.
To simulate an error, you'll send a request to an API endpoint that doesn't exist: /posts/asdf.
This request will return a 404 status code:
import axios from "axios";
import React from "react";

const baseURL = "https://jsonplaceholder.typicode.com/posts";

export default function App() {
  const [post, setPost] = React.useState(null);
  const [error, setError] = React.useState(null);

  React.useEffect(() => {
    // invalid url will trigger an 404 error
    axios.get(`${baseURL}/asdf`).then((response) => {
      setPost(response.data);
    }).catch(error => {
      setError(error);
    });
  }, []);

  if (error) return `Error: ${error.message}`;
  if (!post) return "No post!"

  return (
    <div>
      <h1>{post.title}</h1>
      <p>{post.body}</p>
    </div>
  );
}
In this case, instead of executing the .then() callback, Axios will throw an error and run the .catch() callback function.
In this function, we are taking the error data and putting it in state to alert our user about the error. So if we have an error, we will display that error message.
In this function, the error data is put in state and used to alert users about the error. So if there's an error, an error message is displayed.
When you run this code code, you'll see the text, "Error: Request failed with status code 404".
How to Create an Axios Instance
If you look at the previous examples, you'll see that there's a baseURL that you use as part of the endpoint for Axios to perform these requests.
However, it gets a bit tedious to keep writing that baseURL for every single request. Couldn't you just have Axios remember what baseURL you're using, since it always involves a similar endpoint?
In fact, you can. If you create an instance with the .create() method, Axios will remember that baseURL, plus other values you might want to specify for every request, including headers:
import axios from "axios";
import React from "react";

const client = axios.create({
  baseURL: "https://jsonplaceholder.typicode.com/posts"
});

export default function App() {
  const [post, setPost] = React.useState(null);

  React.useEffect(() => {
    client.get("/1").then((response) => {
      setPost(response.data);
    });
  }, []);

  function deletePost() {
    client
      .delete("/1")
      .then(() => {
        alert("Post deleted!");
        setPost(null)
      });
  }

  if (!post) return "No post!"

  return (
    <div>
      <h1>{post.title}</h1>
      <p>{post.body}</p>
      <button onClick={deletePost}>Delete Post</button>
    </div>
  );
}
The one property in the config object above is baseURL, to which you pass the endpoint.
The .create() function returns a newly created instance, which in this case is called client.
Then in the future, you can use all the same methods as you did before, but you don't have to include the baseURL as the first argument anymore. You just have to reference the specific route you want, for example, /, /1, and so on.
How to Use the Async-Await Syntax with Axios
A big benefit to using promises in JavaScript (including React applications) is the async-await syntax.
Async-await allows you to write much cleaner code without then and catch callback functions. Plus, code with async-await looks a lot like synchronous code, and is easier to understand.
But how do you use the async-await syntax with Axios?
In the example below, posts are fetched and there's still a button to delete that post:
import axios from "axios";
import React from "react";

const client = axios.create({
  baseURL: "https://jsonplaceholder.typicode.com/posts"
});

export default function App() {
  const [post, setPost] = React.useState(null);

  React.useEffect(() => {
    async function getPost() {
      const response = await client.get("/1");
      setPost(response.data);
    }
    getPost();
  }, []);

  async function deletePost() {
    await client.delete("/1");
    alert("Post deleted!");
    setPost(null);
  }

  if (!post) return "No post!"

  return (
    <div>
      <h1>{post.title}</h1>
      <p>{post.body}</p>
      <button onClick={deletePost}>Delete Post</button>
    </div>
  );
}
However in useEffect, there's an async function called getPost.
Making it async allows you to use the await keword to resolve the GET request and set that data in state on the next line without the .then() callback.
Note that the getPost function is called immediately after being created.
Additionally, the deletePost function is now async, which is a requirement to use the await keyword which resolves the promise it returns (every Axios method returns a promise to resolve).
After using the await keyword with the DELETE request, the user is alerted that the post was deleted, and the post is set to null.
As you can see, async-await cleans up the code a great deal, and you can use it with Axios very easily.
How to Create a Custom useAxios Hook
Async-await is a great way to simplify your code, but you can take this a step further.
Instead of using useEffect to fetch data when the component mounts, you could create your own custom hook with Axios to perform the same operation as a reusable function.
While you can make this custom hook yourself, there's a very good library that gives you a custom useAxios hook called use-axios-client.
First, install the package:
npm install use-axios-clientTo use the hook itself, import useAxios from use-axios-client at the top of the component.
Because you no longer need useEffect, you can remove the React import:
import { useAxios } from "use-axios-client";

export default function App() {
  const { data, error, loading } = useAxios({
    url: "https://jsonplaceholder.typicode.com/posts/1"
  });

  if (loading || !data) return "Loading...";
  if (error) return "Error!";

  return (
    <div>
      <h1>{data.title}</h1>
      <p>{data.body}</p>
    </div>
  )
}
Now you can call useAxios at the top of the app component, pass in the URL you want to make a request to, and the hook returns an object with all the values you need to handle the different states: loading, error and the resolved data.
In the process of performing this request, the value loading will be true. If there's an error, you'll want to display that error state. Otherwise, if you have the returned data, you can display it in the UI.
The benefit of custom hooks like this is that it really cuts down on code and simplifies it overall.
If you're looking for even simpler data fetching with Axios, try out a custom useAxios hook like this one.
What's Next?
Congratulations! You now know how to use one of the most powerful HTTP client libraries to power your React applications.
I hope you got a lot out of this guide.
Remember that you can download this guide as a PDF cheatsheet to keep for future reference.
Enjoyed this tutorial? Here's a special bonus.
Reading tutorials are a great way to learn React, but there is no replacement for hands-on coding.
Introducing: the Learn React app
The Learn React app is an interactive learning experience designed to make you a confident React developer through 100s of fun challenges.
Ready to level up your React skills? Click the link below to get started!
What is Body Parser?
Body Parser is a middleware of Node JS used to handle HTTP POST request. Body Parser can parse string based client request body into JavaScript Object which we can use in our application.
What Body Parser Do?
- Parse the request body into JS Object ( if content-type is application/JSON) or a HTML Form data where MIME type is application/x-www-form-urlencoded.
- Put above JS Object in req.body so that middleware can use the data.
Install Body Parser
npm i body-parser
Body Parser middleware was earlier a part of express js. For Express 4.16 and above, we have to install it separately.
API
To include body-parser in our application, use following code. The bodyParser object has two methods, bodyParser.json() and bodyParser.urlencoded(). The data will be available in req.body property.
var bodyParser = require('body-parser');
req.body
req.body contains data ( in key-value form ) submitted in request body. The default value is undefined.
req.json
    const express=require('express');
    const app=express();

    const bodyParser=require('body-parser');
    // parse application/json
    app.use(bodyParser.json());

    app.post('post',(req,res)=>{
        console.log(req.body);
        res.json(req.body);
    });
Form Data
Use bodyParser to parse HTML Form Data received through HTTP POST method. Create a separate HTML Form with inputs. Use name attributes in all input controls. Set the method (in html form ) to POST and action to path of Post request.
    const express=require('express');
    const app=express();

    const bodyParser=require('body-parser');
    // parse application/x-www-form-urlencoded
    app.use(bodyParser.urlencoded({ extended: false }));

    app.post('formdata',(req,res)=>{
        console.log(req.body);
        res.json(req.body);
    });
HTML Page
    <form method="post" action="127.0.0.01:3000/formdata">
        <input type="text" name="username" required>
        <input type="password" name="userpass" required>
        <button>Send</button>
    <form>
What Is Body-parser?
- Body-parser parses is an HTTP request body that usually helps when you need to know more than just the URL being hit.
- Specifically in the context of a POST, PATCH, or PUT HTTP request where the information you want is contained in the body.
- Using body-parser allows you to access req.body from within routes and use that data.
Mongoose
Environment variables can be used in cases when :
- When you have to store sensitive data of the application and do not expose that data to the public repository. For example, if you want to store API keys, passwords, etc. then such data are stored in the .env file using environment variables, and the .env file is added to the gitignore file so that it is not exposed to the public repository when the code is pushed to GitHub.
- When you want to customize your application variables based on the environment your code is running on like a production environment, development environment, or staging environment.
How to Use DotEnv
DotEnv is a lightweight npm package that automatically loads environment variables from a .env file into the process.env object.
To use DotEnv, first install it using the command: npm i dotenv. Then in your app, require and configure the package like this: require('dotenv').config().
Note that some packages such as Create React App already include DotEnv, and cloud providers may have different means of setting environment variables all together. So make sure you check the documentation for any packages or providers you are using before you follow any advice in this article.
How to Create a .env File
Once you have DotEnv installed and configured, make a file called .env at the top level of your file structure. This is where you will create all of your environment variables, written in thr NAME=value format. For example, you could set a port variable to 3000 like this: PORT=3000.
You can declare multiple variables in the .env file. For example, you could set database-related environment variables like this:
DB_HOST=localhost
DB_USER=admin
DB_PASSWORD=password
What are streams?
- Readable streams are used in operations where data is read, such as reading data from a file or streaming video.
- Writable streams are used in operations where data is written, such as writing or updating data to a file.
- Duplex streams can be used to perform both read and write operations. A typical example of a duplex stream is a socket, which can be used for two-way communication, such as in a real-time chat app.
- Transform streams are duplex streams that perform transformations on the data being processed. Operations such as compression and extraction use transform streams.
- Efficient memory usage - With streams, large amounts of data do not need to be loaded into memory, reducing the number of reads and write cycles required to perform operations.
- Better performance - With streams, there is higher data processing throughput since data is processed as soon as it becomes available rather than waiting for all the data to arrive and then process it.
- Increased composability - With streams, developers can compose complex applications that interconnect data between multiple pieces of code or even across applications. This benefit allows developers to build microservices with Node.js.
- Real-time applications - Streams are essential for creating real-time applications such as video streaming or chat applications.
How to create a readable stream
const Stream = require('stream')
const readableStream = new Stream.Readable()readableStream.push('Hello World!')- Data event - This event is raised whenever data is available to be read by a stream.
- End event - This event is raised when the stream reaches the end of the file, and no more data is available to read.
- Error event - This event is raised when an error occurs during the read stream process. This event is also raised when using writable streams.
- Finish event - This event is raised when all data has been flushed to the underlying system.
read() method of the readable stream needs to be called explicitly to receive the next chunk of data from the stream.- By adding a ‘data’ event handler to the stream.
- By calling the
stream.resume()method. - By calling the
stream.pipe()method, which sends data to writable streams.
> mkdir streams-example
> cd streams-example
> touch index.js
> touch read.txtconst fs = require('fs');
const readStream = fs.createReadStream(__dirname + '/read.txt');readStream.on('data', function(chunk){
console.log('Chunk read');
console.log(chunk);
});> node index
How to create a writable stream
const fs = require('fs');
const writeStream = fs.createWriteStream('write.txt', {flags: 'a'});
const data = "Using streams to write data.";
writeStream.write(data);var fs = require('fs');
var readableStream = fs.createReadStream('read.txt');
var writableStream = fs.createWriteStream('write.txt');
readableStream.on('data', function(chunk) {
writableStream.write(chunk);
});The stream.pipeline() method is a module method that is used to the pipe by linking the streams passing on errors and accurately cleaning up and providing a callback function when the pipeline is done.
Syntax:
stream.pipeline(...streams, callback)
Parameters: This method accepts two parameters as mentioned above and described below.
- …streams: These are two or more streams that are to be piped together.
- callback: This function is called when the pipeline is fully done and it shows an ‘error’ if the pipeline is not accomplished.
Comments
Post a Comment