Node.js Interview Questions and Answers For Freshers


1. What is Node.js? Where can you use it?

Node.js is an open-source, cross-platform JavaScript runtime environment and library to run web applications outside the client’s browserIt is used to create server-side web applications.

Node.js is perfect for data-intensive applications as it uses an asynchronous, event-driven model. You can use  I/O intensive web applications like video streaming sites. You can also use it for developing: Real-time web applications, Network applications, General-purpose applications, and Distributed systems.

===========

Node.js is open-source: This means that the source code for Node.js is publicly available. And it's maintained by contributors from all over the world. The Node.js contribution guide shows you how to contribute.

Node.js is cross-platform: Node.js is not dependent on any operating system software. It can work on Linux, macOS, or Windows.

Node.js is a JavaScript runtime environment: When you write JavaScript code in your text editor, that code cannot perform any task unless you execute (or run) it. And to run your code, you need a runtime environment.

==================

Node.js is an open-source server side runtime environment built on Chrome's V8 JavaScript engine. It provides an event driven, non-blocking (asynchronous) I/O and cross-platform runtime environment for building highly scalable server-side applications using JavaScript.

==========

NodeJS Process Model


Process Model Nodejs

NodeJS Process Model

Contrary to the traditional web server model, NodeJS uses an event-driven, non-blocking I/O model that makes it lightweight and efficient. The NodeJS process model can be explained with three architectural features of NodeJS.

Single-threaded event loop

Non-Blocking I/O Model

Event-driven and Asynchronous by default

Single Threaded Event Loop

NodeJS runs on a single-threaded environment which means each user request processes on a single thread only. This makes it use lesser resources and run smoothly using events and emitters.

Events are a crucial paradigm of the NodeJS process. Events are actions that instruct the runtime what and when something needs to be completed. Event Emitters are response object instances that can be subscribed to and acted upon to perform operations. Event Emitters emit events based on certain predefined events accepting a callback. According to MDN web docs, event loops are responsible for executing the code, collecting and processing events, and executing queued sub-tasks.

NodeJS has two types of threads: one Event loop also referred to as the main thread, and the k Workers also referred to as the background thread. When a new user request comes in, it is placed in an event queue. Every request consists of a synchronous and asynchronous part. The synchronous part of the request is handled on the main thread while the asynchronous part is handled in the background via the k Workers/ background threads.

Even though we talk about multiple threads, NodeJS is said to be single-threaded as all the requests are received on a single thread, and execution of the asynchronous processes takes place internally.

Non-Blocking I/O Model

Blocking codes or operations are the ones that need to be completed entirely before moving on to another operation. Non-blocking codes are asynchronous and accept callback functions to operate.

As mentioned, every request has a synchronous and asynchronous part. The main thread of NodeJS does not keep waiting for the background thread to complete the asynchronous I/O operations. The main thread keeps switching between other requests to process their synchronous part while the background thread process the asynchronous part.

Event-Driven and Asynchronous By Default

Once the execution of the background thread is complete, the background thread emits events to notify the main thread. Callback functions are associated with asynchronous processes. If the main thread is not free, the request waits for the main thread to be free and then takes up the callback request for further execution.

To provide concurrency, I/O events and callbacks, and other time-consuming operations are asynchronous by default. Node architecture uses libuv, a C library built specifically for NodeJS for handling most asynchronous I/O operations.

What are the benefits of using Node.js? ☆☆

Asynchronous and Event driven – All APIs of Node.js are asynchronous. This feature means that if a Node receives a request for some Input/Output operation, it will execute that operation in the background and continue with the processing of other requests. Thus it will not wait for the response from the previous requests.

Fast in Code execution – Node.js uses the V8 JavaScript Runtime engine, the one which is used by Google Chrome. Node has a wrapper over the JavaScript engine which makes the runtime engine much faster and hence processing of requests within Node.js also become faster.

Single Threaded but Highly Scalable – Node.js uses a single thread model for event looping. The response from these events may or may not reach the server immediately. However, this does not block other operations. Thus making Node.js highly scalable. Traditional servers create limited threads to handle requests while Node.js creates a single thread that provides service to much larger numbers of such requests.

Node.js library uses JavaScript – This is another important aspect of Node.js from the developer's point of view. The majority of developers are already well-versed in JavaScript. Hence, development in Node.js becomes easier for a developer who knows JavaScript.

There is an Active and vibrant community for the Node.js framework – The active community always keeps the framework updated with the latest trends in the web development.

No Buffering – Node.js applications never buffer any data. They simply output the data in chunks.

What is difference between process and threads in Node.js?

1. Process:

Processes are basically the programs that are dispatched from the ready state and are scheduled in the CPU for execution. PCB (Process Control Block) holds the concept of process. A process can create other processes which are known as Child Processes. The process takes more time to terminate and it is isolated means it does not share the memory with any other process.

The process can have the following states new, ready, running, waiting, terminated, and suspended.

2. Thread:

Thread is the segment of a process which means a process can have multiple threads and these multiple threads are contained within a process. A thread has three states: Running, Ready, and Blocked.

The thread takes less time to terminate as compared to the process but unlike the process, threads do not isolate.

 Why is Node.js Single-threaded?

Node.js is single-threaded for async processing. By doing async processing on a single-thread under typical web loads, more performance and scalability can be achieved instead of the typical thread-based implementation.

 If Node.js is single-threaded, then how does it handle concurrency?

The Multi-Threaded Request/Response Stateless Model is not followed by the Node JS Platform, and it adheres to the Single-Threaded Event Loop Model. The Node JS Processing paradigm is heavily influenced by the JavaScript Event-based model and the JavaScript callback system. As a result, Node.js can easily manage more concurrent client requests. The event loop is the processing model's beating heart in Node.js.

Why Do You Need Environment Variables?

https://www.scaler.com/topics/react/react-environment-variables/

Environment variables can be used in cases when :

  • When you have to store sensitive data of the application and do not expose that data to the public repository. For example, if you want to store API keys, passwords, etc. then such data are stored in the .env file using environment variables, and the .env file is added to the gitignore file so that it is not exposed to the public repository when the code is pushed to GitHub.
  • When you want to customize your application variables based on the environment your code is running on like a production environment, development environment, or staging environment.

Create React app support custom variables and you don't have to install any other packages.

  • Temporary variables can be added using shell and it is validity is the same as shell session validity.
  • using the .env file.


How to Create Environment Variables

Environment variables are supported out of the box with Node and are accessible via the env object (which is a property of the process global object.)

To see this in action, you can create your own environment variable right in the Node REPL by appending a variable to the process.env object directly.

For example, to create an environment variable to store the combination on my luggage I could assign the variable like this: process.env.LUGGAGE_COMBO=“12345”.

(A quick aside: environment variables are, by convention, generally written in all caps.)

While this is a neat experiment, you would not use the Node REPL like this in an app. To create environment variables in your Node app, you will probably want to use a package like DotEnv.

How to Use DotEnv

DotEnv is a lightweight npm package that automatically loads environment variables from a .env file into the process.env object.

To use DotEnv, first install it using the command: npm i dotenv. Then in your app, require and configure the package like this: require('dotenv').config().

Note that some packages such as Create React App already include DotEnv, and cloud providers may have different means of setting environment variables all together. So make sure you check the documentation for any packages or providers you are using before you follow any advice in this article.

How to Create a .env File

Once you have DotEnv installed and configured, make a file called .env at the top level of your file structure. This is where you will create all of your environment variables, written in thr NAME=value format. For example, you could set a port variable to 3000 like this: PORT=3000.

You can declare multiple variables in the .env file. For example, you could set database-related environment variables like this:

DB_HOST=localhost
DB_USER=admin
DB_PASSWORD=password


What is the config method?

The config method allows your application to get or set values in all files that are in the config directory.

How to use the config() method to set values

To set values from files in the config directory, we will use the config() method.

In the config() method, we use dot notation to get the value we want. The first parameter we use is the name of the file without .php, and then we drill down like we are trying to access values from an array until we get the specific value we are looking for. The second parameter we pass to the config() method is the new value.

9In JSON Web Tokens, the payload is a set of fields that you want to include in the token being generated; Things your API will need to, say, get the right data for a particular user.

It's just a simple JSON object that is usually used to include user identification details such as a user ID, account ID or an email address. However, it can also contain any arbitrary data you might need such as a user's full name, language preferences, etc.

An example payload might look like the following, assuming these were the fields your API depended on to get details about the user/account who the token belongs to. Note that would be considered a rather large payload; Most payloads only have a single user ID field since that's typically all the endpoint should need to properly identify a user.

{
  user_id: 303,
  account_id: 909,
  email: 'joe@example.com',
  full_name: 'Joe Blow',
  default_language: 'en_US'
}

WARNING: The payload is NOT encrypted so make sure you do not store things like passwords, secret keys, credit card numbers, bank account balances, etc. in it. Only identifiers like IDs you'd see in a URL or public keys should ever be stored.

Additionally, the payload contributes to the overall length of the token (more data means longer tokens) so you only want to include the most essential pieces of data. Otherwise, you'll be sending a very large token on every request which consumes bandwidth and, theoretically, takes up more server resources to decode.

Finally, JWT are stateless, meaning they aren't sessions. So don't include any data that changes frequently, such as a game scores, last sign in, etc.


273

Below are the steps to do revoke your JWT access token:

  1. When you do log in, send 2 tokens (Access token, Refresh token) in response to the client.
  2. The access token will have less expiry time and Refresh will have long expiry time.
  3. The client (Front end) will store refresh token in an httponly cookie and access token in local storage.
  4. The client will use an access token for calling APIs. But when it expires, you call auth server API to get the new token (refresh token is automatically added to http request since it's stored in cookies).
  5. Your auth server will have an API exposed which will accept refresh token and checks for its validity and return a new access token.
  6. Once the refresh token is expired, the User will be logged out.

Please let me know if you need more details, I can share the code (Java + Spring boot) as well.

For your questions:

Q1: It's another JWT with fewer claims put in with long expiry time.

Q2: It won't be in a database. The backend will not store anywhere. They will just decrypt the token with private/public key and validate it with its expiry time also.

Q3: Yes, Correct

This post is the first part of a two-parts step-by-step guide for implementing JWT-based Authentication in an Angular application (also applicable to enterprise applications).

The goal in this post is to first start by learning how JSON Web Tokens (or JWTs) work in detail, including how they can be used for User Authentication and Session Management in a Web Application.

In Part 2, we will then see how JWT-based Authentication can be implemented in the specific context of an Angular Application, but this post is about JWTs only.

Why a JWT Deep Dive?

Having a detailed overview of JWTs is essential for:

  • implementing a JWT-based authentication solution
  • all sorts of practical troubleshooting: understanding error messages, stack traces
  • choosing third-party libraries and understanding their documentation
  • designing an in-house authentication solution
  • choosing and configuring a third-party authentication service

Even when choosing a ready to use JWT-based Authentication solution, there will still be some coding involved, especially on the client but also on the server.

At the end of this post, you will know JWTs in-depth including a good understanding of the cryptographic primitives that they are based upon, which are used in many other security use cases.

You will know when to use JWTs and why, you will understand the JWT format to the point that you can manually troubleshoot signatures, and know several online / Node tools to do so.

Using those tools you will be able to troubleshoot yourself out of numerous JWT-related error situations. So without further ado let's get started with our JWT deep dive!

Why JWTs?

The biggest advantage of JWTs (when compared to user session management using an in-memory random token) is that they enable the delegation of the authentication logic to a third-party server that might be:

  • a centralized in-house custom developed authentication server
  • more typically, a commercial product like a LDAP capable of issuing JWTs
  • or even a completely external third-party authentication provider such as for example Auth0

The external authentication server can be completely separate from our application server and does not have to share any secret key with other elements of the network, namely with our application server - there is no secret key installed on our server to be accidentally lost or stolen.

Also, there is no need for any direct live link between the authentication server or the application server for authentication to work (more on that later).

Furthermore, the application server can be completely stateless, as there is no need to keep tokens in-memory between requests. The authentication server can issue the token, send it back and then immediately discard it!

Also, there is also no need to store password digests at the level of the application database either, so fewer things to get stolen and less security-related bugs.

At this point you might be thinking: I have an in-house internal application, are JWTs a good solution for that as well? Yes, in the last section of this post we will cover the use of JWTs in a typical Pre-Authentication enterprise scenario.

Table Of Contents

In this post we are going to cover the following topics:

  • What are JWTs?
  • Online tools for JWT validation
  • What is the format of a JSON Web Token
  • JWTs in a Nutshell: Header, Payload, Signature
  • Base64Url (vs Base64)
  • User Session Management with JWTs: Subject and Expiration
  • The HS256 JWT Signature - How does it work?
  • Digital Signatures
  • Hashing functions and SHA-256
  • The RS256 JWT Signature - let's talk about public key crypto
  • RS256 vs HS256 Signatures - Which one is better?
  • JWKS (JSON Web Key Set) Endpoints
  • How to implement JWT Signature Periodic Key Rotation
  • JWTs in the Enterprise
  • Summary and Conclusions

What are JWTs?

A JSON Web Token (or JWT) is simply a JSON payload containing a particular claim. The key property of JWTs is that in order to confirm if they are valid we only need to look at the token itself.

We don't have to contact a third-party service or keep JWTs in-memory between requests to confirm that the claim they carry is valid - this is because they carry a Message Authentication Code or MAC (more on this later).

A JWT is made of 3 parts: the Header, the Payload and the Signature. Let's go through each one, starting with the Payload.

What does a JWT Payload look like?

The payload of a JWT is just a plain Javascript object. Here is an example of a valid payload object:

{
"name": "John Doe",
"email": "john@johndoe.com",
"admin": true
}
view raw01.ts hosted with ❤ by GitHub

In this case, the payload contains identification information about a given user, but in general, the payload could be anything else such as for example information about a bank transfer.

There are no restrictions on the content of the payload, but it's important to know that a JWT is not encrypted. So any information that we put in the token is still readable to anyone who intercepts the token.

Therefore it's important not to put in the Payload any user information that an attacker could leverage directly.

JWT Headers - Why are they necessary?

The content of the Payload is then validated by the receiver by inspecting the signature. But there are multiple types of signatures, so one of the things that the receiver needs to know is for example which type of signature to look for.

This type of technical metadata information about the token itself is placed in a separate Javascript object and sent together with the Payload.

That separate JSON object is known as the JWT Header, and here is an example of a valid header:

{
"alg": "RS256",
"typ": "JWT"
}
view raw02.ts hosted with ❤ by GitHub

As we can see, its also just a plain Javascript object. In this header, we can see that the signature type used for this JWT was RS256.

More on the multiple types of signatures in a moment, right now let's focus on understanding what the presence of the signature enables in terms of Authentication.

JWT signatures - How are they used for Authentication?

The last part of a JWT is the signature, which is a Message Authentication Code (or MAC). The signature of a JWT can only be produced by someone in possession of both the payload (plus the header) and a given secret key.

Here is how the signature is used to ensure Authentication:

  • the user submits the username and password to an Authentication server, which might be our Application server, but it's typically a separate server
  • the Authentication server validates the username and password combination and creates a JWT token with a payload containing the user technical identifier and an expiration timestamp
  • the Authentication server then takes a secret key, and uses it to sign the Header plus Payload and sends it back to the user browser (we will cover later the exact details on how the signature works )
  • the browser takes the signed JWT and starts sending it with each HTTP request to our Application server
  • The signed JWT acts effectively as a temporary user credential, that replaces the permanent credential wich is the username and password combination

And from there, here is what our Application server does with the JWT token:

  • our Application server checks the JWT signature and confirms that indeed someone in possession of the secret key signed this particular Payload
  • The Payload identifies a particular user via a technical identifier
  • Only the Authentication server is in possession of the private key, and the Authentication server only gives out tokens to users that submit the correct password
  • therefore our Application server can safely be sure that this token was indeed given to this particular user by the Authentication server, meaning that it's indeed the user as it
    had the right password
  • The server proceeds with processing the HTTP request assuming that it indeed it belongs to that user

The only way for an attacker to impersonate a user would be to either steal both its username and personal login password, or steal the secret signing key from the Authentication server.

As we can see, the signature is really the key part of the JWT!

The signature is what enables a fully stateless server to be sure that a given HTTP request belongs to a given user, just by looking at a JWT token present in the request itself, and without forcing the password to be sent each time with the request.

Is the goal of JWTs to make a server stateless?

Making the server stateless is a nice side effect, but the key benefit of JWTs is that the Authentication server that issued the JWT and the Application server that validates the JWT can be two completely separate servers.

This means that there is only the need for some minimal Authentication logic at the level of the application server - we only need to check the JWT!

It would be possible for a complete cluster of applications to delegate login/signup to a single Authentication server.

This means that the Applications servers are simpler and safer, as a lot of the Authentication functionality is concentrated on the Authentication server and reused across applications.

Now that we know on a high level how JWTs enable stateless third-party Authentication, let's get into their implementation details.

What does a JSON Web Token look like?

To learn about the 3 JWT building parts, here is a video that shows some code and an online JWT validation tool:

Let's then have a look at an example of a JWT, taken from the online JWT validation tool available at jwt.io:

eyJhbGciOiJIUzI1NiIsInR5cCI6IkpXVCJ9.eyJzdWIiOiIxMjM0NTY3ODkwIiwibmFtZSI6IkpvaG4gRG9lIiwiYWRtaW4iOnRydWV9.TJVA95OrM7E2cBab30RMHrHDcEfxjoYZgeFONFh7HgQ

You might be thinking, where have the JSON objects gone?? We will get them back in a moment. In fact, at the end of this post you will understand in-depth every aspect of this strange looking string.

Let's have a look at it: we can see that it does have 3 parts separated by dots. The first part before the first dot is the JWT Header:

JWT Header: 
eyJhbGciOiJIUzI1NiIsInR5cCI6IkpXVCJ9

The second part, between the first dot and the second, is the Payload:

JWT Payload: eyJzdWIiOiIxMjM0NTY3ODkwIiwibmFtZSI6IkpvaG4gRG9lIiwiYWRtaW4iOnRydWV9

And the last part, after the second dot is the Signature:

JWT Signature: 
TJVA95OrM7E2cBab30RMHrHDcEfxjoYZgeFONFh7HgQ

If you want to confirm that the information is indeed there, simply copy the complete JWT string above to the official online JWT validation tool available at jwt.io.

But then what are all these characters, how can we read back the information in a JWT for troubleshooting? How does jwt.io get the JSON objects back?

Base64 in a Nutshell, or is it Base64Url?

Believe it or not, the Payload, the Header, and the Signature are still in there in readable form.

It's just that we want to make sure that when we send the JWT across the network we won't run into any of those nasty ("garbled text" qîüö:Ã) character encoding issues.

This problem happens because different computers across the world are handling strings in different character encodings, such as for example UTF-8, ISO 8859-1, etc.

And these problems are ubiquitous as much as strings are: whenever we have a string in any platform we have an encoding being used. Even if we didn't specify any encoding:

  • either the default encoding of the operating system will be used
  • or it will be taken from a configuration parameter in our server

We want to be able to send strings across the network without having to worry about these issues, so we choose a subset of characters that all common encodings handle the same way, and that is how the Base64 encoding format was born.

Base64 vs Base64Url

But what we see in a JWT is actually not Base64: instead its Base64Url.

It's just like Base64, but there are a couple of characters different so that we can easily send a JWT as part of a Url parameter, which is exactly what happens if for example we use a third-party login page that then redirects to our site.

So if we take the second part of this JWT (between the first and the second dot), we get the Payload which looks like this:

eyJzdWIiOiIxMjM0NTY3ODkwIiwibmFtZSI6IkpvaG4gRG9lIiwiYWRtaW4iOnRydWV9

Let's just run it through an online decoder, like for example this one:

{
"sub":"1234567890",
"name":"John Doe",
"admin":true
}
view raw04.ts hosted with ❤ by GitHub

We get back a JSON payload! This is great to know for troubleshooting. We did use a Base64 decoder though, more on this later, right now let's summarize what we have so far:

Summary: We now have a good overview of the content of a JWT Header and the Payload: they are just two Javascript objects, converted to JSON and encoded in Base64Url and separated by a dot.

This format is really just a practical way of sending JSON across a network.

This video shows some code on how to create and validate a JWT, and covers the Header and the Payload parts in detail:

Before moving into the signature, let's talk about what do we put in the Payload in the concrete use case of User Authentication.

User Session Management with JWTs: Subject and Expiration

As we have mentioned, a JWT payload could in principle be any claim, and not just user identification information. But using JWT for Authentication is such a common use case that there are a couple of specific properties of a payload defined for supporting:

  • user identification
  • session expiration

Here is a payload with a couple of the most commonly used JWT payload properties:

{
"iss": "Identifier of our Authentication Server",
"iat": 1504699136,
"sub": "github|353454354354353453",
"exp": 1504699256
}
view raw03.ts hosted with ❤ by GitHub

Here is what these standard properties mean:

  • iss means the issuing entity, in this case, our authentication server
  • iat is the timestamp of creation of the JWT (in seconds since Epoch)
  • sub contains the technical identifier of the user
  • exp contains the token expiration timestamp

This is what is called a Bearer Token, and implicitly means:

The Authentication Server confirms that the bearer of this token is the user with the following ID defined by the sub property: let's give this user access

Now that we have a good understanding of how the Payload is used in the typical case of User Authentication, let's now focus on understanding the Signature.

There are many types of signatures for JWTs, in this post we going to cover two: HS256 and RS256. So let's start with the first signature type: HS256.

The HS256 JWT Digital Signature - How does it work?

Like most signatures, the HS256 digital signature is based on a special type of function: a cryptographic hashing function.

This sounds intimidating, but it's a concept well worth learning: this knowledge was useful 20 years ago and will be useful for a very long time. A lot of practical security implementation revolves around hashes, they are everywhere in web application security.

The good news is that its possible to explain everything that we need to know (as Web application developers) about Hashing in a few paragraphs, and that is what we will do here.

We are going to do this in two steps: first, we will talk about what a hashing function is, and after that, we will see how such function together with a password can be combined to produce a Message Authentication Code (which is the digital signature).

In the end of this section, you will be able to reproduce the HS256 JWT signature yourself using online troubleshooting tools and an npm package.

What is a Hashing function?

A hashing function is a special type of function with some very unique properties: it has lots of practical useful use cases like digital signatures.

We are going to talk about 4 interesting properties of these functions, and then see why these properties enable us to produce a verifiable signature.

The function that we will be using here is called SHA-256.

Hashing Functions Property 1 - Irreversibility

A hashing function is a bit like a meat grinder: you put steaks on one end, and get hamburgers on the other - and there is no way to ever get back those steaks starting with the hamburger:

the function is effectively irreversible!

This means that if we take our Header and Payload and run it through this function, no one will be able to get the data back again just by looking at the output.

To see the output of for example SHA-256, try it out with this online hash calculator, to see what a typical output that looks like this:

3f306b76e92c8a8fbae88a3ef1c0f9b0a81fe3a953fa9320d5d0281b059887c3

This also means that hashing is not encryption: encryption by definition is a reversible action - we do need to get back the original input from the encrypted output.

Hashing Functions Property 2 - Reproducible

Another important thing to know about hashing is that it's reproducible, meaning that if we hash the same input eader and payload multiple times, we will always get back the exact same result, bit by bit.

This means that given a pair of inputs and a hash output, we can always validate if a given output (for example a signature) is correct because we can easily reproduce the calculation - but only if we have all the inputs.

Hashing Functions Property 3 - No Collisions

Another interesting property of Hashing functions is that if we submit multiple values to it, we always get back a unique result per input value.

There are effectively no situations when two different inputs will produce the same output - a unique input produces a unique output.

This means that if we hash the Payload plus the Header, we always get back the exact same result, and not other input data could have produced the same hash output - the hash output is effectively a unique representation of the input data.

Hashing Functions Property 4 - Unpredictability

The last property that we will cover about hashing functions is that given a known output, it's not possible to guess the input using a successive incremental approximation method.

Let's say that we had the hash output just above and we were trying to find out the Payload that generated it, by guessing an input and inspecting the output to see if it's close to the expected result.

Then we simply tweak one character on the input and then check the output again to see if we got closer, and if so repeat the process until we manage to guess the input.

But there is only one problem:

With hashing functions, this strategy will not work!

This is because in a hashing function, if we change even a single character in the input (actually even a single bit), on average 50% of the output bits will change!

So even minimal differences in the input create a completely different output.

This all sounds interesting, but you are likely thinking at this point: how does a hashing function enable a digital signature then??

Can't the attacker just take the Header and Payload and forge the signature?

Anyone can apply the SHA-256 function and get to the same output and append it to the signature of the JWT, right?

How to use hashing functions to produce a signature?

That last part is true, anyone can reproduce the hash of a given Header and Payload.

But the HS256 signature is not only that: instead, what we do is we take the Header, the Payload and we add also a secret password, and then we hash everything together.

The result of that is a SHA-256 HMAC or Hash-Based Message Authentication Code, and one example of a function that does that is the HMAC-SHA256 function, which is used in HS256 signatures.

The result of that function can only be reproduced by someone in possession of the JWT Header, the Payload (which are readable by anyone that grabbed the token), AND the password.

This means that that resulting hash is effectively a form of digital signature!

This is because the hashed result proves that the Payload was created and then signed by someone in possession of the password: there would be no other way for someone to come up with that particular hash.

So the hash serves as an unforgeable digital proof that the Payload is valid.

The hash is then appended to the message, in order to allow the receiver to authenticate it: this hashed output is called an HMAC: Hash-Based Message Authentication Code, which is a form of digital signature.

And that is exactly what we do in the case of JWTs: that last part of the JWT (after the second dot) is the SHA-256 hash of the Header plus the Payload, encoded in Base64Url.

How to validate a JWT signature?

So when we receive a HS256-signed JWT on our server, we have to have that exact same password too, in order be to be able to validate the signature and confirm that the token Payload is indeed valid.

To check the signature we simply take the JWT header plus the payload and hash it together with the password. This means in the case of HS256 that the JWT receiver needs to have the exact same password as the sender.

And if we get back the same hash as in the signature it means that the token must be valid, because only someone with the password could have come up with that signature.

And that, in general, is how digital signatures and HMACs work. Do you want to see this in action?

Manually confirming a SHA-256 JWT Signature

Let's take that the same JWT as above and remove the signature and the second dot, leaving only the Header and the Payload part. That would look something like this:

eyJhbGciOiJIUzI1NiIsInR5cCI6IkpXVCJ9.eyJzdWIiOiIxMjM0NTY3ODkwIiwibmFtZSI6IkpvaG4gRG9lIiwiYWRtaW4iOnRydWV9

Now if you copy/paste this string to an online HMAC SHA-256 tool like this one, and use the password secret, we get back the JWT signature!

Or almost, we will get back the Base64 version of it, which still has an = at the end, and this is close but not identical to Base64Url:

TJVA95OrM7E2cBab30RMHrHDcEfxjoYZgeFONFh7HgQ=

That equal sign would show up as %3D in a URL bar, so that is kind of messy, but it also explains the need for Base64Url, if we want to send JWTs as a URL parameter.

There aren't a lot of online Base64Url converters available, but we can always do that in the command line. So to really confirm this HS256 signature, here is an npm package that implements Base64Url, as well as conversion from/to Base64.

The base64url NPM Package

Let's then use it to convert our result to Base64 URL and completely confirm the signature and our understanding of how it works:

mkdir quick-test && cd quick-test
npm init
npm install base64url
 
node
> const base64url = require('base64url');
> base64url.fromBase64("TJVA95OrM7E2cBab30RMHrHDcEfxjoYZgeFONFh7HgQ=")

TJVA95OrM7E2cBab30RMHrHDcEfxjoYZgeFONFh7HgQ

So finally there we have it, this string is the HS256 JWT signature that we were trying to reproduce:

This is the exact same signature as the JWT above, character per character!

So congratulations, you now know in-depth how HS256 JWT signatures work and you will be able to troubleshoot yourself out of any situation using these online tools and packages.

Why other types of signatures then?

This, in summary, is how JWT signatures are used for Authentication, and HS256 is just an example of a particular signature type. But there other signature types, and the one most commonly used is: RS256.

What is the difference? We have introduced HS256 here mostly because it makes it much simpler to understand the notion of a MAC code, and you might very well find it in production in many applications.

But in general, it's much better to use something like the RS256 signature method instead, because as we are going to learn in the next section it has so many advantages over HS256.

Disadvantages of HS256 Signatures

HS256 signatures can be brute forced if the input secret key is weak, but that could be said about many other key based technologies.

Hash-based signatures are however particularly simpler to brute force when compared to other alternatives, for typical production key sizes.

But more than that, a practical disadvantage of HS256 is that it requires the existence of a previously agreed secret password between the server that is issuing the JWTs, and any other server machine consuming the JWTs for validation and user identification.

Unpractical Key Rotation

This means that if we want to change the password we need to have it distributed and installed to all network nodes that need it, which is not convenient, it's error prone and would involve coordinated server downtime.

This might not even be feasible is let's say one server is managed by a completely different team or even by a third-party organization.

No separation between token creation and validation

It all boils down to the fact that there is no distinction between the ability to create JWTs vs the ability of simply validating them: with HS256 everyone in the network can both create and validate tokens because they all have the secret password.

This means that there are many more places where the password can be lost or stolen by an attacker, as the password needs to be installed everywhere, and not all applications have the same level of operational security.

One way to mitigate this is to create one shared password per application, but instead, we are going to learn about a new signature method that solves all these problems and that modern JWT-based solutions now use by default: RS256.

THe RS256 JWT Signature

With RS256 we are still going to produce a Message Authentication Code just like before, the goal is still to create a digital signature that proves that a given JWT is valid.

But in the case of this signature, we are going to separate the ability to create valid tokens, that only the Authentication server should have, from the ability to validate JWT tokens, that only our Application server would benefit from doing.

The way that we are going to that is that we are going to create two keys instead of one:

  • There will still be a private key but this time it will be owned only by the Authentication server, used only to sign JWTs
  • The private key can be used to sign JWTs, but it cannot be used to validate them
  • There is a second key called the public key, which is used by the application server only to validate JWTs
  • The public key can be used to validate JWT signatures, but it cannot be used to sign new JWTs
  • The public key does not need to be kept private and it often is not, because if the attacker gets it there is no way to use it to forge signatures

Introducing The RSA encryption technology

RS256 signatures use a particular type of keys, called RSA Keys. RSA is the name of an encryption/decryption algorithm that takes one key to encrypt and a second key to decrypt.

Note that RSA is not a Hashing function, because by definition the output of encryption can be reversed and we can get back the initial result.

Let's see what an RSA Public Key looks like:

-----BEGIN PUBLIC KEY-----
MIGfMA0GCSqGSIb3DQEBAQUAA4GNADCBiQKBgQDdlatRjRjogo3WojgGHFHYLugdUWAY9iR3fy4arWNA1KoS8kVw33cJibXr8bvwUAUparCwlvdbH6dvEOfou0/gCFQsHUfQrSDv+MuSUMAe8jzKE4qW+jK+xQU9a03GUnKHkkle+Q0pX/g6jXZ7r1/xAK5Do2kQ+X5xK9cipRgEKwIDAQAB
-----END PUBLIC KEY-----  

Again it looks bit scary, but it's just a unique key generated by a command line tool like openssl or an online RSA key generation utility like this one.

Again this key could be made public, and this is actually typically published, so the attacker does not need to guess this key: it usually already has it.

But then there is the corresponding RSA Private Key:

-----BEGIN RSA PRIVATE KEY-----
MIICWwIBAAKBgQDdlatRjRjogo3WojgGHFHYLugdUWAY9iR3fy4arWNA1KoS8kVw33cJibXr8bvwUAUparCwlvdbH6dvEOfou0/gCFQsHUfQrSDv+MuSUMAe8jzKE4qW+jK+xQU9a03GUnKHkkle+Q0pX/g6jXZ7r1/xAK5Do2kQ+X5xK9cipRgEKwIDAQABAoGAD+onAtVye4ic7VR7V50DF9bOnwRwNXrARcDhq9LWNRrRGElESYYTQ6EbatXS3MCyjjX2eMhu/aF5YhXBwkppwxg+EOmXeh+MzL7Zh284OuPbkglAaGhV9bb6/5CpuGb1esyPbYW+Ty2PC0GSZfIXkXs76jXAu9TOBvD0ybc2YlkCQQDywg2R/7t3Q2OE2+yo382CLJdrlSLVROWKwb4tb2PjhY4XAwV8d1vy0RenxTB+K5Mu57uVSTHtrMK0GAtFr833AkEA6avx20OHo61Yela/4k5kQDtjEf1N0LfI+BcWZtxsS3jDM3i1Hp0KSu5rsCPb8acJo5RO26gGVrfAsDcIXKC+bQJAZZ2XIpsitLyPpuiMOvBbzPavd4gY6Z8KWrfYzJoI/Q9FuBo6rKwl4BFoToD7WIUS+hpkagwWiz+6zLoX1dbOZwJACmH5fSSjAkLRi54PKJ8TFUeOP15h9sQzydI8zJU+upvDEKZsZc/UhT/SySDOxQ4G/523Y0sz/OZtSWcol/UMgQJALesy++GdvoIDLfJX5GBQpuFgFenRiRDabxrE9MNUZ2aPFaFp+DyAe+b4nDwuJaW2LURbr8AEZga7oQj0uYxcYw==
-----END RSA PRIVATE KEY-----  

The good news is that there is no way an attacker could guess that!

Again let's remember the two keys are linked, what one key encrypts the other and only the other can decrypt. But how do we use that to produce a signature?

Why not just encrypt the payload with RSA?

Here is one attempt to create a digital signature using RSA: we take the Header and the Payload, and encrypt it using RSA with the private key, then we send the JWT over.

The receiver gets the JWT, decrypts it with the Public Key, and checks the result.

If the decryption process works and the output looks like a JSON payload, this means that it must have been the Authentication Server that created this data and encrypted it. So it must be valid, right?

That is indeed true, and it would be sufficient to prove that the token is correct. But that is not what we do due to practical reasons.

The RSA encryption process is relatively slow compared to for example a hashing function. For larger payload sizes this could be an issue, and this is only one reason.

So what do then, how do HS256 signatures actually use RSA in practice?

Using RSA and SHA-256 to sign a JWT (RSA-SHA256)

In practice what we do is we take the Header and the Payload and we hash them first, using for example SHA-256.

This is something very fast to do, and we obtain a unique representation of the input data that is much smaller than the actual data itself.

We then take the hash output, and encrypt that instead of the whole data (header plus payload) using the RSA private key, which gives us the RS256 signature!

We then append it to the JWT as the last of the 3 parts, and we send it.

How does the receiver check RS256 Signatures?

The receiver of the JWT will then:

  • take the header and the payload, and hash everything with SHA-256
  • decrypt the signature using the public key, and obtain the signature hash
  • the receiver compares the signature hash with the hash that he calculated himself based on the Header and the Payload

Do the two hashes match? Then this proves that the JWT was indeed created by the Authentication server!

Anyone could have calculated that hash, but only the Authentication server could have encrypted it with the matching RSA private key.

Do you think that there has to be more to it? Let's confirm this then, and learn how to troubleshoot RS256 signatures along the way.

Manually confirming an RS256 JWT signature

Let's start by taking an example of a JWT signed with RS256 from jwt.io:

eyJhbGciOiJSUzI1NiIsInR5cCI6IkpXVCJ9.eyJzdWIiOiIxMjM0NTY3ODkwIiwibmFtZSI6IkpvaG4gRG9lIiwiYWRtaW4iOnRydWV9.EkN-DOsnsuRjRO6BxXemmJDm3HbxrbRzXglbN2S4sOkopdU4IsDxTI8jO19W_A4K8ZPJijNLis4EZsHeY559a4DFOd50_OqgHGuERTqYZyuhtF39yxJPAjUESwxk2J5k_4zM3O-vtd1Ghyo4IbqKKSy6J9mTniYJPenn5-HIirE

As we can see, there is no immediate visual difference when compared to an HS256 JWT, but this was signed with the same RSA Private Key shown above.

Now let's isolate the Header and the Payload only, and remove the signature:

eyJhbGciOiJSUzI1NiIsInR5cCI6IkpXVCJ9.eyJzdWIiOiIxMjM0NTY3ODkwIiwibmFtZSI6IkpvaG4gRG9lIiwiYWRtaW4iOnRydWV9

All we have to do now is to hash this with SHA-256, and encrypt it with RSA using the RSA private key shown above.

The result should be the JWT signature! Let's confirm if that is the case using the Node built-in Crypto module. There is no need for an external installation, this comes built-in with Node.

This module comes with a built-in RSA-SHA256 function and many other signature functions that we can use to try to reproduce signatures.

To do that, the first thing that we need is to take the RSA private key and save it to a text file, named private.key.

Then on the command line, we run the node shell and execute this small program:

const crypto = require('crypto');
const fs = require('fs');
const sign = crypto.createSign('RSA-SHA256');
// copy / paste here the header and the payload of your JWT only
sign.write('eyJhbGciOiJSUzI1NiIsInR5cCI6IkpXVCJ9
.eyJzdWIiOiIxMjM0NTY3ODkwIiwibmFtZSI6IkpvaG4gRG9lIiwiYWRtaW4iOnRydWV9');
sign.end();
var privateKey = fs.readFileSync('./private.key');
console.log(sign.sign(privateKey, 'base64'));
view raw05.ts hosted with ❤ by GitHub

If you are using a different JWT than the test JWT that we have been using, then you need to copy/paste only the two parts to the write call, without the JWT signature.

And here is what we get back:

 EkN+DOsnsuRjRO6BxXemmJDm3HbxrbRzXglbN2S4sOkopdU4IsDxTI8jO19W/A4K8ZPJijNLis4EZsHeY559a4DFOd50/OqgHGuERTqYZyuhtF39yxJPAjUESwxk2J5k/4zM3O+vtd1Ghyo4IbqKKSy6J9mTniYJPenn5+HIirE=

Which is completely different than the JWT signature !! But wait a second: there are slashes here, equal signs: this would not be possible to put in an URL without further escaping.

This is because we have created the Base64 version of the signature, and what we need instead is the Base64Url version of this. So let's convert it:

bash$ node
const base64url = require('base64url');
base64url.fromBase64("EkN+DOsnsuRjRO6BxXemmJDm3HbxrbRzXglbN2S4sOkopdU4IsDxTI8jO19W/A4K8ZPJijNLis4EZsHeY559a4DFOd50/OqgHGuERTqYZyuhtF39yxJPAjUESwxk2J5k/4zM3O+vtd1Ghyo4IbqKKSy6J9mTniYJPenn5+HIirE=");

And here is what get back:

EkN-DOsnsuRjRO6BxXemmJDm3HbxrbRzXglbN2S4sOkopdU4IsDxTI8jO19W_A4K8ZPJijNLis4EZsHeY559a4DFOd50_OqgHGuERTqYZyuhtF39yxJPAjUESwxk2J5k_4zM3O-vtd1Ghyo4IbqKKSy6J9mTniYJPenn5-HIirE 

Which is exactly, bit by bit the RS256 signature that we were trying to create!

This proves our understanding of RS256 JWT signatures, and we now know how to troubleshoot them if needed.

In summary, RS256 JWT signatures are simply an RSA encrypted SHA-256 hash of the header plus payload.

So we now know how RS256 signatures work, but why are these signatures better than HS256?

RS256 Signatures vs HS256 - Why use RS256?

With RS256, the attacker can easily perform the first step of signature creation process which is to create the SHA-256 hash based on the values of a stolen JWT header and payload.

But from there to recreate a signature he would have to brute force RSA, which for a good key size is unfeasible.

But that is not the most practical reason why we would want to choose RS256 over HS256, for most applications.

With RS256, we also know that the private key that has the power of signing tokens is only kept by the Authentication server, where it's much safer - so RS256 means fewer chances of losing the signing private key.

But there is a much bigger practical reason to choose RS256 - simplified key rotation.

How to implement key rotation

Let's remember that the public key used to validate tokens can be published anywhere, and the attacker cannot in practice do anything with it.

After all, what good would it do for an attacker to be able to validate a stolen JWT? An attacker wants to be able to forge JWTs, not validate them.

This opens up the possibility of publishing the public key in a server under our control.

The application servers then only needs to connect to that server to fetch the public key, and check again periodically just in case it has changed, either due to an emergency or periodic key rotation.

So there is no need to bring the application server and the authentication server down at the same time, and update the keys eveywhere in one go.

But how can the public key get published? Here is one possible format.

JWKS (JSON Web Key Set) Endpoints

There are many formats to publish public keys, but here is one that will feel familiar: JWKS which is short for Json Web Key Set.

There are some very easy to use npm packages to consume these endpoints and validate JWTs, as we will see on part two.

These are endpoints that can publish a series of public keys, not just one.

If you are curious to know what this type of endpoints looks like, have a look at this live example, here is what we receive in response to an HTTP GET request:

{
"keys": [
{
"alg": "RS256",
"kty": "RSA",
"use": "sig",
"x5c": [
"MIIDJTCCAg2gAwIBAgIJUP6A/iwWqvedMA0GCSqGSIb3DQEBCwUAMDAxLjAsBgNVBAMTJWFuZ3VsYXJ1bml2LXNlY3VyaXR5LWNvdXJzZS5hdXRoMC5jb20wHhcNMTcwODI1MTMxNjUzWhcNMzEwNTA0MTMxNjUzWjAwMS4wLAYDVQQDEyVhbmd1bGFydW5pdi1zZWN1cml0eS1jb3Vyc2UuYXV0aDAuY29tMIIBIjANBgkqhkiG9w0BAQEFAAOCAQ8AMIIBCgKCAQEAwUvZ+4dkT2nTfCDIwyH9K0tH4qYMGcW/KDYeh+TjBdASUS9cd741C0XMvmVSYGRP0BOLeXeaQaSdKBi8uRWFbfdjwGuB3awvGmybJZ028OF6XsnKH9eh/TQ/8M/aJ/Ft3gBHJmSZCuJ0I3JYSBEUrpCkWjkS5LtyxeCPA+usFAfixPnU5L5lyacj3t+dwdFHdkbXKUPxdVwwkEwfhlW4GJ79hsGaGIxMq6PjJ//TKkGadZxBo8FObdKuy7XrrOvug4FAKe+3H4Y5ZDoZZm5X7D0ec4USjewH1PMDR0N+KUJQMRjVul9EKg3ygyYDPOWVGNh6VC01lZL2Qq244HdxRwIDAQABo0IwQDAPBgNVHRMBAf8EBTADAQH/MB0GA1UdDgQWBBRwgr0c0DYG5+GlZmPRFkg3+xMWizAOBgNVHQ8BAf8EBAMCAoQwDQYJKoZIhvcNAQELBQADggEBACBV4AyYA3bTiYWZvLtYpJuikwArPFD0J5wtAh1zxIVl+XQlR+S3dfcBn+90J8A677lSu0t7Q7qsZdcsrj28BKh5QF1dAUQgZiGfV3Dfe4/P5wUaaUo5Y1wKgFiusqg/mQ+kM3D8XL/Wlpt3p804dbFnmnGRKAJnijsvM56YFSTVO0JhrKv7XeueyX9LpifAVUJh9zFsiYMSYCgBe3NIhIfi4RkpzEwvFIBwtDe2k9gwIrPFJpovZte5uvi1BQAAoVxMuv7yfMmH6D5DVrAkMBsTKXU1z3WdIKbrieiwSDIWg88RD5flreeTDaCzrlgfXyNybi4UTUshbeo6SdkRiGs="
],
"n": "wUvZ-4dkT2nTfCDIwyH9K0tH4qYMGcW_KDYeh-TjBdASUS9cd741C0XMvmVSYGRP0BOLeXeaQaSdKBi8uRWFbfdjwGuB3awvGmybJZ028OF6XsnKH9eh_TQ_8M_aJ_Ft3gBHJmSZCuJ0I3JYSBEUrpCkWjkS5LtyxeCPA-usFAfixPnU5L5lyacj3t-dwdFHdkbXKUPxdVwwkEwfhlW4GJ79hsGaGIxMq6PjJ__TKkGadZxBo8FObdKuy7XrrOvug4FAKe-3H4Y5ZDoZZm5X7D0ec4USjewH1PMDR0N-KUJQMRjVul9EKg3ygyYDPOWVGNh6VC01lZL2Qq244HdxRw",
"e": "AQAB",
"kid": "QzY0NjREMjkyQTI4RTU2RkE4MUJBRDExNzY1MUY1N0I4QjFCODlBOQ",
"x5t": "QzY0NjREMjkyQTI4RTU2RkE4MUJBRDExNzY1MUY1N0I4QjFCODlBOQ"
}
]
}
view raw06.ts hosted with ❤ by GitHub

The kid property is the key identifier, and x5c is the representation of one particular public key.

The great thing about this format is that its standard, so we just have to have the URL to the endpoint, and a library that consumes JWKS - this should give us a ready to use public key for validating JWTs, without having to install it on our server.

JWTs are often associated to public internet sites, and to social login solutions. But what about intranet, in-house applications?

JWTs in the Enterprise

JWTs are applicable also to the enterprise, as a great alternative to the typical Pre-Authentication setup which is a known security liability.

In the Pre-Authentication setup that many companies use, we run our application servers behind a proxy on a private network, and simply retrieve the current user from an HTTP header.

The HTTP header that identifies the user is usually filled in by a centralized element of the network, usually a centralized login page installed on a proxy server that will take care of the user session.

That server will block access to the application if the session is expired, and will authenticate the users after login.

After that, it will forward all requests to the application server and simply add an HTTP header to identify the user.

The problem is that with that setup in practice anyone inside the network can easily impersonate a user just by setting that same HTTP header!

There are solutions for that, like white-listing the IP of the proxy server at the level of the application server, or using a client certificate but in practice, most companies don't have these measures in place.

A better version of the Pre-Authentication Setup

The Pre-Authentication idea is good though because this setup means that the Application Developer does not have to implement the authentication features itself on each application, sparing time and avoiding potential security bugs.

Wouldn't it be great to have the convenience of the Pre-Authentication setup, without having to compromise security and make our Application authentication easily bypassable, even if only inside a private network?

This is simple to do if we put JWT into the picture: instead of just putting the username in the header as we usually do in Pre-Authentication, let's make that HTTP header a JWT.

Let's then put the username inside the payload of that JWT, signed by the Authentication server.

The Application server, instead of just taking the username from the header, will first validate the JWT:

  • if the signature is correct, then the user is correctly authenticated and the request goes through
  • if not, the application server can simply reject the request

The result is that we now have Authentication working correctly, even inside the private network!

We no longer have to trust blindly the HTTP Header containing the username. We can make sure that that HTTP header is indeed valid and issued by the proxy, and it's not some attacker trying to log in as another user.

Conclusions

In this post we got an overall idea of what JWTs are, and how they are used for Authentication. JWTs are simply JSON payloads whith a easibly verifiable and unforgable signature.

Again, there is nothing about JWTs that is authentication-specific, we could use them to send any claim across the network.

Another common security related use for JWTs if Authorization: we can for example put in the Payload the list of Authorization roles for the user: Read Only User, Administrator, etc.

In the next post of this series, we are going to learn how to implement Authentication in an Angular application using JWTs.

I hope you enjoyed this post, if you have some questions or comments please let me know in the comments below and I will get back to you.

If you would like to learn a lot more on how to secure an Angular application, we recommend checking the Angular Security Course, where JWTs are covered in much more detail.

To get notified when more posts like this come out, I invite you to subscribe to our newsletter:

https://blog.angular-university.io/angular-jwt/

https://auth0.com/learn/json-web-tokens

JSON Web Token (JWT) is an open standard (RFC 7519) that defines a compact and self-contained way for securely transmitting information between parties as a JSON object. This information can be verified and trusted because it is digitally signed. JWTs can be signed using a secret (with HMAC algorithm) or a public/private key pair using RSA.

Let’s explain some concepts of this definition further.

  • Compact: Because of its size, it can be sent through an URL, POST parameter, or inside an HTTP header. Additionally, due to its size its transmission is fast.
  • Self-contained: The payload contains all the required information about the user, to avoid querying the database more than once.
Interested in getting up-to-speed with JWTs as soon as possible?DOWNLOAD THE FREE EBOOK

ipad pro handbook

When should you use JSON Web Tokens?

These are some scenarios where JSON Web Tokens are useful:

  • Authentication: This is the typical scenario for using JWT, once the user is logged in, each subsequent request will include the JWT, allowing the user to access routes, services, and resources that are permitted with that token. Single Sign On is a feature that widely uses JWT nowadays, because of its small overhead and its ability to be easily used among systems of different domains.
  • Information Exchange: JWTs are a good way of securely transmitting information between parties, because as they can be signed, for example using a public/private key pair, you can be sure that the sender is who they say they are. Additionally, as the signature is calculated using the header and the payload, you can also verify that the content hasn’t changed.

Which is the JSON Web Token structure?

JWTs consist of three parts separated by dots (.), which are:

  • Header
  • Payload
  • Signature

Therefore, a JWT typically looks like the following.

xxxxx.yyyyy.zzzzz

Let’s break down the different parts.

The header typically consists of two parts: the type of the token, which is JWT, and the hashing algorithm such as HMAC SHA256 or RSA.

For example:

{
  'alg': 'HS256',
  'typ': 'JWT'
}

Then, this JSON is Base64Url encoded to form the first part of the JWT.

Payload

The second part of the token is the payload, which contains the claims. Claims are statements about an entity (typically, the user) and additional metadata. There are three types of claims: reservedpublic, and private claims.

    • Reserved claims: These are a set of predefined claims, which are not mandatory but recommended, thought to provide a set of useful, interoperable claims. Some of them are: iss (issuer), exp (expiration time), sub (subject), aud (audience), among others.

Notice that the claim names are only three characters long as JWT is meant to be compact.

  • Public claims: These can be defined at will by those using JWTs. But to avoid collisions they should be defined in the IANA JSON Web Token Registry or be defined as a URI that contains a collision resistant namespace.
  • Private claims: These are the custom claims created to share information between parties that agree on using them.

An example of payload could be:

{
  'sub': '1234567890',
  'name': 'John Doe',
  'admin': true
}

The payload is then Base64Url encoded to form the second part of the JWT.

Signature

To create the signature part you have to take the encoded header, the encoded payload, a secret, the algorithm specified in the header, and sign that.

For example if you want to use the HMAC SHA256 algorithm, the signature will be created in the following way.

HMACSHA256(
  base64UrlEncode(header) + '.' +
  base64UrlEncode(payload),
  secret)

The signature is used to verify that the sender of the JWT is who it says it is and to ensure that the message was’t changed in the way.

Putting all together

The output is three Base64 strings separated by dots that can be easily passed in HTML and HTTP environments, while being more compact compared to XML-based standards such as SAML.

The following shows a JWT that has the previous header and payload encoded and it is signed with a secret.

An encoded JWT

You can browse to jwt.io where you can play with a JWT and put these concepts in practice. jwt.io allows you to decode, verify and generate JWT.

How JSON Web Tokens work?

In authentication, when the user successfully logs in using their credentials, a JSON Web Token will be returned. Since tokens are credentials, great care must be taken to prevent security issues. In general, you should not keep tokens longer than required.

You also should not store sensitive session data in browser storage due to lack of security.

Whenever the user wants to access a protected route, it should send the JWT, typically in the Authorization header using the Bearer schema. Therefore the content of the header should look like the following.

Authorization: Bearer <token>

This is a stateless authentication mechanism as the user state is never saved in the server memory. The server’s protected routes will check for a valid JWT in the Authorization header, and if there is, the user will be allowed. As JWTs are self-contained, all the necessary information is there, reducing the need of going back and forward to the database.

This allows to fully rely on data APIs that are stateless and even make requests to downstream services. It doesn’t matter which domains are serving your APIs, as Cross-Origin Resource Sharing (CORS) won’t be an issue as it doesn’t use cookies.
How JSON Web Tokens Work

Why should you use JSON Web Tokens?

Let’s talk about the benefits of JSON Web Tokens (JWT) comparing it to Simple Web Tokens (SWT) and Security Assertion Markup Language Tokens (SAML).

As JSON is less verbose than XML, when it is encoded its size is also smaller; making JWT more compact than SAML. This makes JWT a good choice to be passed in HTML and HTTP environments.

Security-wise, SWT can only be symmetric signed by a shared secret using the HMAC algorithm. While JWT and SAML tokens can also use a public/private key pair in the form of a X.509 certificate to sign them. However, signing XML with XML Digital Signature without introducing obscure security holes is very difficult compared to the simplicity of signing JSON.

JSON parsers are common in most programming languages, because they map directly to objects, conversely XML doesn’t have a natural document-to-object mapping. This makes it easier to work with JWT than SAML assertions.

Regarding usage, JWT is used at an Internet scale. This highlights the ease of client side processing of JWTs on multiple platforms, especially, mobile.
Json web token sample

How we use JSON Web Tokens in Auth0?

In Auth0, we issue JWTs as a result of the authentication process. When the user logs in using Auth0, a JWT is created, signed, and sent to the user. Auth0 supports signing JWT with both HMAC and RSA algorithms. This token will be then used to authenticate and authorize with APIs which will grant access to their protected routes and resources.

We also use JWTs to perform authentication and authorization in Auth0’s API v2, replacing the traditional usage of regular opaque API keys. Regarding authorization, JSON Web Tokens allow granular security, that is the ability to specify a particular set of permissions in the token, which improves debuggability.

What Is A Token?

Tokens are pieces of data that carry just enough information to facilitate the process of determining a user's identity or authorizing a user to perform an action. All in all, tokens are artifacts that allow application systems to perform the authorization and authentication process.

New to identity concepts? Read Authentication vs Authorization to get started.

Common identity frameworks and protocols use token-based strategies to secure access to applications and resources. For example, we can use OAuth 2.0 for authorization and OIDC for authentication.

OAuth 2.0 is one of the most popular authorization frameworks out there. It is designed to allow an application to access resources hosted by other servers on behalf of a user. OAuth 2.0 uses Access Tokens and Refresh Tokens.

OpenID Connect (OIDC) is an identity protocol that performs user authentication, user consent, and token issuance. OIDC uses ID Tokens.

Want to get up to speed with OAuth2 and OpenID Connect?

DOWNLOAD THE FREE EBOOK
Oauth2 OpenID Connect Professional Guide

Let's explore the three token types that we use with OAuth 2.0 and OpenID Connect to fulfill the authentication and authorization processes of our application systems. In the process, we'll see the critical role that refresh tokens play in helping developers build applications that offer convenience without compromising security.

Token Types

What's an ID token?

As the name may suggest, an ID token is an artifact that client applications can use to consume the identity of a user. For example, the ID token can contain information about the name, email, and profile picture of a user. As such, client applications can use the ID token to build a user profile to personalize the user experience.

An authentication server that conforms to the OpenID Connect (OIDC) protocol to implement the authentication process issues its clients an ID token whenever a user logs in. The consumers of ID tokens are mainly client applications such as Single-Page Applications (SPAs) and mobile applications. They are the intended audience.

What's an access token?

When a user logins in, the authorization server issues an access token, which is an artifact that client applications can use to make secure calls to an API server. When a client application needs to access protected resources on a server on behalf of a user, the access token lets the client signal to the server that it has received authorization by the user to perform certain tasks or access certain resources.

OAuth 2.0 doesn't define a format for access tokens. At Auth0, for example, access tokens issued for the Management API and access tokens issued for any custom API that you have registered with Auth0 follow the JSON Web Token (JWT) standard. Their basic structure conforms to the typical JWT structure, and they contain standard JWT claims asserted about the token itself.

Interested in getting up-to-speed with JWTs as soon as possible?

DOWNLOAD THE FREE EBOOK
JWT Handbook

This is the content of a decoded access token that follows the JWT format:

{
  "iss": "https://YOUR_DOMAIN/",
  "sub": "auth0|123456",
  "aud": [
    "my-api-identifier",
    "https://YOUR_DOMAIN/userinfo"
  ],
  "azp": "YOUR_CLIENT_ID",
  "exp": 1489179954,
  "iat": 1489143954,
  "scope": "openid profile email address phone read:appointments"
}

It's important to highlight that the access token is a bearer token. Those who hold the token can use it. The access token then acts as a credential artifact to access protected resources rather than an identification artifact. Malicious users could theoretically compromise a system and steal access tokens, which in turn they could use to access protected resources by presenting those tokens directly to the server.

As such, it's critical to have security strategies that minimize the risk of compromising access tokens. One mitigation method is to create access tokens that have a short lifespan: they are only valid for a short time defined in terms of hours or days.

There are different ways that a client application can get a new access token for a user. For example, once an access token expires, the client application could prompt the user to log in again to get a new access token. Alternatively, the authorization server could issue a refresh token to the client application that lets it replace an expired access token with a new one.

You can see both ID tokens and access tokens in action in any of our "Complete Guides to User Authentication" available for ReactAngularVue, and Node.js!

What Is a Refresh Token?

As mentioned, for security purposes, access tokens may be valid for a short amount of time. Once they expire, client applications can use a refresh token to "refresh" the access token. That is, a refresh token is a credential artifact that lets a client application get new access tokens without having to ask the user to log in again.

An application system where a SPA uses a refresh token to obtain a new access token

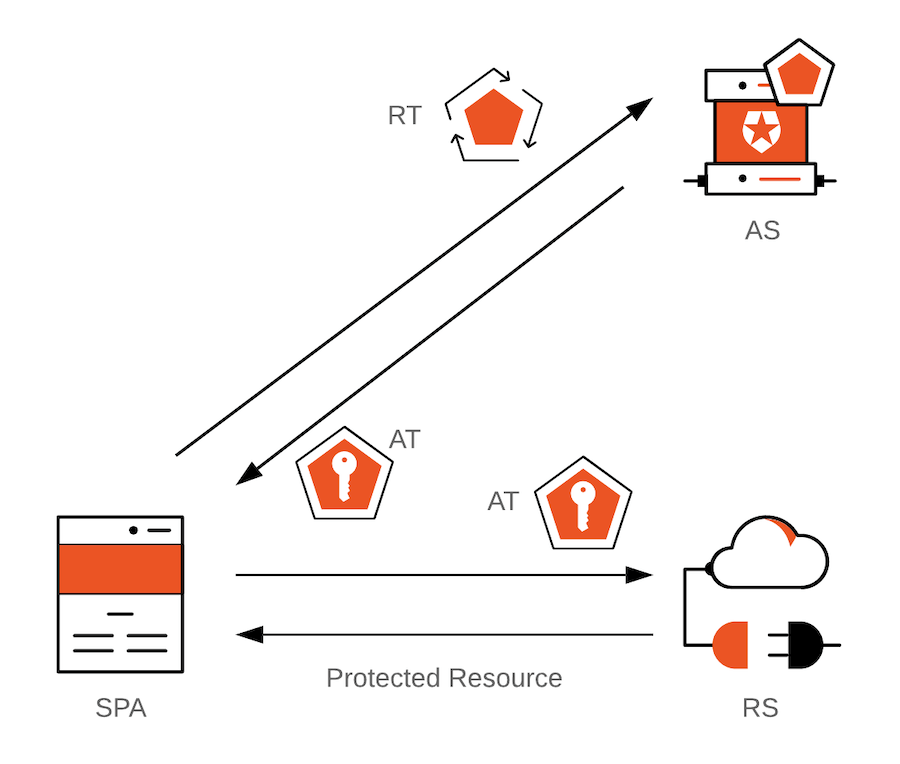
In the diagram above, SPA = Single-Page Application; AS = Authorization Server; RS = Resource Server; AT = Access Token; RT = Refresh Token.

The client application can get a new access token as long as the refresh token is valid and unexpired. Consequently, a refresh token that has a very long lifespan could theoretically give infinite power to the token bearer to get a new access token to access protected resources anytime. The bearer of the refresh token could be a legitimate user or a malicious user. As such, security companies, such as Auth0, create mechanisms to ensure that this powerful token is mainly held and used continuously by the intended parties.

When to Use Refresh Tokens

It's important to keep in mind that the OAuth 2.0 specification defines access tokens and refresh tokens. So, if we were to discuss authorization strategies in terms of other identity protocols or frameworks, such as SAML, we would not have the concepts of access tokens or refresh tokens.

For those involved with web development, access token and refresh tokens are common talk because the web extensively uses token-based authorization and authentication through the OAuth 2.0 framework and the OpenID Connect protocol.

When combined, OAuth 2.0 and OIDC bring to life an array of authorization and authentication flows. Each flow has its own set of benefits and caveats that define the best scenarios and architecture where we should use access and refresh tokens.

If there's an app for that, there's also a flow for that!

Keep in mind that according to the spec, when using the Implicit Flow, the authorization server should not issue refresh tokens. The Implicit flow is often implemented in Single-Page Applications (SPAs), which run on the frontend layer of a system architecture. There's no easy way of keeping a refresh token secure in the frontend layer on its own.

Using the Authorization Code Flow with Proof Key for Code Exchange (PKCE) mitigates many risks inherent to the Implicit Flow. For example, when using the implicit grant type, the access token is transmitted in the URI fragment, which can expose it to unauthorized parties. You can learn more about these vulnerabilities by reading the "Misuse of Access Token to Impersonate Resource Owner in Implicit Flow" section of the spec.

However, implementing PKCE in your applications still has no impact on how secure refresh tokens are.

However, you may not need refresh tokens.

There are scenarios where you can still get an access token without interrupting the user and without relying on the almighty power of the refresh token. Other examples to keep a session going can be cookies or silent authentication.

However, billions of people use SPAs every day. It is important to provide users with a user experience that balances security and convenience well. Is there anything that we could do to let SPAs afford the convenience of refresh tokens in a less risky and more secure manner?

Absolutely!

An identity platform that offers Refresh Token Rotation makes it acceptable to use refresh tokens with Single-Page Applications. The spec underlines that when you can not verify that a refresh token belongs to a client, such a SPA, we should not use them unless we have Refresh Token Rotation in place.

Let's learn more about this security strategy in the next section.

Keeping Refresh Tokens Secure

A short-lived access token helps improve the security of our applications, but it comes with a cost: when it expires, the user needs to log in again to get a new one. Frequent re-authentication can diminish the perceived user experience of your application. Even if you are doing so to protect their data, users may find your service frustrating or difficult to use.

A refresh token can help you balance security with usability. Since refresh tokens are typically longer-lived, you can use them to request new access tokens after the shorter-lived access tokens expire.

However, since refresh tokens are also bearer tokens, we need to have a strategy in place that limits or curtails their usage if they ever get leaked or become compromised. All those who hold the refresh tokens have the power to get new access tokens whenever they want. "They" could be legitimate users or attackers.

At Auth0, we created a set of features that mitigate the risks associated with using refresh tokens by imposing safeguards and controls on their lifecycle. Our identity platform offers refresh token rotation, which also comes with automatic reuse detection.

Let's dive deeper into this security technique.

Refresh Token Rotation

Until very recently, a robust strategy to help SPAs maintain the user's session was using the Authorization Code Flow with PKCE in conjunction with silent authentication. Refresh token rotation is a technique for getting new access tokens using refresh tokens that goes beyond silent authentication.

Refresh token rotation guarantees that every time an application exchanges a refresh token to get a new access token, a new refresh token is also returned. Therefore, you no longer have a long-lived refresh token that could provide illegitimate access to resources if it ever becomes compromised. The threat of illegitimate access is reduced as refresh tokens are continually exchanged and invalidated.

For example, with refresh token rotation enabled in the Auth0 Dashboard, every time your application exchanges a refresh token to get a new access token, the authorization server also returns a new refresh-access token pair. This safeguard helps your app mitigate replay attacks resulting from compromised tokens.

Refresh Token Automatic Reuse Detection

Refresh tokens are bearer tokens. It's impossible for the authorization server to know who is legitimate or malicious when receiving a new access token request. We could then treat all users as potentially malicious.

How could we handle a situation where there is a race condition between a legitimate user and a malicious one? For example:

  • 🐱 Legitimate User has 🔄 Refresh Token 1 and 🔑 Access Token 1.

  • 😈 Malicious User manages to steal 🔄 Refresh Token 1 from 🐱 Legitimate User.

  • 🐱 Legitimate User uses 🔄 Refresh Token 1 to get a new refresh-access token pair.

  • The 🚓 Auth0 Authorization Server returns 🔄 Refresh Token 2 and 🔑 Access Token 2 to 🐱 Legitimate User.

  • 😈 Malicious User then attempts to use 🔄 Refresh Token 1 to get a new access token. Pure evil!

What do you think should happen next? Would 😈 Malicious User manage to get a new access token?

This is what happens when your identity platform has 🤖 Automatic Reuse Detection:

  • The 🚓 Auth0 Authorization Server has been keeping track of all the refresh tokens descending from the original refresh token. That is, it has created a "token family".

  • The 🚓 Auth0 Authorization Server recognizes that someone is reusing 🔄 Refresh Token 1 and immediately invalidates the refresh token family, including 🔄 Refresh Token 2.

  • The 🚓 Auth0 Authorization Server returns an Access Denied response to 😈 Malicious User.

  • 🔑 Access Token 2 expires, and 🐱 Legitimate User attempts to use 🔄 Refresh Token 2 to request a new refresh-access token pair.

  • The 🚓 Auth0 Authorization Server returns an Access Denied response to 🐱 Legitimate User.

  • The 🚓 Auth0 Authorization Server requires re-authentication to get new access and refresh tokens.

It's critical for the most recently-issued refresh token to get immediately invalidated when a previously-used refresh token is sent to the authorization server. This prevents any refresh tokens in the same token family from being used to get new access tokens.

This protection mechanism works regardless of whether the legitimate or malicious user is able to exchange 🔄 Refresh Token 1 for a new refresh-access token pair before the other. Without enforcing sender-constraint, the authorization server can't know which actor is legitimate or malicious in the event of a replay attack.

Automatic reuse detection is a key component of a refresh token rotation strategy. The server has already invalidated the refresh token that has already been used. However, since the authorization server has no way of knowing if the legitimate user is holding the most current refresh token, it invalidates the whole token family just to be safe.

Refresh Tokens Help Us Embrace Privacy Tools

Privacy is a hot topic in our digital world. We not only need to balance security with convenience, but we also need to add privacy to the balancing act.

Recent developments in browser privacy technology, such as Intelligent Tracking Prevention (ITP), prevent access to the session cookie, requiring users to reauthenticate.

There is no persistent storage mechanism in a browser that can assure access by the intended application only. As such, long-lived refresh tokens are not suitable for SPAs as there are vulnerabilities that malicious users could exploit to obtain these high-value artifacts, granting them access to protected resources.

Because refresh token rotation does not rely on access to the Auth0 session cookie, it is not affected by ITP or similar mechanisms.

However, a refresh token could have its lifespan limited by the lifespan of an access token. This means we can safely use refresh tokens to play along with browser privacy tools and provide continuous access to end-users without disrupting the user experience.

You Can Store Refresh Token In Local Storage

Yes, you read that right. When we have refresh token rotation in place, we can store tokens in local storage or browser memory.

You may have heard before (maybe from us) that we should not store tokens in local storage.

Storing tokens in browser local storage provides persistence across page refreshes and browser tabs; however, if malicious users managed to run JavaScript in the SPA using a cross-site scripting (XSS) attack, they could retrieve the tokens stored in local storage. A vulnerability leading to a successful XSS attack could be present in the SPA source code or any third-party JavaScript code the app consumes, such as Bootstrap or Google Analytics.

However, we can reduce the absolute token expiration time of tokens to reduce the security risks of storing tokens in local storage. This reduces the impact of a reflected XSS attack (but not of a persistent one). A refresh token may have a long lifespan by configuration. However, the defined long lifespan of a refresh token is cut short with refresh token rotation. The refresh is only valid within the lifespan of the access token, which would be short-lived.


A string is a data structure that represents a sequence of characters, and an array is a data structure that contains multiple values.

And did you know – a string can be broken apart into an array of multiple strings using the split method. Let's see how that works with some examples.

TL;DR

If you just want the code, here you go:

const publisher = 'free code camp'
publisher.split(' ') // [ 'free', 'code', 'camp' ]

Syntax

According to the MDN, the syntax you'll need to split the string is str.split([separator[, limit]]). If we apply this to the above example:

  • str is publisher
  • separator is ' '
  • there is no limit

When do you need to split a string?

Example 1: getting part of a string

Here is a common example which involves getting the token from an auth header that is part of a Token-based Authentication System.

If this doesn't mean anything to you that's ok. All you need to know for the following example is that there is a string with the value bearer token, but only token is needed (as this is the part that identifies the user):

const authHeader = 'bearer token'
const split = authHeader.split(' ') // (1) [ 'bearer', 'token' ]
const token = split[1] // (2) token

Here's what's happening in the above code:

  1. The string is split with ' ' as the separator
  2. The second entry in the array is accessed

Example 2: apply array methods to a string

Often the input you are given is a string, but you want to apply array methods to it (eg. mapfilter, or reduce).

For example, let's say you are given a string of morse code and you want to see what it reads in English:

const morse = '-.-. --- -.. .'
// (1)
const morseToChar = {
  '-.-.': 'c',
  '-..': 'd',
  '.': 'e',
  '---': 'o',
}

const morseArray = morse.split(' ') // (2) [ '-.-.', '---', '-..', '.' ]
const textArray = morseArray.map((char) => morseToChar[char]) // (3) [ 'c', 'o', 'd', 'e' ]
const text = textArray.join(") // (4)

Here's what's happening in the above code:

  1. An object literal is created to map morse chars to the English alphabet
  2. The morse code is split into an array with a ' ' as the separator. (Without ' ' as an argument you would end up with an array that has separate entries for each . and -.)
  3. The morse code array is mapped/transformed to a text array
  4. A string is created from the array with '' as the separator. (Without '' as an argument the output would be c,o,d,e.)

How to add a limit to split

According to the MDN, it is also possible to pass a limit as an argument to split. I have never needed to do this, but here is how you could apply it:

const publisher = 'free code camp'
publisher.split(' ', 1) // [ 'free' ]

In the above example, the array is limited to one entry. Without it the value of the array would be [ 'free', 'code', 'camp' ].

Before you go…

Thank you for reading this far! I write about my professional and educational experiences as a self-taught software developer, so feel free to check out my website or subscribe to my newsletter for more content.

while ((line = reader.readLine()) != null)
                double crtValue = Double.valueOf(line.split(",")[1]);
line#split returns an array, [1] acceses the second element of the returned array. 

It means that your line is a String of numbers separated by commas.
eg: "12.34,45.0,67.1"

The line.split(",") returns an array of Strings.
eg: {"12.34","45.0","67.1"}

line.split(",")[1] returns the 2nd(because indexes begin at 0) item of the array.

The Split Token

https://nordicapis.com/strategies-for-integrating-oauth-with-api-gateways/

The split token pattern is in many ways similar to the previously described phantom token. At least the result is the same — the OAuth client deals with an opaque token, and the API's services handle JWTs. In this pattern, though, the API gateway doesn't have to call the introspection endpoint to get a JWT. When the authorization server issues the JWT, it splits it into two parts: one consists of the header and payload of the JWT, and the other is the token's signature. The signature part is returned to the client and used as the opaque token. The header and payload are sent to the API gateway where they are cached, with the signature's hash used as the cache key.

When the client calls the API, it sends the signature part of the token. The API gateway hashes it, looks up the corresponding header and payload in the cache, and, if found, glues the pieces back together to form a JWT. The JWT is thus reconstructed without the need to contact the authorization server.

Comments